This document assumes that you have already created a Cloud Connection allowing StreamNative to connect to your cloud account. If you have not yet done so, please create a Cloud Connection first, and then return to this page to continue setting up your Cloud Environment.
Plan a Cloud Environment
Before you start provisioning a cloud environment, you need to plan for the required information. The information you need to provide depends on your cloud provider. Here is a summary of the required information:Region
Select the region where the Cloud Environment will be created.For Azure, the region is the resource group name, please ensure that you have created it as the doc describes.
VPC
Choose between using a StreamNative-managed VPC or your own VPC (akaBring Your Own Network, or BYON).
StreamNative-managed VPC
If you decide to use a StreamNative-managed VPC, you need to provide the CIDR value for the VPC. Below are the recommended default CIDR values for each cloud provider:- AWS
- Default VPC CIDR:
10.60.0.0/16(must between/16and/28), but we suggest using/16to/18, otherwise there will not be enough IP addresses. - The subnet CIDR will be calculated by VPC CIDR.
- Default VPC CIDR:
- GCP
- Default VPC CIDR:
10.0.0.0/16 - Secondary ranges for pods and services:
- Pods:
192.168.0.0/16 - Services:
192.168.64.0/18
- Pods:
- Default VPC CIDR:
- Azure
- Default VPC CIDR:
10.70.0.0/16 - Default Subnet CIDR:
10.70.0.0/24
- Default VPC CIDR:
Bring You Own Network (BYON)
This feature is available in BYOC Pro. Please contact us if you are interested in BYOC Pro.
- AWS
- GCP
- Azure
- The VPC must be tagged with
Vendor=StreamNativeon both VPC and subnets. - For private subnets, tag them with
Type=private. - For public subnets, tag them with
Type=public.
Bring Your Own DNS
This feature is available in BYOC Pro. Please contact us if you are interested in BYOC Pro.
Default Gateway
Select the endpoint type for the default gateway. A gateway exposes service endpoints externally and can be either public or private. If you select private, you must provide allowed IDs for creating privatelink services. The allowed IDs are the account IDs that you want to grant access to the private endpoints.Create a Cloud Environment
After you have planned all the required information, you can then provision a cloud environment through Cloud Console,snctl, or StreamNative’s Terraform provider.
- Console
- snctl
- Terraform
TutorialYou can watch the video of creating a cloud environment using Cloud Console UI: Step-by-step guide
Step-by-step guide- In the upper-right corner of Cloud Console, click your user profile, and in the dropdown menu, click Cloud Environments.
- On the Cloud Environments page, click the + Create button and select Create environment.
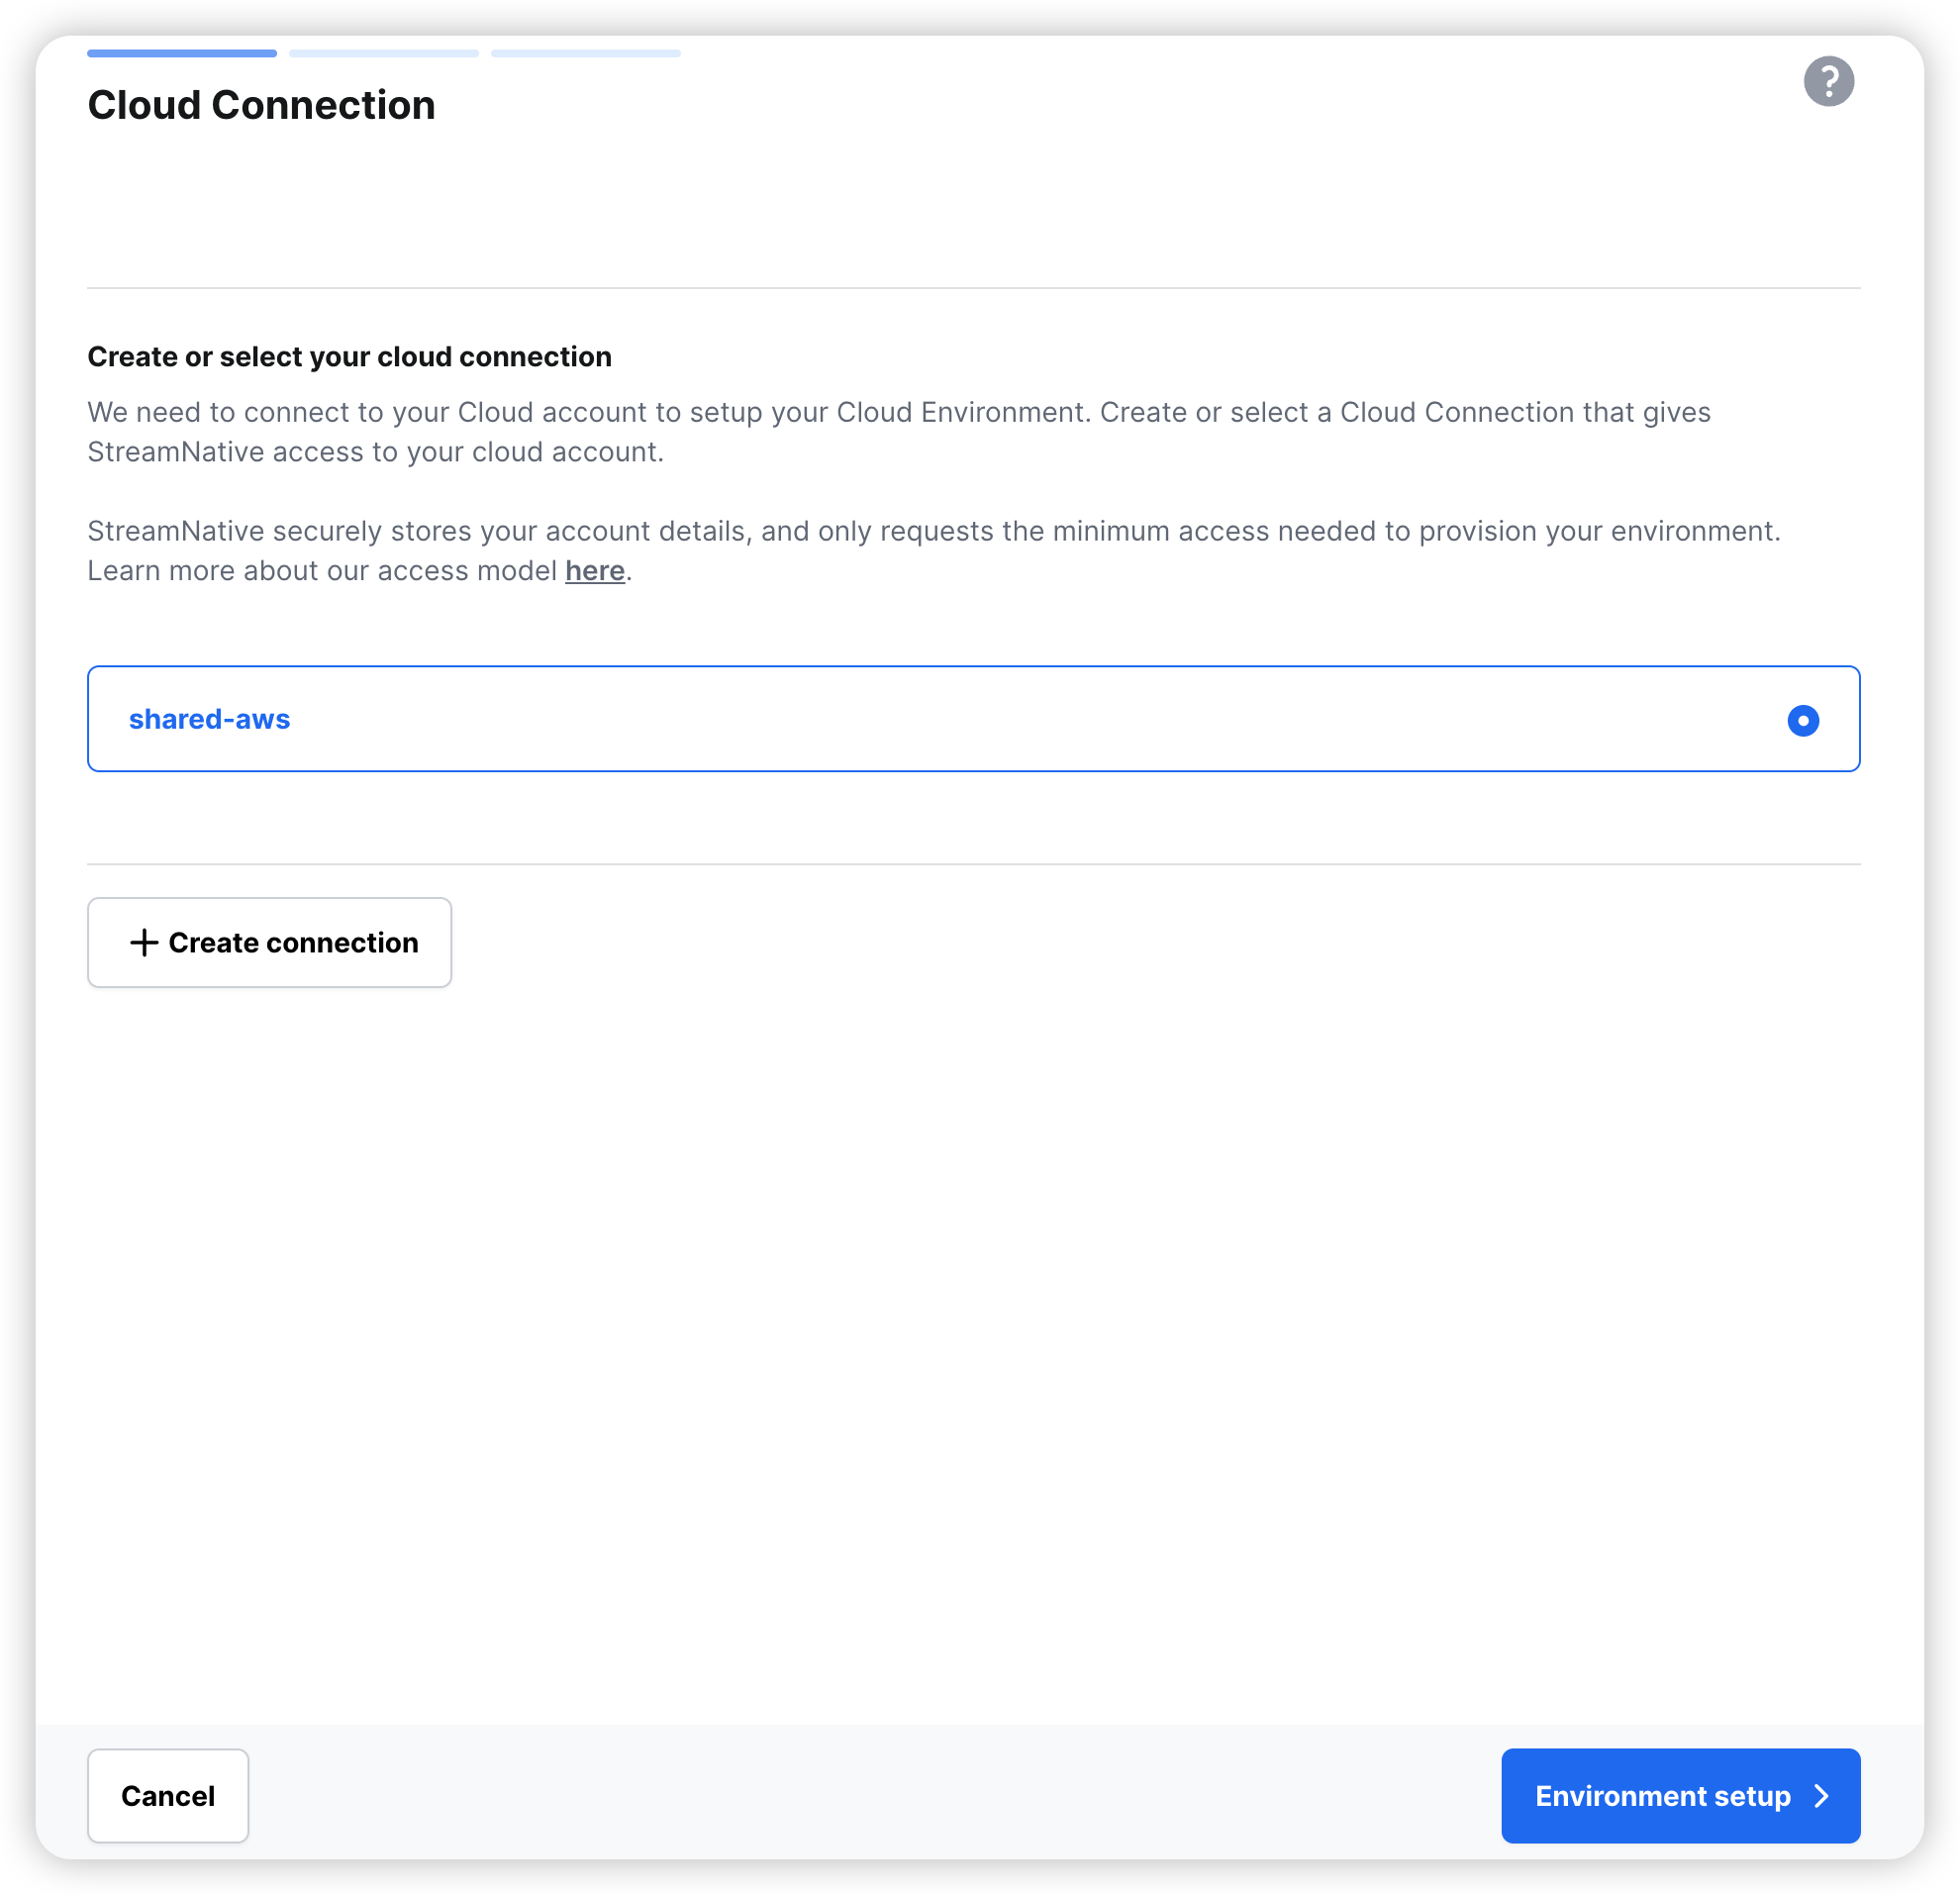
- On the Cloud Connection page, select the cloud connection you want to use, then click Environment setup.
-
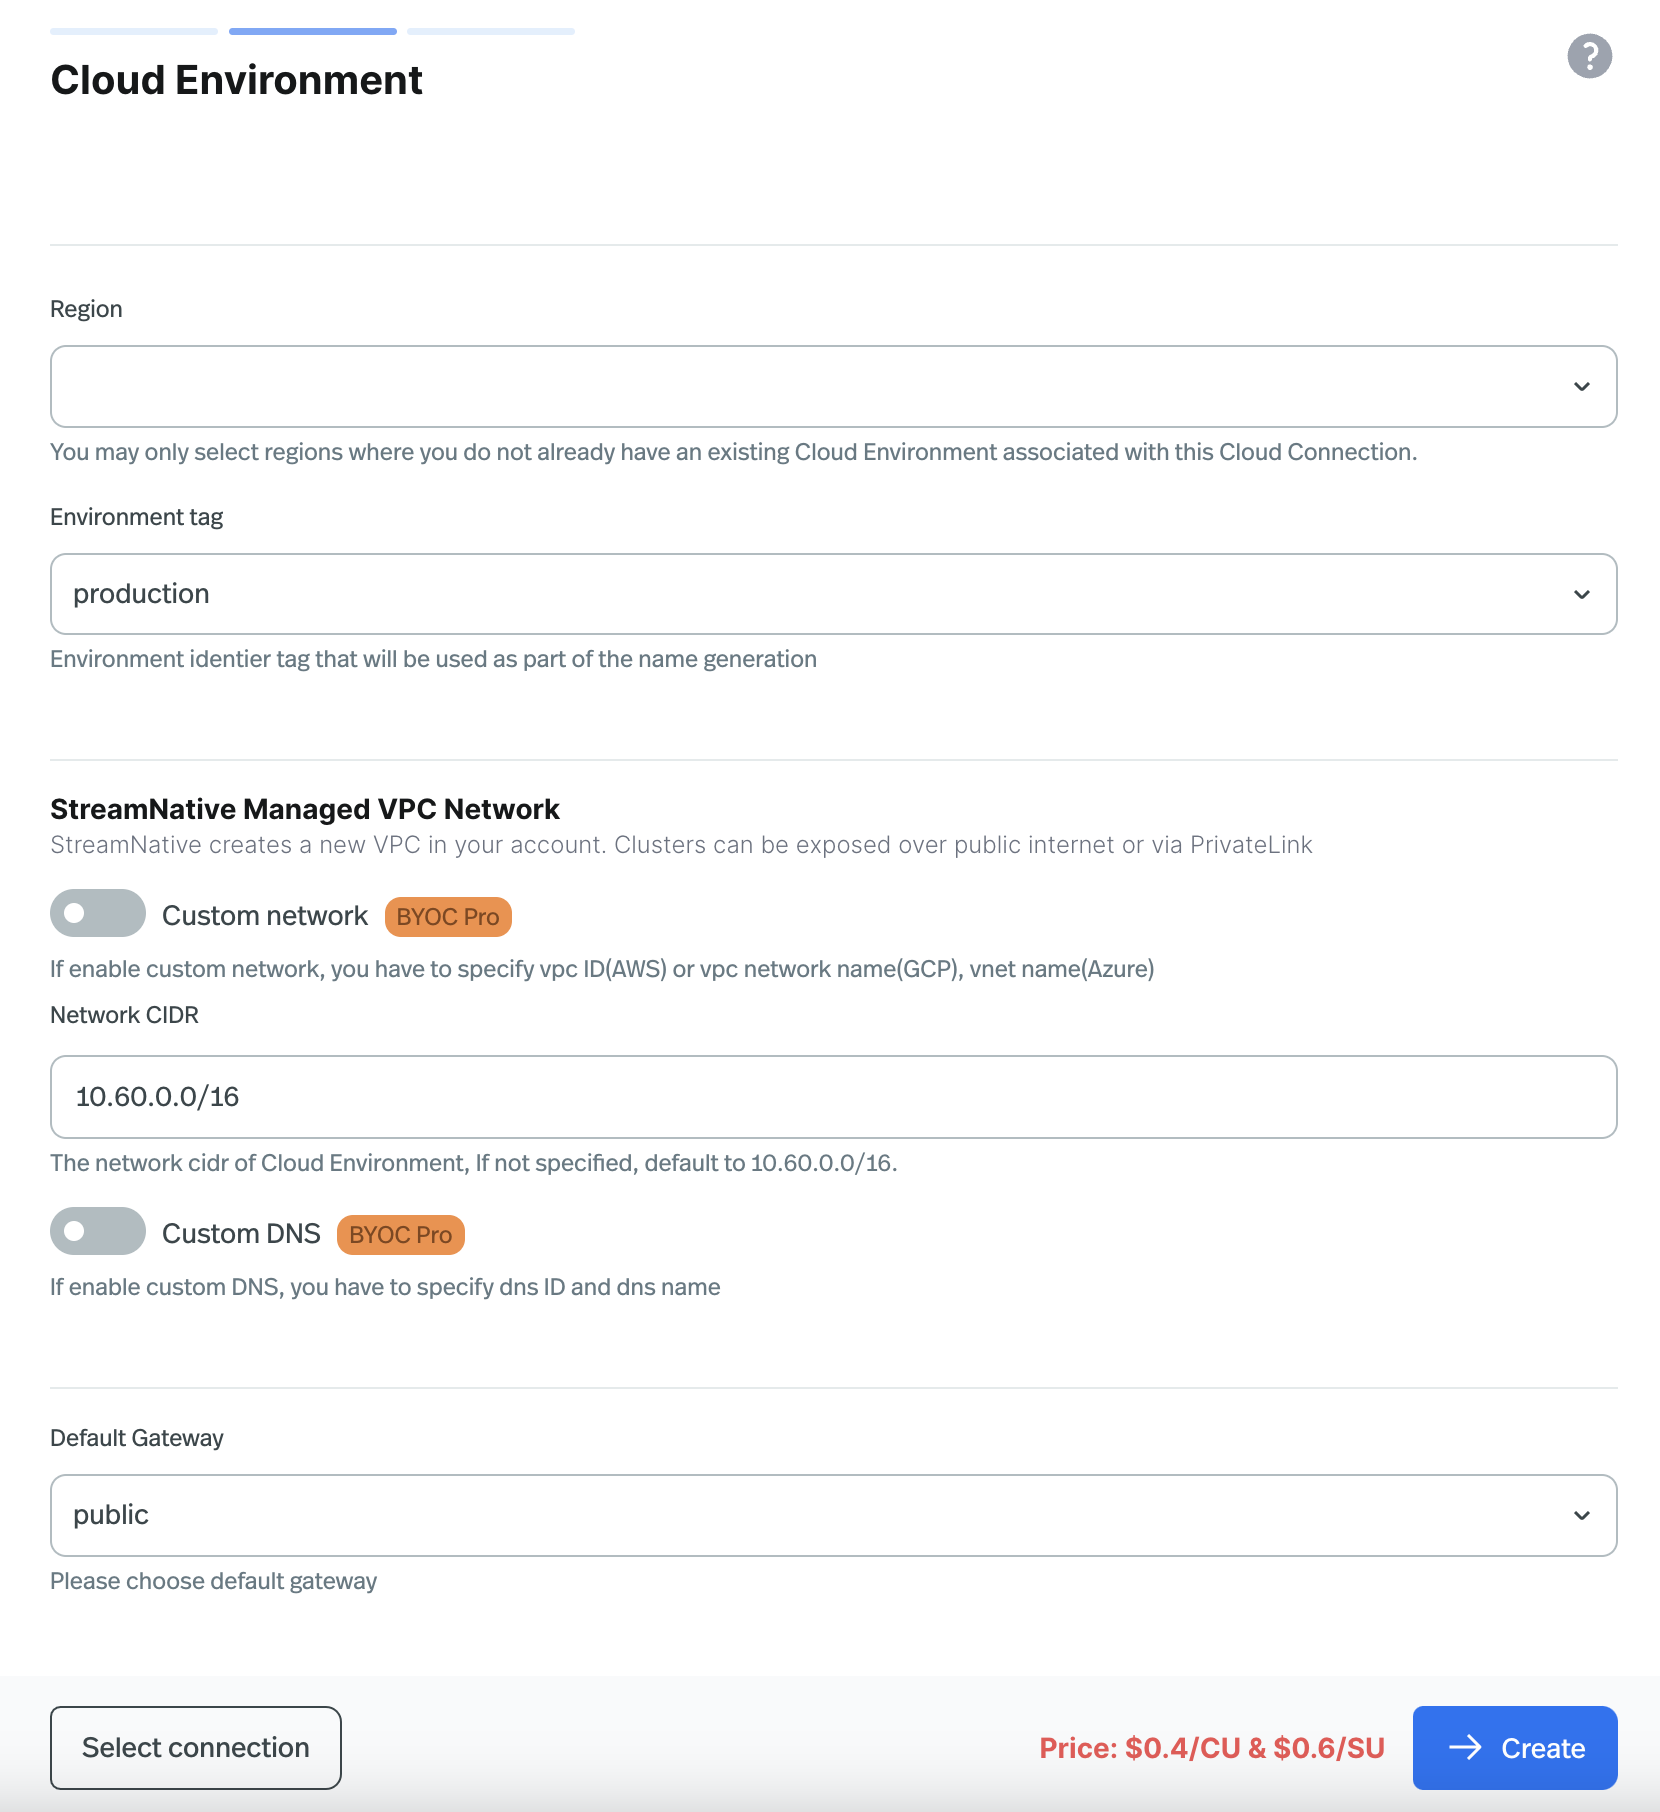
On the Cloud Environment page, fill out the required information based on what you have planned in the previous step.
- Region: Select the region where the Cloud Environment will be created.
- Environment tag: Select a tag for the Cloud Environment. This tag will be used for generating the name for the Cloud Environment.
-
VPC [BYOC Pro Feature]:
- StreamNative-managed VPC: Provide the Network CIDR value for the VPC.
-
Custom Network: Provide the Network Id value of your VPC.
- AWS: The Network Id is the VPC ID.
- GCP: The Network Id is the Network Name.
- Azure: The Network Id is the VNet Name.
- Custom DNS [BYOC Pro Feature]: If you want to use your own DNS, check Custom DNS checkbox and provide the DNS ID and DNS name of your DNS zone.
-
Select the CloudConnection, then click Environment setup.
-
Specify the region and other configurations, then click Create.
Monitoring the Provisioning Process
Creating a Cloud Environment through Terraform does not immediately create the Cloud Environment, but rather kicks off a process that creates it. Provisioning a Cloud Environment takes approximately 40 minutes. You will receive an email notification when the Cloud Environment is ready or if there are any issues. At the same time, if you want to monitor the provisioning process, you can usesnctl.
- Replace
CLOUD_ENVIRONMENT_NAMEwith the name of the cloud environment.
snctl describe returns a status of True and a type of Ready your Cloud Environment has been provisioned, and you can create a Pulsar Cluster within it.
If this command returns an error state, you can try to gather more detailed information about the error with (the -o yaml flag outputs the full resource details in YAML format):
Update a Cloud Environment
It is generally not recommended to update a Cloud Environment once it has been created. If you need to update a Cloud Environment, please reach out to StreamNative support team to discuss your requirements.Delete a Cloud Environment
- Console
- snctl
- Terraform
- In the upper-right corner of Cloud Console, click your user profile, and in the dropdown menu, click Cloud Environments.
- On the Cloud Environments page, find the cloud environment you want to delete, and click the ellipsis (…) on the right side of the row, and then click Delete.
- On the Delete cloud environment page, enter the name of the cloud environment, and click Confirm.