This document assumes that you have already run the Vendor Access Module for your respective cloud provider. StreamNative will not be able to connect to your cloud account until you have done so. If you have not yet done so, please run the Vendor Access Module for your cloud provider using the instructions provided (AWS, Azure, and GCP), and then return to this page to continue setting up your Cloud Connection.
snctl, or StreamNative’s terraform provider.
Create a Cloud Connection
A Cloud Connection represents a connection between StreamNative Cloud and your cloud account. It contains the necessary account information for StreamNative to access your cloud account but doesn’t contain any credentials. StreamNative Cloud uses assume role to access your cloud account. To ensure StreamNative Cloud can access your cloud account, you need to grant StreamNative Cloud permission to assume the role in your cloud account. See BYOC Overview for more details. When you successfully create a Cloud Connection, it provisions a Pool that will be used for provisioning your Cloud Environment, which you’ll later use for provisioning your Instances and Clusters. The information you will need to provide depends on the cloud provider you are using. Here is a summary of the information you need to provide for each cloud provider:- AWS: The AWS account ID.
- GCP: The GCP project ID.
- Azure: The Azure subscription ID, tenant ID, client ID, and support client ID
- Console
- snctl
- Terraform
TutorialYou can watch the video of creating a cloud connection using Cloud Console UI: Step-by-step guide
Step-by-step guide- In the upper-right corner of Cloud Console, click your user profile, and in the dropdown menu, click Cloud Environments.
- On the Cloud Environments page, click Cloud Connections tab.
-
On the Cloud Connections tab, click + New Cloud Connection button to create a new Cloud Connection.
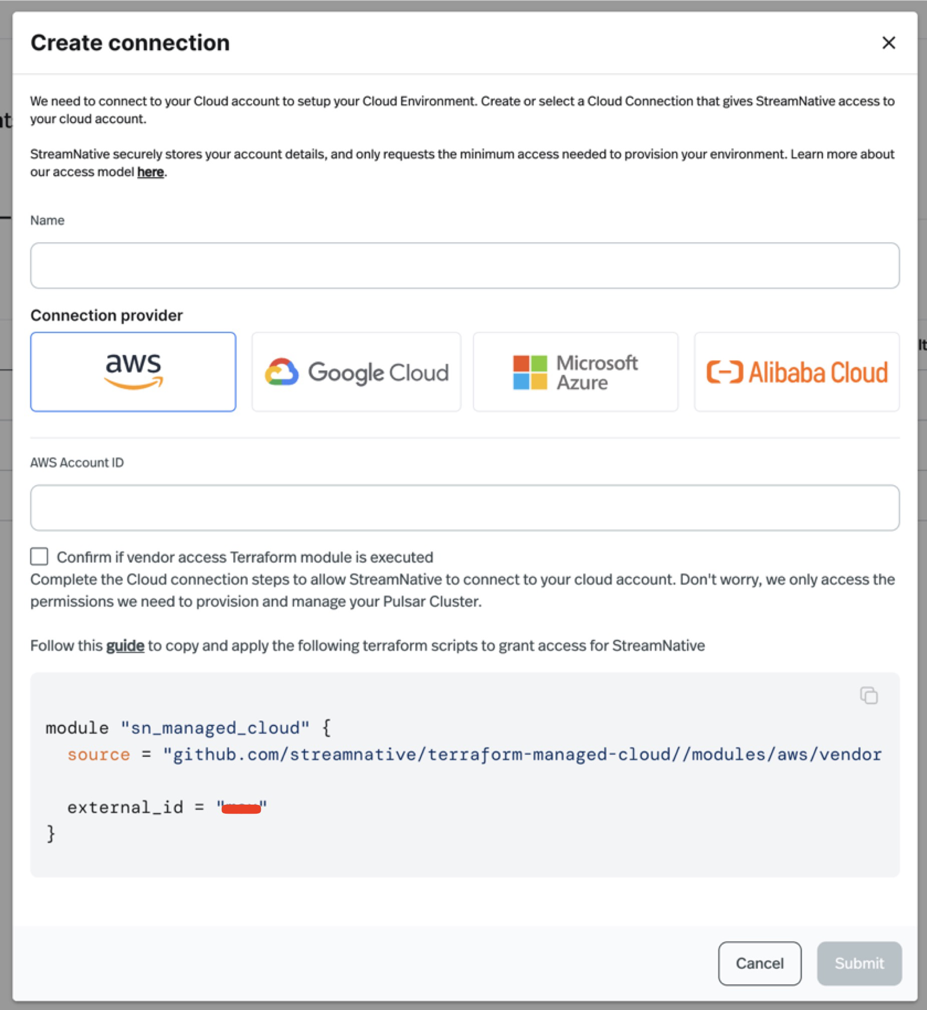
- Enter the name of the Cloud Connection.
-
Select the connection provider of the Cloud Connection and fill out the required fields:
- AWS:
- AWS Account ID: The AWS Account ID
- Google Cloud:
- Google Cloud Project ID: The Google Cloud Project ID
- Azure:
- Subscription ID: The Azure Subscription ID
- Tenant ID: The Azure Tenant ID
- Client ID: The Azure Client ID
- Support Client ID: The Azure Support Client ID
- AWS:
- Select Confirm if vendor access Terraform module is executed checkbox after you have executed the Vendor Access Module for your cloud provider.
- Click Submit to create the Cloud Connection.
Update a Cloud Connection
After a Cloud Connection is created, it cannot be updated. If you need to modify any information, you must delete the existing Cloud Connection and create a new one with the correct details.Delete a Cloud Connection
- Console
- snctl
- Terraform
- In the upper-right corner of Cloud Console, click your user profile, and in the dropdown menu, click Cloud Environments.
- On the Cloud Environments page, click Cloud Connections tab.
- On the Cloud Connections tab, find the cloud connection you want to delete, and click the ellipsis (…) on the right side of the row, and then click Delete.
- On the Delete cloud connection page, enter the name of the cloud connection, and click Confirm.