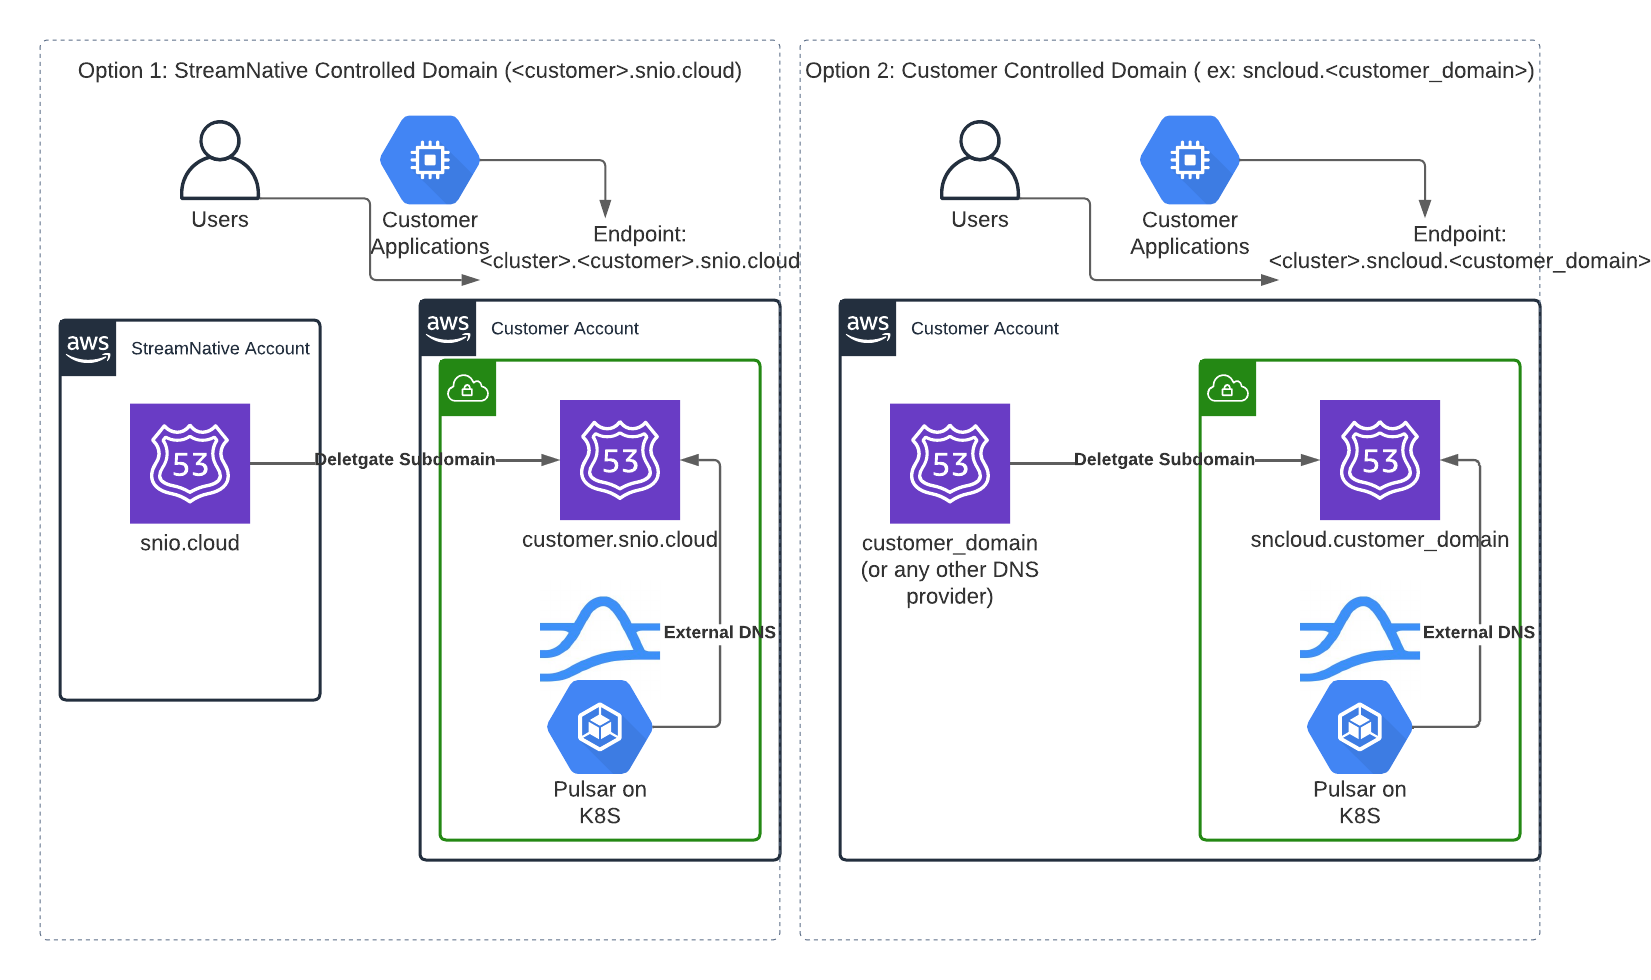
Domain options
StreamNative BYOC offers two domain configurations: Custom Domains and StreamNative Managed Domains.- Custom Domains: You delegate a DNS zone to the AWS account used for BYOC deployment. All service endpoints are created under this domain.
- StreamNative Managed Domains: StreamNative uses a domain within the
snio.clouddomain, assigning a subzone specific to your cloud account.

Custom domains
With a custom domain, DNS names and TLS certificates for StreamNative clusters reside under a domain that you control. StreamNative requires a dedicated AWS Route53 zone for these domains to ensure that only necessary DNS records are modified. This allows AWS policies to be restricted specifically to this zone. This zone needs to be public to enable the generation of TLS certificates from Let’s Encrypt.StreamNative managed domains
For managed domains, StreamNative sets up and manages a Route53 zone in your AWS account under thesnio.cloud domain, based on your organization ID (e.g., o-12345.snio.cloud). StreamNative then delegates management of this subdomain.
Due to AWS IAM limitations, when using StreamNative-managed domains, the AWS Access Module must first be provisioned with the route53 zone argument set as a wildcard (
*). Once the zone is created and its ID is known, it can be restricted to that specific zone ID.Create a zone for a custom domain
StreamNative requires a dedicated Route53 zone. This section explains how to delegate a subzone from an existing domain, assuming you are using Route53 as your DNS provider. For details about how to delegate a subzone, see your DNS provider docs.Create a subzone via delegation
The typical approach is to create a subdomain and delegate it from the parent domain.- If your parent domain is on Route53, refer to the Route53 documentation.
- If your parent domain is not on Route53, follow the general instructions in this AWS document.
Register a new domain
If you prefer to register a new domain through Route53, consult the AWS documentation.Validate the zone
After creating and delegating the zone, it’s crucial to validate it. Command line tools, such asdig, allow for directly querying DNS records and ensuring that the NS records have propagated.
This example assumes that you have created a subzone sncloud.myco.com, and that had NS records from route53 of:
- ns-1654.awsdns-14.co.uk.
- ns-1513.awsdns-61.org.
- ns-449.awsdns-56.com.
- ns-755.awsdns-30.net.
dig NS sncloud.myco.com should return a response like:
ANSWER SECTION has 4 records that match the 4 NS records above.
Another option is to use a tool like DNS NS Lookup Checker to lookup records. However, this may take longer to validate.
Provide the zone ID
After you complete the validation, you can use the zone ID to configurehosted_zone_allowed_ids in StreamNative’s Vendor Access Module. The format of the ID should be similar to ZXXXXXXXXXXXXXXXXXXXXX (the letter Z followed by 21 digits or uppercase letters).