Access model in AWS
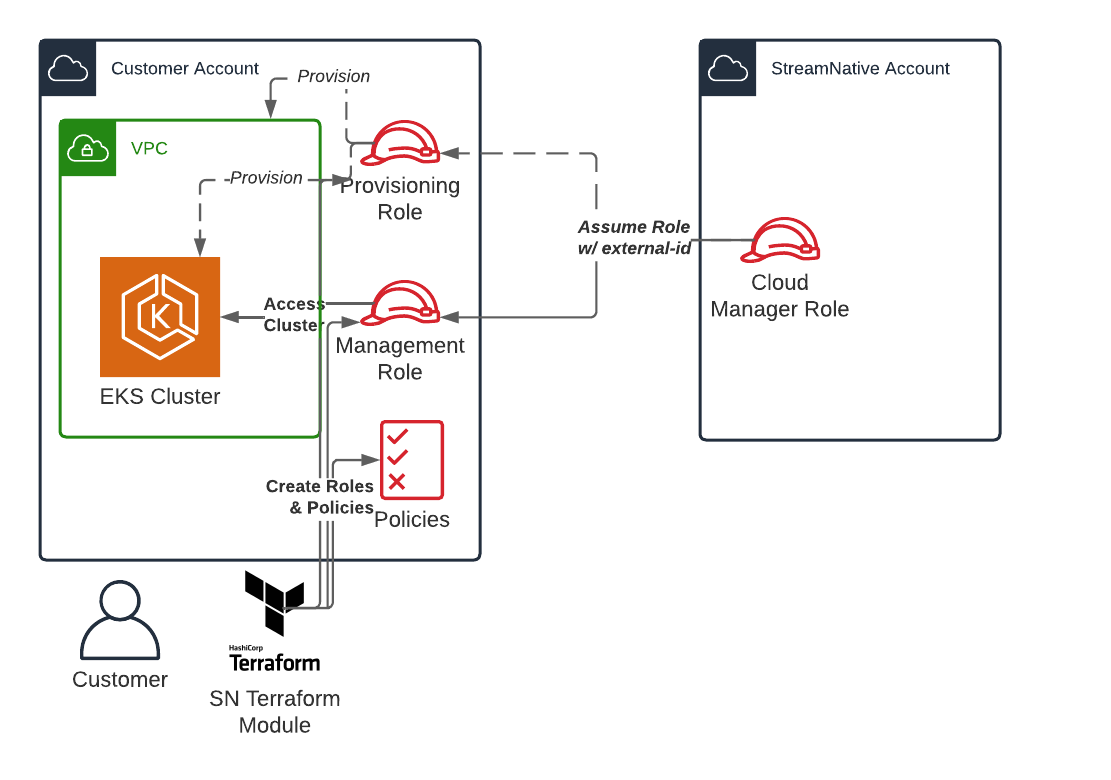
StreamNative leverages advanced IAM features in AWS to ensure minimal and precise access, allowing for efficient management of only necessary resources. Best practices in AWS are adhered to, enhancing security. Access to customer accounts is segmented into two IAM roles:- Bootstrap/Provisioning Role: This role handles the provisioning and maintenance of the underlying infrastructure like VPCs, EKS clusters (and associated node groups, and so on), IAM resources, and is also utilized for troubleshooting during incidents by StreamNative’s SRE team.
- Management Role: This role is primarily for automated management tasks, having minimal permissions, mostly read-only, and also interacts with the EKS cluster to deploy and manage Pulsar clusters.
- An external ID for role assumption, enhancing security when third parties access your AWS account (See AWS’s documentation on using third-party access.
- A permission boundary to restrict the permissions of dynamically created roles (refer to AWS’s documentation).
- Policies are limited only to the required AWS services, actions, and resources within those services wherever possible.
- Tag-based access, through the
Vendor: StreamNativetag, is used where applicable to enforce resources that are created with these tags and access is limited to only resources with the tag (See AWS docs on tag-based access control). - All IAM policies are statically created by the customer (via StreamNative Vendor Access Terraform module) to limit access.
Provision AWS Access
StreamNative facilitates the setup of necessary policies and roles through a module. This module can be provisioned in a standalone Terraform project (as documented here), but can also be integrated into existing Terraform projects. For full documentation of inputs and outputs of the Terraform module, see the module’s README on GitHub. You can also watch the video of provisioning AWS access:
Prerequisites
- New to Terraform? Learn the Terraform AWS Getting Started Tutorial to get a basic introduction.
- Install Terraform, version 1.3.0 or greater.
- Ensure you have created an organization through the StreamNative Cloud Console.
- If you want to use a custom domain (BYOC Pro only), you need your route53 zone ID.
Step 1: Create a new project and instantiate the module
Terraform works by having Terraform codes (in the form of*.tf files) and state files that represent the current resources. If you are using Terraform locally, without a remote state store, these files should be checked into source control for future updates.
Create a new folder and add a file called main.tf with the following content, replacing the referenced variables.
<YOUR_SNCLOUD_ORG_ID>: your StreamNative Cloud organization ID. This is typically an ID likeo-xxxxx. This can be found in your organization list or the top header of the application.
git as source control, you need to use the git init command to initialize this folder as a git project.
Step 2: Initialize the Terraform
While the above Terraform code is all needed, the module needs to be downloaded to this Terraform project. To do so, runterraform init.
This will download the module and required dependencies.
Step 3: Create a shell with the correct AWS credentials
Terraform requires AWS credentials with the proper permissions in the target account to create the resources to grant access. The permissions required by the module are all AWS IAM permissions, specifically to managed roles, policies, and attachments. The AWS Managed Access policies ofIAMFullAccess are sufficient to perform these operations.
All of the Terraform AWS credentials mechanisms are compatible with the Terraform module.
If you are new to Terraform and AWS, the following steps will provide credentials in your shell:
- Follow the steps to create an access key and secret for your user.
- Set the
AWS_ACCESS_KEY_ID,AWS_SECRET_ACCESS_KEY, andAWS_REGIONenvironment variables from the generated credentials.
Step 4: Run the Terraform
After initialization, and with credentials in the shell, the next step is to run the Terraform withterraform apply.
This will create a Terraform plan which shows all the resources to be created.