pulsarctl CLI tool. For details, see work with connectors using the pulsarctl CLI tool.
Create source connectors
Before creating source connectors, you need to meet the following prerequisites.Prerequisites
This section lists prerequisites for creating supported source connectors on StreamNative Console and for source connectors connecting to external systems.- AMQP1_0
- AWS SQS
- Debezium Microsoft SQL Server
- Debezium MongoDB
- Debezium MySQL
- Debezium PostgreSQL
- Kafka
- Kinesis
-
Prerequisites for creating an AMQP1_0 source connector on StreamNative Console
- Install the Function Mesh Operator.
- Enable Function Mesh Worker service.
- Enable the Connectors page on StreamNative Console.
- Log in to the StreamNative Console.
- Grant the admin role or service account with the source or sink permission. For details, see authenticate service accounts.
-
Prerequisites for an AMQP1_0 source connector connecting to external systems
- Enable AMQP 1.0-compliant broker service, like RabbitMQ, for remote access.
- Enable proper access credentials for remote connection.
-
Prerequisites for creating an AWS SQS source connector on StreamNative Console
- Install the Function Mesh Operator.
- Enable Function Mesh Worker service.
- Enable the Connectors page on StreamNative Console.
- Log in to the StreamNative Console.
- Grant the admin role or service account with the source or sink permission. For details, see authenticate service accounts.
-
Prerequisites for an AWS SQS source connector connecting to external systems
- Configure the AWS account with the Access Key.
- Provision AWS Simple Queue Service (SQS).
- Attach proper access policies to the AWS account. For details, see Amazon SQS API permissions: Actions and resource reference.
- sqs:CreateQueue
- sqs:ChangeMessageVisibility
- sqs:GetQueueUrl
- sqs:GetQueueAttributes
- sqs:ReceiveMessage
- sqs:DeleteMessage
-
Prerequisites for creating a Debezium Microsoft SQL Server source connector on StreamNative Console
- Install the Function Mesh Operator.
- Enable Function Mesh Worker service.
- Enable the Connectors page on StreamNative Console.
- Log in to the StreamNative Console.
- Grant the admin role or service account with the source or sink permission. For details, see authenticate service accounts.
- Prerequisites for a Debezium Microsoft SQL Server source connector connecting to external systems Before using the Debezium Microsoft SQL Server connector to monitor the changes committed on a Microsoft SQL server, ensure you enable change data capture on the SQL Server database and on each table that you want to capture. For details, see the Debezium SQL Server documentation. If you want to monitor a Microsoft SQL Server database running in Amazon RDS or Azure, see the Debezium SQL Server documentation to set up the required configurations.
-
Prerequisites for creating a Debezium MongoDB source connector on StreamNative Console
- Install the Function Mesh Operator.
- Enable Function Mesh Worker service.
- Enable the Connectors page on StreamNative Console.
- Log in to the StreamNative Console.
- Grant the admin role or service account with the source or sink permission. For details, see authenticate service accounts.
- Prerequisites for a Debezium MongoDB source connector connecting to external systems The Debezium MongoDB connector only works with MongoDB replica sets or with sharded clusters where each shard is a separate replica set. As a result, to monitor a MongoDB server with the Debezium MongoDB connector, you must set up a replica set or sharded cluster with required privileges. For details, see the Debezium MongoDB documentation to set up the MongoDB.
-
Prerequisites for creating a Debezium MySQL source connector on StreamNative Console
- Install the Function Mesh Operator.
- Enable Function Mesh Worker service.
- Enable the Connectors page on StreamNative Console.
- Log in to the StreamNative Console.
- Grant the admin role or service account with the source or sink permission. For details, see authenticate service accounts.
- Prerequisites for a Debezium MySQL source connector connecting to external systems Before using the Debezium connector to monitor the changes committed on a MySQL server, ensure you configure a user with sufficient privileges, and enable the binlog for MySQL server. For details, see the Debezium MySQL documentation. If you want to monitor a MySQL database running in Amazon RDS, see the Amazon RDS documentation to enable the binary logging in Amazon RDS.
-
Prerequisites for creating a Debezium PostgreSQL source ◊connector on StreamNative Console
- Install the Function Mesh Operator.
- Enable Function Mesh Worker service.
- Enable the Connectors page on StreamNative Console.
- Log in to the StreamNative Console.
- Grant the admin role or service account with the source or sink permission. For details, see authenticate service accounts.
- Prerequisites for a Debezium PostgreSQL source connector connecting to external systems Before using the Debezium PostgreSQL connector to monitor the changes committed on a PostgreSQL server, ensure you install the required plugins, enable a replication slot, and configure a user with sufficient privileges to perform the replication. For details, see the Debezium PostgreSQL documentation. If you want to monitor a PostgreSQL database running in Amazon RDS, see the Debezium PostgreSQL documentation to set up the required configurations.
-
Prerequisites for creating a Kafka source connector on StreamNative Console
- Install the Function Mesh Operator.
- Enable Function Mesh Worker service.
- Enable the Connectors page on StreamNative Console.
- Log in to the StreamNative Console.
- Grant the admin role or service account with the source or sink permission. For details, see authenticate service accounts.
-
Prerequisites for a Kafka source connector connecting to external systems
- Enable Kafka service for remote access.
- Enable proper access credentials for remote connection.
-
Prerequisites for creating a Kinesis source connector on StreamNative Console
- Install the Function Mesh Operator.
- Enable Function Mesh Worker service.
- Enable the Connectors page on StreamNative Console.
- Log in to the StreamNative Console.
- Grant the admin role or service account with the source or sink permission. For details, see authenticate service accounts.
-
Prerequisites for a Kinesis source connector connecting to external systems
- Configure the AWS account with the Access Key.
- Provision an AWS Kinesis data stream.
- Attach proper access policies to the AWS account. Besides Kinesis related permissions, you also need to grant proper permissions for DynamoDB and Cloud Watch. For details, see controlling Access to Amazon Kinesis Data Streams Resources Using IAM.
Steps
- From the left navigation pane, under Resources, click Connectors.
- Select the Created Sources tab.
-
Click CREATE A SOURCE. A drop-down menu displays that lists available sink connectors.
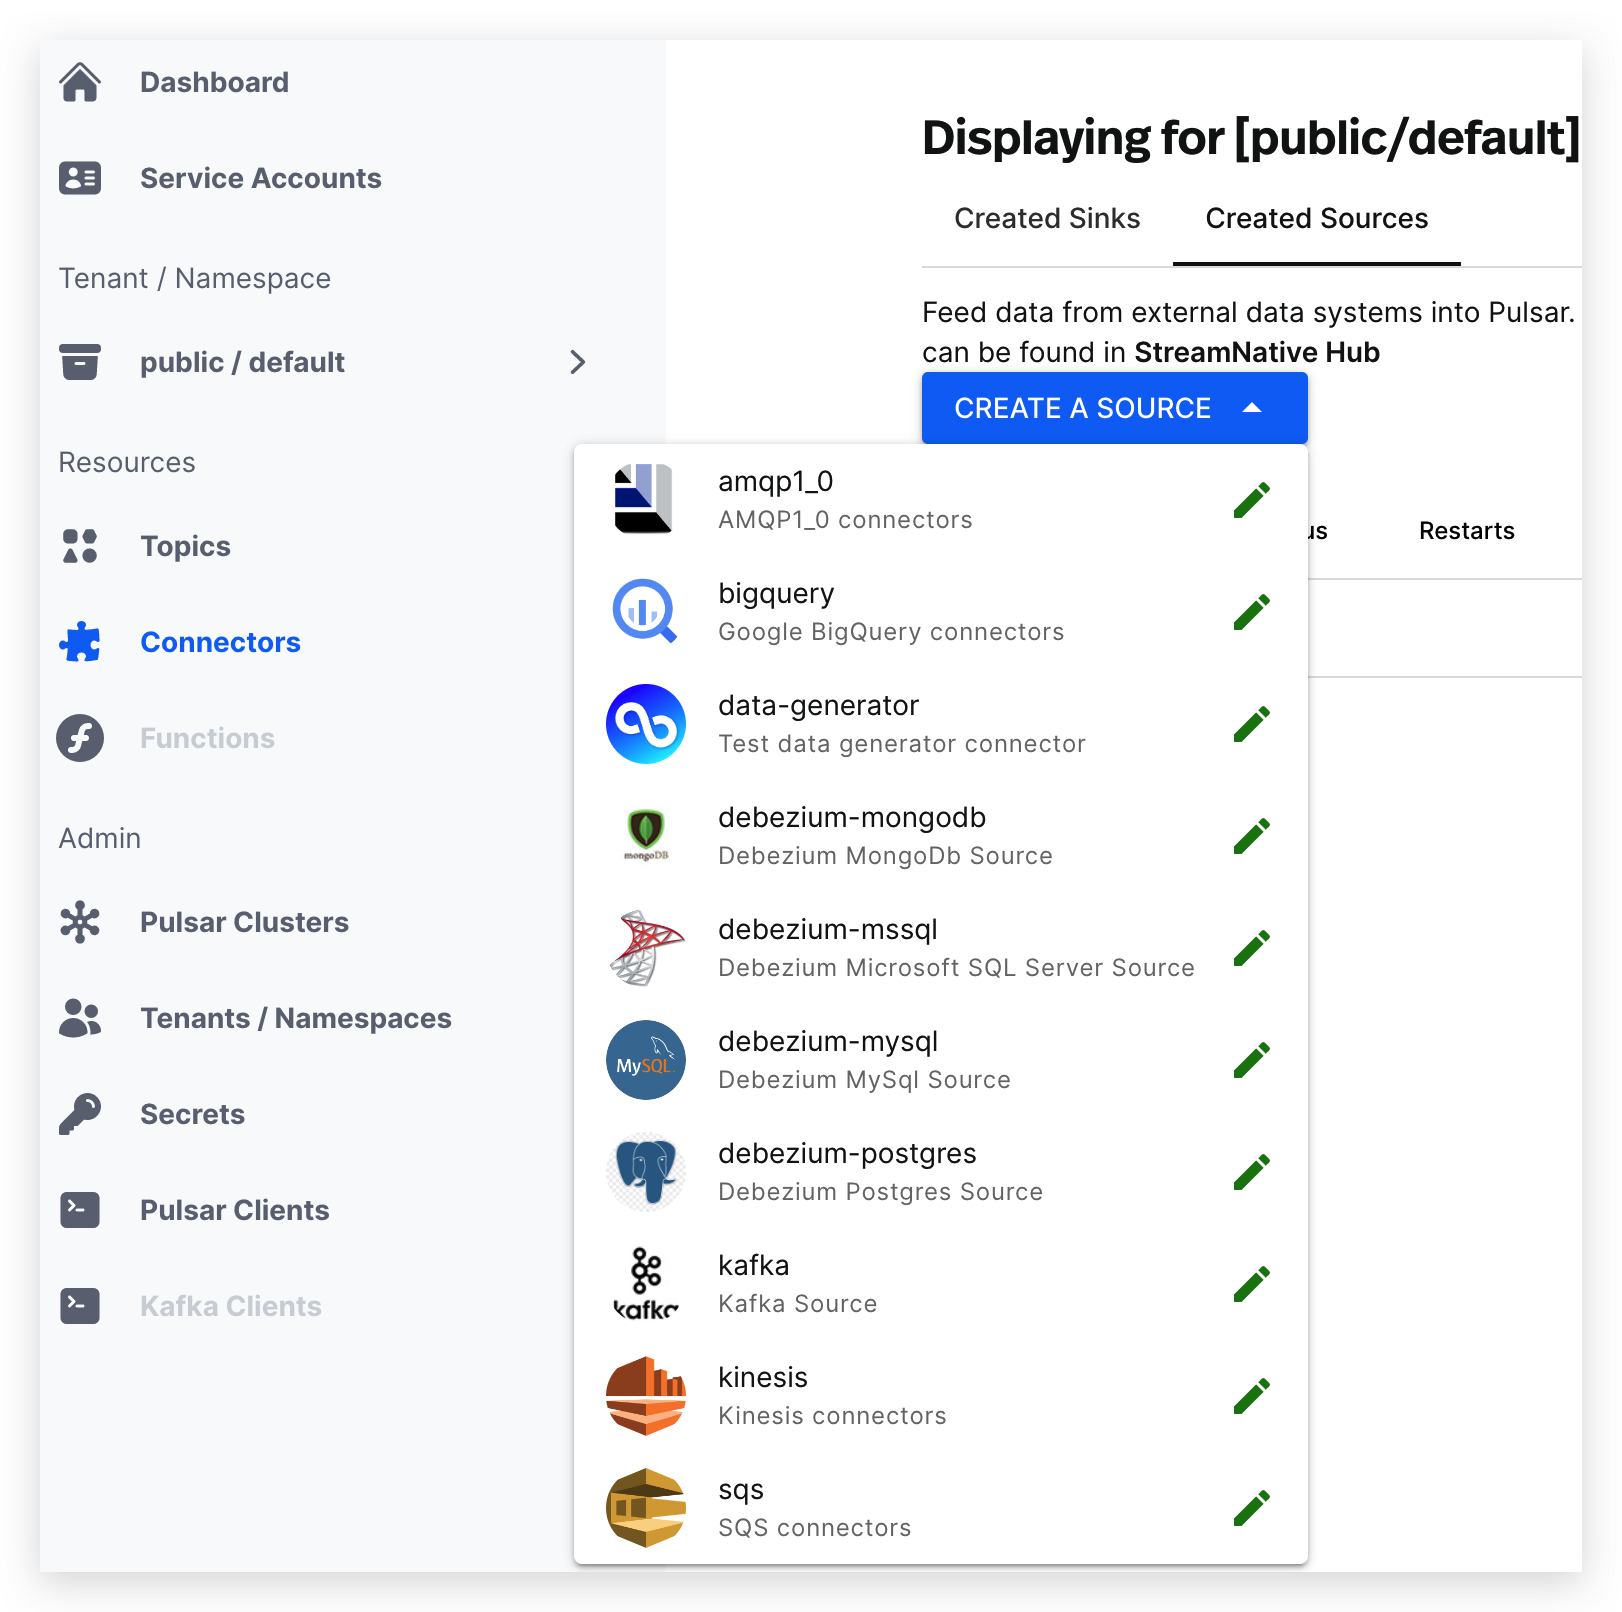
- Click the icon of the source connector type that you want to create and enter the page where you can configure the source connector.
- Configure the source connector. See the tables of valid configuration options below.
- Click SUBMIT.
- AMQP 1.0
- AWS SQS
- Google BigQuery
- Debezium Microsoft SQL Server
- Debezium MongoDB
- Debezium MySQL
- Debezium PostgreSQL
- Kafka
- Kinesis
| Field | Description |
|---|---|
| Source Type | (Read-only) the type of the source connector. |
| Service Account | Select the service account for creating the source connector. |
| Source Name | Enter a name for the source connector. The text string supports lowercase characters, numeric characters, and the special character hyphen (-). |
| Output Topic | Configure the output topic for the source connector. - Tenant: select the tenant you want to ingest messages from. - Namespace: select the namespace you want to ingest messages from. - Topic: select the topic you want to ingest the messages from. |
| Replicas | Set the number of instances for running the source connector. |
| Config | Configure the source connector. - Protocol: enter the protocol. amqp is the default setting. - Host: enter the AMQP service host. - Port: enter the AMQP service port. - Username: enter the username to authenticate to the AMQP1_0 source connector. - Password: enter the password to authenticate to the AMQP1_0 source connector. - Queue: enter the name of the queue that messages should be read from or written to. |
| Field | Description |
|---|---|
| Source Type | (Read-only) the type of the source connector. |
| Service Account | Select the service account for creating the source connector. |
| Source Name | Enter a name for the source connector. The text string supports lowercase characters, numeric characters, and the special character hyphen (-). |
| Output Topic | Configure the output topic for the source connector. - Tenant: select the tenant you want to ingest messages from. - Namespace: select the namespace you want to ingest messages from. - Topic: select the topic you want to ingest the messages from. |
| Replicas | Set the number of instances for running the source connector. |
| Config | Configure the source connector. - AWS Endpoint: enter the AWS SQS endpoint URL. For details, see AWS service endpoints. - Queue Name: enter the name of the SQS queue that messages should be read from or written to. - AWS Region: enter the supported AWS region. For example, us-west-1 and us-west-2. - AWS Credential Plugin Name: enter the fully-qualified class name of the AWS credential plugin. - AWS Credential Plugin Param: enter the JSON-format parameters of the AWS credential plugin, including the Access Key and the Secret Key. |
| Field | Description |
|---|---|
| Source Type | (Read-only) the type of the source connector. |
| Service Account | Select the service account for creating the source connector. |
| Source Name | Enter a name for the source connector. The text string supports lowercase characters, numeric characters, and the special character hyphen (-). |
| Output Topic | Configure the output topic for the source connector. - Tenant: select the tenant you want to ingest messages from. - Namespace: select the namespace you want to ingest messages from. - Topic: select the topic you want to ingest the messages from. |
| Replicas | Set the number of instances for running the source connector. |
| BigQuery Project ID | Enter the Google BigQuery project ID. |
| BigQuery Dataset Name | Enter the Google BigQuery dataset name. |
| BigQuery Table Name | Enter the Google BigQuery table name. |
| BigQuery Credential JsonString | Enter the authentication JSON key. Set the environment variable GOOGLE_APPLICATION_CREDENTIALS to the path of the JSON file that contains your service account key when the credentialJsonString is set to an empty string. By default, it is set to an empty string. |
| Queue Size | Enter the buffer queue size of the source. It is used for storing records before they are sent to Pulsar topics. By default, it is set to 10000. |
| Snapshot Time | Enter the snapshot time of the table. If it is not set, it is interpreted as the current time. |
| Sql | The SQL query on BigQuery. The computed result is saved in a temporary table. The temporary table has a configurable expiration time, and the BigQuery source connector automatically deletes the temporary table when the data is transferred completely. The projectId and dataset Name gets values from the configuration file, and the tableName` is generated by the UUID. |
| Expiration Time In Minutes | Enter the expiration time in minutes until the table is expired and auto-deleted. |
| Max Parallelism | Enter the maximum parallelism for reading. In fact, the number may be less if the BigQuery source connector deems the data small enough. |
| Selected Fields | Enter a list of clauses that can filter the result of the table. |
| Filters | Enter the names of the fields in the table that should be read. |
| Checkpoint Interval Seconds | Enter the checkpoint interval (in units of seconds). By default, it is set to 60s. |
| Field | Description |
|---|---|
| Source Type | (Read-only) the type of the source connector. |
| Service Account | Select the service account for creating the source connector. |
| Source Name | Enter a name for the source connector. The text string supports lowercase characters, numeric characters, and the special character hyphen (-). |
| Output Topic | Configure the output topic for the source connector. - Tenant: select the tenant which you want to ingest messages from. - Namespace: select the namespace which you want to ingest messages from. - Topic: select the topic which you want to ingest the messages from. Currently, the output topic is a required configuration but it is not used for the Debezium connector to save data. The Debezium connector saves data on the following 4 types of topics: - One topic for storing the database metadata messages. It is named with the database server name ( database.server.name), like public/default/database.server.name. - One topic for storing the database history information. The connector writes and recovers DDL statements on this topic. - One topic for storing the offset metadata messages. The connector saves the last successfully-committed offsets on this topic. - One per-table topic. The connector writes change events for all operations that occur in a table to a single Pulsar topic that is specific to that table. If automatic topic creation is disabled on the Pulsar broker, you need to manually create these 4 types of topics and the output topic. |
| Replicas | Set the number of instances for running the source connector. |
| Config | Configure the source connector. - Database Hostname: enter the IP address or hostname of the Microsoft SQL Server database server. - Database Port: enter the port ID of the Microsoft SQL Server database server. - Database User: enter the name of the database user to be used when connecting to Microsft SQL Server. - Database Password: enter the password to be used when connecting to Microsoft SQL Server. - Database Dbname: enter the logical name of the Microsoft SQL Server database. - Database Server Name: enter the logical name of the database server or cluster. - Table Whitelist: enter a comma-separated list of regular expressions that match fully-qualified table identifiers for tables that should be monitored. - Table Blacklist: enter a comma-separated list of the fully-qualified table identifiers for tables that should be excluded. - Column Blacklist: enter a comma-separated list of the fully-qualified column names that should be excluded. - Snapshot Mode: enter the criteria for running a snapshot when the connector starts. - Database History Pulsar Service Url: enter the Pulsar cluster service URL for the history topic. - Key Converter: enter the converter provided by Kafka Connect to convert the record key. - Value Converter: enter the converter provided by Kafka Connect to convert the record value. - Json With Envelope: enable or disable to display the payload. |
| Field | Description |
|---|---|
| Source Type | (Read-only) the type of the source connector. |
| Service Account | Select the service account for creating the source connector. |
| Source Name | Enter a name for the source connector. The text string supports lowercase characters, numeric characters, and the special character hyphen (-). |
| Output Topic | Configure the output topic for the source connector. - Tenant: select the tenant you want to ingest messages from. - Namespace: select the namespace you want to ingest messages from. - Topic: select the topic you want to ingest the messages from. Currently, the output topic is a required configuration but it is not used for the Debezium connector to save data. The Debezium connector saves data on the following 4 types of topics: - One topic for storing the database metadata messages. It is named with the database server name ( database.server.name), like public/default/database.server.name. - One topic for storing the database history information. The connector writes and recovers DDL statements on this topic. - One topic for storing the offset metadata messages. The connector saves the last successfully-committed offsets on this topic. - One per-table topic. The connector writes change events for all operations that occur in a table to a single Pulsar topic that is specific to that table. If automatic topic creation is disabled on the Pulsar broker, you need to manually create these 4 types of topics and the output topic. |
| Replicas | Set the number of instances for running the source connector. |
| Config | Configure the source connector. - Mongodb Hosts: enter a hostname and port pairs (in the form ‘host’ or ‘host:port’) of the MongoDB servers in the replica set. If the mongodb.members.auto.discover parameter is set to false, the host and port pair are prefixed with the replica set name (e.g., rs0/localhost:27017). - Mongodb Name: enter a unique name that identifies the connector and / or MongoDB replica set or sharded cluster that this connector monitors. Each server should be monitored by up to one Debezium connector, since this server name prefixes all persisted Kafka topics exported from the MongoDB replica set or cluster. - Mongodb User: enter the name of the database user to be used when connecting to MongoDB. This is required only when MongoDB is configured to use authentication. - Mongodb Password: enter the password to be used when connecting to MongoDB. This is required only when MongoDB is configured to use authentication. - Mongodb Ssl Enabled: enable or disable SSL connection. If enabled, the MongoDB connector uses SSL to connect to MongoDB instances. - Mongodb Ssl Invalid Hostname Allowed: enable or disable the validation of the hostnames in the certificate presented by the MongoDB instance. Allow the connector to connect to MongoDB instances even if the hostname in the server certificates do not match the server’s host. - The taskId of the MongoDB connector: enter the task ID of the MongoDB connector that attempts to use a separate task for each replica set. - Collection Whitelist: enter a comma-separated list of regular expressions that match collection names to be monitored. - Collection Blacklist: enter a comma-separated list of regular expressions that match collection names to be excluded. - Field Blacklist: enter a comma-separated list of the fully-qualified field names that should be excluded. - Field Renames: enter a comma-separated list of fully-qualified replacements of fields that should be used to rename fields in the change event message values. - Key Converter: enter the converter provided by Kafka Connect to convert the record key. - Value Converter: enter the converter provided by Kafka Connect to convert the record value. - Json With Envelope: enable or disable to display the payload. |
| Field | Description |
|---|---|
| Source Type | (Read-only) the type of the source connector. |
| Service Account | Select the service account for creating the source connector. |
| Source Name | Enter a name for the source connector. The text string supports lowercase characters, numeric characters, and the special character hyphen (-). |
| Output Topic | Configure the output topic for the source connector. - Tenant: select the tenant you want to ingest messages from. - Namespace: select the namespace you want to ingest messages from. - Topic: select the topic you want to ingest the messages from. Currently, the output topic is a required configuration but it is not used for the Debezium connector to save data. The Debezium connector saves data on the following 4 types of topics: - One topic for storing the database metadata messages. It is named with the database server name ( database.server.name), like public/default/database.server.name. - One topic for storing the database history information. The connector writes and recovers DDL statements on this topic. - One topic for storing the offset metadata messages. The connector saves the last successfully-committed offsets on this topic. - One per-table topic. The connector writes change events for all operations that occur in a table to a single Pulsar topic that is specific to that table. If automatic topic creation is disabled on the Pulsar broker, you need to manually create these 4 types of topics and the output topic. |
| Replicas | Set the number of instances for running the source connector. |
| Config | Configure the source connector. - Database Hostname: enter the IP address or hostname of the MySQL database server. - Database Port: enter the port ID of the MySQL database server. - Database User: enter the name of the database user to be used when connecting to MySQL. - Database Password: enter the password to be used when connecting to MySQL. - Database Server Id: enter the ID of the database server. The ID must be unique within a database cluster. - Database Server Name: enter the logical name of the database server. - Database Whitelist: enter a comma-separated list of regular expressions that match collection names to be monitored. - Database Blacklist: enter a comma-separated list of regular expressions that match collection names to be excluded. - Table Whitelist: enter a comma-separated list of regular expressions that match fully-qualified table identifiers for tables to be monitored. - Table Blacklist: enter a comma-separated list of the fully-qualified table identifiers for tables that should be excluded. - Column Blacklist: enter a comma-separated list of the fully-qualified column names that should be excluded. - Snapshot Mode: enter the criteria for running a snapshot when the connector starts. - Database History Pulsar Service Url: enter the Pulsar cluster service URL for the history topic. - Key Converter: enter the converter provided by Kafka Connect to convert the record key. - Value Converter: enter the converter provided by Kafka Connect to convert the record value. - Json With Envelope: enable or disable to display the payload. |
| Field | Description |
|---|---|
| Source Type | (Read-only) the type of the source connector. |
| Service Account | Select the service account for creating the source connector. |
| Source Name | Enter a name for the source connector. The text string supports lowercase characters, numeric characters, and the special character hyphen (-). |
| Output Topic | Configure the output topic for the source connector. - Tenant: select the tenant you want to ingest messages from. - Namespace: select the namespace you want to ingest messages from. - Topic: select the topic you want to ingest the messages from. Currently, the output topic is a required configuration but it is not used for the Debezium connector to save data. The Debezium connector saves data on the following 4 types of topics: - One topic for storing the database metadata messages. It is named with the database server name ( database.server.name), like public/default/database.server.name. - One topic for storing the database history information. The connector writes and recovers DDL statements on this topic. - One topic for storing the offset metadata messages. The connector saves the last successfully-committed offsets on this topic. - One per-table topic. The connector writes change events for all operations that occur in a table to a single Pulsar topic that is specific to that table. If automatic topic creation is disabled on the Pulsar broker, you need to manually create these 4 types of topics and the output topic. |
| Replicas | Set the number of instances for running the source connector. |
| Config | Configure the source connector. - Database Hostname: enter the IP address or hostname of the PostgreSQL database server. - Database Port: enter the port ID of the PostgreSQL database server. - Database User: enter the name of the database user to be used when connecting to PostgreSQL. - Database Password: enter the password to be used when connecting to PostgreSQL. - Database Dbname: enter the name of the PostgreSQL database. - Plugin Name: enter the name of the PostgreSQL logical decoding plugin installed on the PostgreSQL server. - Database Sslmode: enable or disable to use an encrypted connection to the PostgreSQL server. - Database Sslcert: enter the path to the file containing the SSL certificate for the client. - Database Sslkey: enter the path to the file containing the SSL private key of the client. - Database Sslpassword: enter the password to access the client private key from the file specified by database SSL key. - Database Sslrootcert: enter the path to the file containing the root certificate(s) against which the server is validated. - Database Server Name: enter the logical name of the database server. - Schema Whitelist: enter a comma-separated list of regular expressions that match schema names to be monitored. - Schema Blacklist: enter a comma-separated list of regular expressions that match schema names to be excluded. - Table Whitelist: enter a comma-separated list of regular expressions that match fully-qualified table identifiers for tables to be monitored. - Table Blacklist: enter a comma-separated list of the fully-qualified table identifiers for tables that should be excluded. - Column Blacklist: enter a comma-separated list of the fully-qualified column names that should be excluded. - The name of the PostgreSQL logical decoding slot: enter the name of the replication slot. The text string supports lower-case letters, numbers, and the underscore character. - Database History Pulsar Service Url: enter the Pulsar cluster service URL for the history topic. - Key Converter: enter the converter provided by Kafka Connect to convert the record key. - Value Converter: enter the converter provided by Kafka Connect to convert the record value. - Json With Envelope: enable or disable to display the message payload. |
| Field | Description |
|---|---|
| Source Type | (Read-only) the type of the source connector. |
| Service Account | Select the service account for creating the source connector. |
| Source Name | Enter a name for the source connector. The text string supports lowercase characters, numeric characters, and the special character hyphen (-). |
| Output Topic | Configure the output topic for the source connector. - Tenant: select the tenant you want to ingest messages from. - Namespace: select the namespace you want to ingest messages from. - Topic: select the topic you want to ingest the messages from. |
| Replicas | Set the number of instances for running the source connector. |
| Config | Configure the source connector. - Kafka brokers host: enter the addresses of the Kafka brokers that a Kafka client connects to initially bootstrap itself. - Kafka consumer group id: enter a string that uniquely identifies the group of consumer processes to which this consumer belongs. - Fetch minimum bytes: enter the minimum amount of data the server should return for a fetch request. - Auto commit enabled: enable or disable auto commit. If it is set to true, the consumer’s offset is periodically committed in the background. - Auto commit Interval in ms: enter the name of the AWS Kinesis stream. - Heartbeat interval in ms: enter the interval (in ms) between heartbeats to the consumer when using Kafka’s group management facilities. The value must be lower than the session timeout. - Session timeout in ms: enter the timeout (in ms) used to detect failures when using Kafka’s group management facilities. - Topic: enter the Kafka topic name where messages are sent to Pulsar topics. - Consumer config properties: enter the consumer configuration properties passed to the consumer. Other properties specified in the connector configuration file take precedence over this configuration item. - Key deserialization class: enter the serializer class for Kafka producers to serialize keys. - Value deserialization class: enter the serializer class for Kafka producers to serialize values. The serializer is set by a specific implementation of KafkaAbstractSink. - Auto offset reset: define the behavior of the consumer when there is no committed position. |
| Field | Description |
|---|---|
| Source Type | (Read-only) the type of the source connector. |
| Service Account | Select the service account for creating the source connector. |
| Source Name | Enter a name for the source connector. The text string supports lowercase characters, numeric characters, and the special character hyphen (-). |
| Output Topic | Configure the output topic for the source connector. - Tenant: select the tenant you want to ingest messages from. - Namespace: select the namespace you want to ingest messages from. - Topic: select the topic you want to ingest the messages from. |
| Replicas | Set the number of instances for running the source connector. |
| Config | Configure the source connector. - AWS Endpoint: enter the Kinesis endpoint URL. For details, see AWS service endpoints. - AWS Region: enter the supported AWS region. For example, us-west-1 and us-west-2. - AWS Credential Plugin Name: enter the fully-qualified class name of the AWS credential plugin. If it is empty, a default AWSCredentialsProvider that accepts the JSON map of credentials in AWSCredentialPluginParam will be created. - AWS Credential Plugin Param: enter the JSON-format parameters of the AWS credential plugin, including the Access Key and the Secret Key. - AWS Kinesis Stream Name: enter the name of the AWS Kinesis stream. You must have the Kinesis stream created before creating a source connector. For more details, see Amazon documentation |
Update source connectors
You can make changes to the configuration of a source connector after it is created.- From the left navigation pane, under Resources, click Connectors.
- Select the Created Sources tab.
- Click the ellipsis at the end of the row of the connector that you want to update, and then click Edit.
- Edit the configuration that you want to change. For details, see create source connectors.
- Click SUBMIT.
Delete source connectors
To delete a source connector, follow these steps.- From the left navigation pane, under Resources, click Connectors.
- Select the Created Sources tab.
- Click the ellipsis at the end of the row of the connector that you want to delete, and then click Delete.
- Enter the source connector name and then click Confirm.