

pulsarctl CLI tool to create and manage sink connectors. For details, see work with connectors using the pulsarctl CLI tool.
Create sink connectors
This section describes how to create sink connectors.Prerequisites
This section lists prerequisites for creating supported sink connectors on StreamNative Console and for sink connectors connecting to external systems- AMQP1_0
- AWS Lambda
- AWS SQS
- Cloud Storage
- Elasticsearch
- Google Bigquery
- Kinesis
- AWS EventBridge
-
Prerequisites for creating an AMQP1_0 sink connector on StreamNative Console
- Install the Function Mesh Operator.
- Enable Function Mesh Worker service.
- Enable the Connectors page on StreamNative Console.
- Log in to the StreamNative Console.
- Grant the admin role or service account with the source or sink permission. For details, see authenticate service accounts.
-
Prerequisites for an AMQP1_0 sink connector connecting to external systems
- Enable AMQP 1.0-compliant broker service, like RabbitMQ, for remote access.
- Enable proper access credentials for remote connection.
-
Prerequisites for creating an AWS Lambda sink connector on StreamNative Console
- Install the Function Mesh Operator.
- Enable Function Mesh Worker service.
- Enable the Connectors page on StreamNative Console.
- Log in to the StreamNative Console.
- Grant the admin role or service account with the source or sink permission. For details, see authenticate service accounts.
-
Prerequisites for an AWS Lambda sink connector connecting to external systems
- Configure the AWS account with the Access Key.
- Provision AWS Lambda Service with target functions.
- Attach proper access policies to the AWS account. For details, see AWS Lambda permissions.
- lambda:InvokeFunction
-
Prerequisites for creating an AWS SQS sink connector on StreamNative Console
- Install the Function Mesh Operator.
- Enable Function Mesh Worker service.
- Enable the Connectors page on StreamNative Console.
- Log in to the StreamNative Console.
- Grant the admin role or service account with the source or sink permission. For details, see authenticate service accounts.
-
Prerequisites for an AWS SQS sink connector connecting to external systems
- Configure the AWS account with the Access Key.
- Provision AWS Simple Queue Service (SQS).
- Attach proper access policies to the AWS account. For details, see Amazon SQS API permissions: Actions and resource reference.
- sqs:CreateQueue
- sqs:SendMessage
Currently, only AWS S3 is supported.
-
Prerequisites for creating a Cloud Storage sink connector on StreamNative Console
- Install the Function Mesh Operator.
- Enable Function Mesh Worker service.
- Enable the Connectors page on StreamNative Console.
- Log in to the StreamNative Console.
- Grant the admin role or service account with the source or sink permission. For details, see authenticate service accounts.
-
Prerequisites for a Cloud Storage sink connector connecting to external systems
- Configure the AWS account with the Access Key.
- Provision the AWS S3 Bucket.
- Grant the
s3:PutObjectaccess permission to the AWS account.
-
Prerequisites for creating an Elasticsearch sink connector on StreamNative Console
- Install the Function Mesh Operator.
- Enable Function Mesh Worker service.
- Enable the Connectors page on StreamNative Console.
- Log in to the StreamNative Console.
- Grant the admin role or service account with the source or sink permission. For details, see authenticate service accounts.
-
Prerequisites for an Elasticsearch sink connector connecting to external systems
- Enable Elasticsearch service for remote access.
- Enable proper access credentials for remote connection.
- Assign any of the following privileges to a role. For details, see security privileges.
- create_index
- read
- write
- view_index_metadata
-
Prerequisites for creating a Google Bigquery sink connector on StreamNative Console
- Install the Function Mesh Operator.
- Enable Function Mesh Worker service.
- Enable the Connectors page on StreamNative Console.
- Log in to the StreamNative Console.
- Grant the admin role or service account with the source or sink permission. For details, see authenticate service accounts.
-
Prerequisites for a Google Bigquery sink connector connecting to external systems
- Configure the Google Cloud account credentials. For details, see create a service account key.
- Create the BigQuery project and dataset.
- Ensure that the Google Cloud credentials have the following permissions to the Google BigQuery API. For details, see control access to resources.
- bigquery.jobs.create
- bigquery.tables.create
- bigquery.tables.get
- bigquery.tables.getData
- bigquery.tables.list
- bigquery.tables.update
- bigquery.tables.updateData
-
Prerequisites for creating a Kinesis sink connector on StreamNative Console
- Install the Function Mesh Operator.
- Enable Function Mesh Worker service.
- Enable the Connectors page on StreamNative Console.
- Log in to the StreamNative Console.
- Grant the admin role or service account with the source or sink permission. For details, see authenticate service accounts.
-
Prerequisites for a Kinesis sink connector connecting to external systems
- Configure the AWS account with the Access Key.
- Provision an AWS Kinesis data stream.
- Attach proper access policies to the AWS account. Besides Kinesis related permissions, you also need to grant proper permissions for DynamoDB and Cloud Watch. For details, see controlling Access to Amazon Kinesis Data Streams Resources Using IAM.
-
Prerequisites for creating an AWS EventBridge sink connector on StreamNative Console
- Install the Function Mesh Operator.
- Enable Function Mesh Worker service.
- Enable the Connectors page on StreamNative Console.
- Log in to the StreamNative Console.
- Grant the admin role or service account with the source or sink permission. For details, see authenticate service accounts.
- Prerequisites for an AWS EventBridge sink connector connecting to external systems: see AWS EventBridge Sink Connector Docs for more details.
Steps
- From the left navigation pane, under Resources, click Connectors.
- Select the Created Sinks tab.
-
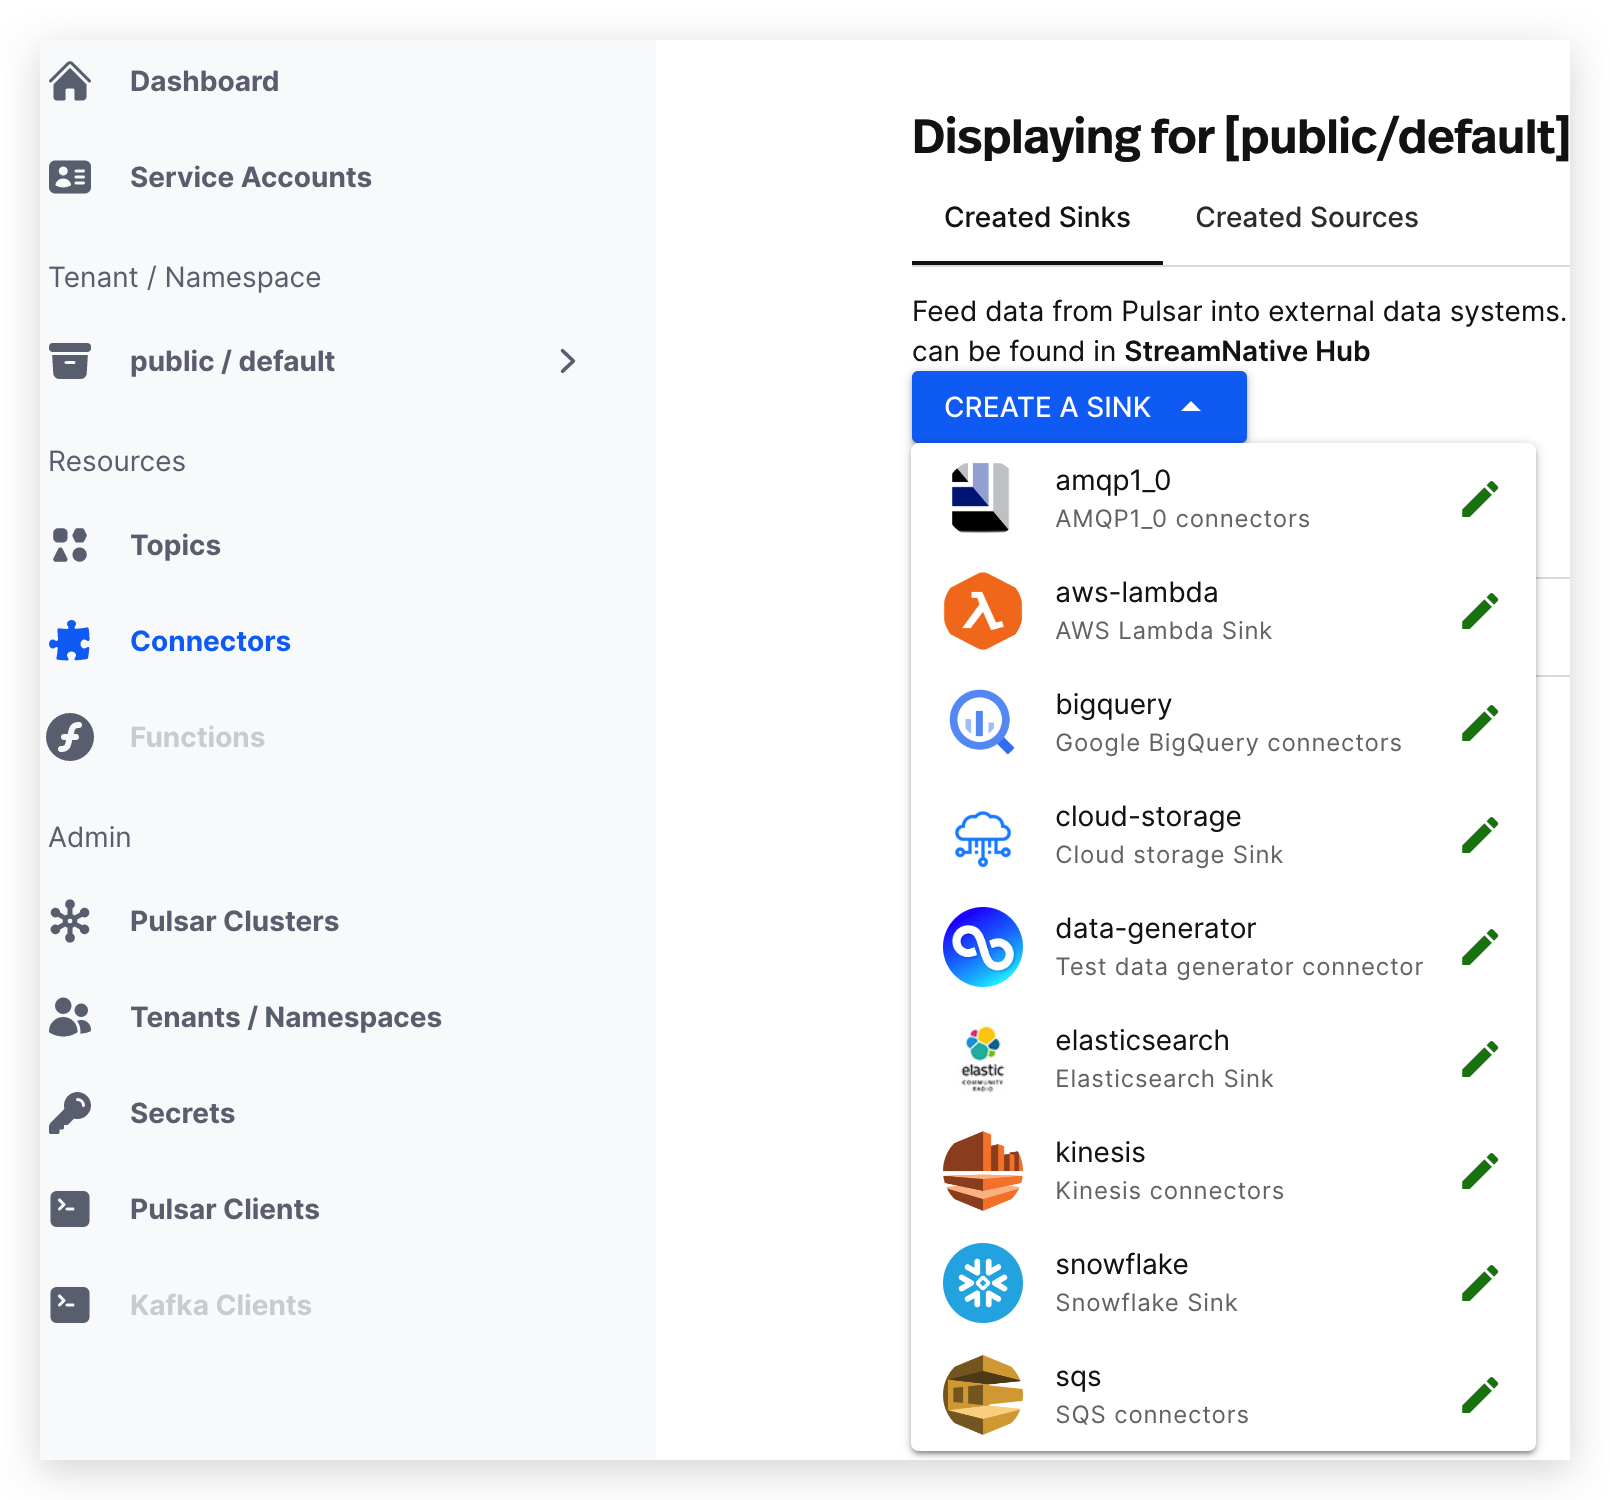
Click CREATE A SINK. A drop-down menu appears and lists available sink connectors.
-
Click the icon of the sink connector that you want to create and enter the page where you can configure the sink connector.
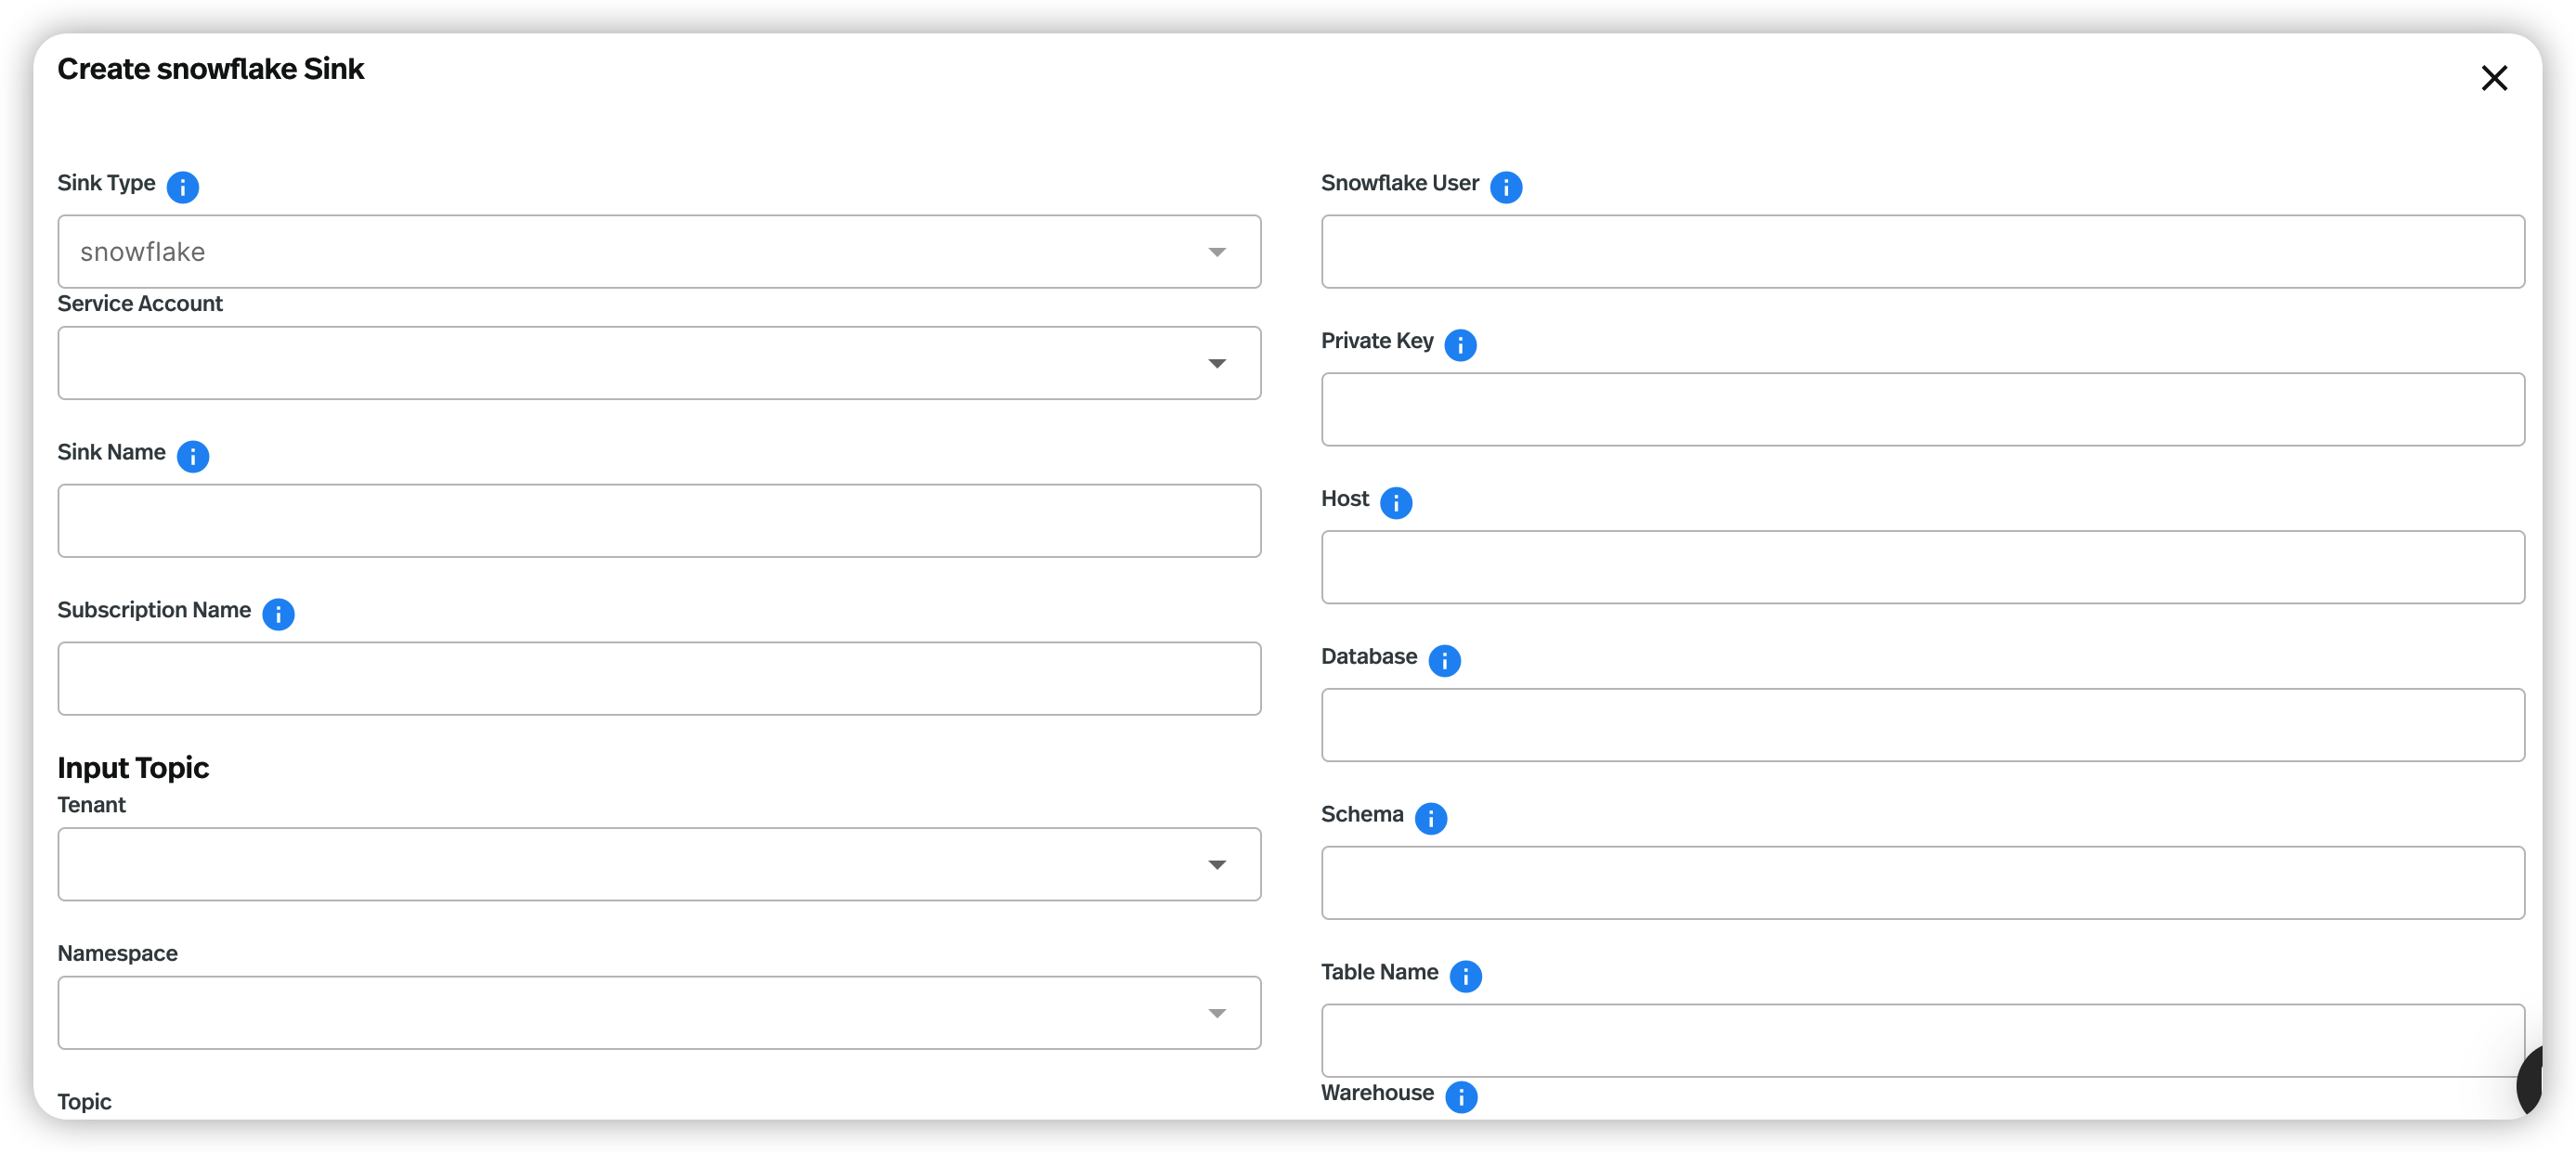
- Configure the sink connector. See the tables of valid configuration options below.
- Click SUBMIT.
- AMQP 1.0
- AWS Lambda
- AWS SQS
- Cloud Storage
- Elasticsearch
- Google BigQuery
- Kinesis
- Snowflake
- AWS EventBridge
| Field | Description |
|---|---|
| Sink Type | (Read-only) the type of the sink connector. |
| Service Account | Select the service account for creating the sink connector. |
| Sink Name | Enter a name for the sink connector. The text string supports lowercase characters, numeric characters, and the special character hyphen (-). |
| Subscription Name | Enter the subscription name for the consumers that consume messages from the input topic. |
| Input Topic | Configure the input topic for the sink connector. - Tenant: select the tenant you want to export messages from. - Namespace: select the namespace you want to export messages from. - Topic: select the topic you want to export messages from. |
| Replicas | Configure the number of Pulsar instances to run the sink connector. |
| Config | Configure the sink connector. - Protocol: enter the protocol. amqp is the default setting. - Host: enter the AMQP service host. - Port: enter the AMQP service port. - Username: enter the username to authenticate to the AMQP1_0 sink connector. - Password: enter the password to authenticate to the AMQP1_0 sink connector. - Queue: enter the name of the queue that messages should be read from or written to. |
| Field | Description |
|---|---|
| Sink Type | (Read-only) the type of the sink connector. |
| Service Account | Select the service account for creating the sink connector. |
| Sink Name | Enter a name for the sink connector. The text string supports lowercase characters, numeric characters, and the special character hyphen (-). |
| Subscription Name | Enter the subscription name for the consumers that consume messages from the input topic. |
| Input Topic | Configure the input topic for the sink connector. - Tenant: select the tenant you want to export messages from. - Namespace: select the namespace you want to export messages from. - Topic: select the topic you want to export messages from. |
| Replicas | Configure the number of Pulsar instances to run the sink connector. |
| Config | Configure the sink connector. - AWS Endpoint: enter the AWS Lambda endpoint URL. For details, see AWS service endpoints. - Lambda Function Name: enter the name of the Lambda function. The Lambda function that should be invoked by the messages. - Synchronous Invocation: enable or disable synchronous invocation. If it is set to true, it means invoking a Lambda function synchronously. If it is set to false, it means invoking a Lambda function asynchronously. - AWS Region: enter the supported AWS region. For example, us-west-1 and us-west-2. - AWS Credential Plugin Name: enter the fully-qualified class name of the AWS credential plugin. - AWS Credential Plugin Param: enter the JSON-format parameters of the AWS credential plugin, including the Access Key and the Secret Key. |
| Field | Description |
|---|---|
| Sink Type | (Read-only) the type of the sink connector. |
| Service Account | Select the service account for creating the sink connector. |
| Sink Name | Enter a name for the sink connector. The text string supports lowercase characters, numeric characters, and the special character hyphen (-). |
| Subscription Name | Enter the subscription name for the consumers that consume messages from the input topic. |
| Input Topic | Configure the input topic for the sink connector. - Tenant: select the tenant you want to export messages from. - Namespace: select the namespace you want to export messages from. - Topic: select the topic you want to export messages from. |
| Replicas | Configure the number of Pulsar instances to run the sink connector. |
| Config | Configure the sink connector. - AWS Endpoint: enter the AWS SQS endpoint URL. For details, see AWS service endpoints. - Queue Name: enter the name of the SQS queue that messages should be read from or written to. - AWS Region: enter the supported AWS region. For example, us-west-1 and us-west-2. - AWS Credential Plugin Name: enter the fully-qualified class name of the AWS credential plugin. - AWS Credential Plugin Param: enter the JSON-format parameters of the AWS credential plugin, including the Access Key and the Secret Key. |
| Field | Description |
|---|---|
| Sink Type | (Read-only) the type of the sink connector. |
| Service Account | Select the service account for creating the sink connector. |
| Sink Name | Enter a name for the sink connector. The text string supports lowercase characters, numeric characters, and the special character hyphen (-). |
| Subscription Name | Enter the subscription name for the consumers that consume messages from the input topic. |
| Input Topic | Configure the input topic for the sink connector. - Tenant: select the tenant you want to export messages from. - Namespace: select the namespace you want to export messages from. - Topic: select the topic you want to export messages from. |
| Replicas | Configure the number of Pulsar instances to run the sink connector. |
| Config | Configure the sink connector. - Access Key ID: enter the Cloud Storage access key ID. - Time Partition Pattern: enter the format pattern of the time-based partitioning. - With Metadata: if it is set to true, it means to write out Pulsar message properties, messageId, schema version along with the message. - Partitioner Type: enter the partitioning type. It can be configured by topic partitions or by time. By default, the partition type is configured by topic partitions. - Slice Topic Partition Path: if it is set to true, it means to extract the topic name from partitioned topics as the bucket path. By default, it is set to false. - Path Prefix: enter the prefix of the bucket path. - Bucket: enter the Cloud Storage bucket. - Secret Access Key: enter the Cloud Storage secret access key. - Time Partition Duration: enter the time interval for time-based partitioning, such as 1d, or 1h. - Endpoint: enter the Cloud Storage endpoint. - Provider: enter the Cloud Storage type, such as aws-s3 or gcs. - Format Type: enter the data format type. Available options are JSON, Avro, or Parquet. By default, it is set to JSON. - Region: enter the region for FIPS endpoints offered by AWS services. |
| Field | Description |
|---|---|
| Sink Type | (Read-only) the type of the sink connector. |
| Service Account | Select the service account for creating the sink connector. |
| Sink Name | Enter a name for the sink connector. The text string supports lowercase characters, numeric characters, and the special character hyphen (-). |
| Subscription Name | Enter the subscription name for the consumers that consume messages from the input topic. |
| Input Topic | Configure the input topic for the sink connector. - Tenant: select the tenant you want to export messages from. - Namespace: select the namespace you want to export messages from. - Topic: select the topic you want to export messages from. |
| Replicas | Configure the number of Pulsar instances to run the sink connector. |
| Config | Configure the sink connector. - ElasticSearch Url: enter the URL of the Elasticsearch cluster that the connector connects to. - Index Name: enter the index name that the connector writes messages to. By default, it is the topic name. - Type Name: enter the type name to which the connector writes messages to. By default, it is set to _doc. However, for Elasticsearch 6.2 or previous version, you should set it to a valid type name other than _doc. - Enable schema: enable or disable the Schema Aware mode. - Index Number Of Shards: enter the number of shards of the index. - Create Index If Needed: create the index if it is missing. - username: enter the username that is used to connect to the Elasticsearch cluster. If the username is set, the password should also be provided. - password: enter the password that is used to connect to the Elasticsearch cluster. If the username is set, the password should also be provided. - maxRetries: enter the maximum number of retries for Elasticsearch requests. - retryBackoffInMs: enter the base time to wait when retrying an Elasticsearch request (in milliseconds). - maxRetryTimeInSec: enter the maximum retry time interval (in seconds) for retrying an Elasticsearch request. - Bulk Enabled: enable or disable the Elasticsearch bulk processor to flush write requests based on the number or size of requests, or after a given period. - Bulk Actions: enter the maximum number of actions per Elasticsearch bulk request. - Bulk Size In megabytes: enter the maximum size (in megabytes) of Elasticsearch bulk requests. - Bulk Concurrent Requests: enter the maximum number of in-flight Elasticsearch bulk requests. If it is set to 0, it means that one single request is allowed to be executed. If it is set to 1, it means one concurrent request is allowed to be executed while new bulk requests are accumulated. - Bulk Flush Interval In Ms: enter the maximum time to wait for flushing pending writes when bulk writes are enabled. By default, it is set to 1, which means not to flush pending writes when bulk writes are enabled. - Compression Enabled: enable or disable Elasticsearch request compression. - Client Connection Timeout In Ms: enter the Elasticsearch client connection timeout (in milliseconds). - Connection Request Timeout In Ms: enter the time (in milliseconds) for getting a connection from the Elasticsearch connection pool. - Connection Idle Timeout In Ms: enter the idle connection timeout to prevent a read timeout. - Socket Timeout In Ms: enter the socket timeout (in milliseconds) for waiting to read the Elasticsearch response. - Key Ignore: configure whether to ignore the record key to build the Elasticsearch document _id. If primaryFields is defined, the connector extracts the primary fields from the payload to build the document _id. If no primaryFields is provided, a random document _id is automatically generated. - Primary Fields: enter a comma separated ordered list of field names which are used to build the Elasticsearch document _id from the record value. If there is a single field, the field is converted as a string. If this list has 2 or more fields, the generated _id is a string representation of a JSON array of the field values. - Null Value Action: configure how to handle records with null values. Available options are IGNORE, DELETE or FAIL. By default, it is set to IGNORE. - Malformed Doc Action: configure how to handle Elasticsearch rejected documents due to some malformation. Available options are IGNORE, DELETE or FAIL. By default, it is set to FAIL. - Strip Nulls: if it is set to false, Elasticsearch _source includes ‘null’ for empty fields (for example {"foo": null}). Otherwise, null fields are stripped. - ssl settings: the SSL communication configuration. For details, see the following table. |
| Name | Type | Required | Default | Description |
|---|---|---|---|---|
enabled | Boolean | false | false | Enable or disable SSL/TLS. |
hostnameVerification | Boolean | false | true | Configure whether or not to validate node host names when using SSL. |
truststorePath | String | false | ” ” (empty string) | Enter the path to the truststore file. |
truststorePassword | String | false | ” ” (empty string) | Enter the Truststore password. |
keystorePath | String | false | ” ” (empty string) | Enter the path to the keystore file. |
keystorePassword | String | false | ” ” (empty string) | Enter the Keystore password. |
cipherSuites | String | false | ” ” (empty string) | Enter the SSL/TLS cipher suites. |
protocols | String | false | ”TLSv1.2” | Enter a comma separated list of enabled SSL/TLS protocols. |
| Field | Description |
|---|---|
| Sink Type | (Read-only) the type of the sink connector. |
| Service Account | Select the service account for creating the sink connector. |
| Sink Name | Enter a name for the sink connector. The text string supports lowercase characters, numeric characters, and the special character hyphen (-). |
| Subscription Name | Enter the subscription name for the consumers that consume messages from the input topic. |
| Input Topic | Configure the input topic for the sink connector. - Tenant: select the tenant you want to export messages from. - Namespace: select the namespace you want to export messages from. - Topic: select the topic you want to export messages from. |
| Replicas | Configure the number of Pulsar instances to run the sink connector. |
| Config | Configure the sink connector. - Project ID: enter the Google BigQuery project ID. - Dataset Name: enter the Google BigQuery dataset name. - Table Name: enter the Google BigQuery table name. - Credential Json String: enter the authentication JSON key. Set the environment variable GOOGLE_APPLICATION_CREDENTIALS to the path of the JSON file that contains your service account key when the credentialJsonString is set to an empty string. By default, it is set to an empty string. - Visible Model: enter the model of data visible in BigQuery for reading. If it is set to Pending, records are buffered in a pending state until you commit the stream. By default, it is set to Committed. - Pending Max Size: enter the maximum number of messages waiting to be committed in Pending mode. By default, it is set to 10_000. - Batch Max Size: enter the maximum number of batch messages. By default, it is set to 20. - Batch Max Time: enter the maximum batch waiting time (in units of milliseconds). By default, it is set to 5000. - Batch Flush Interval Time: enter the batch flush interval (in units of milliseconds). By default, it is set to 2000. - Failed Max Retry Num: enter the maximum retries when appending fails. By default, it is set to 20. - Partitioned Tables: if it is set to true, it means to create a partitioned table when the table is automatically created. It will use the __event_time__ as the partition key. By default, it is set to true. - Partitioned Table Interval Day: enter the number of days between the partitioning of the partitioned table. By default, it is set to 7. - Clustered Tables: if it is set to true, it means to create a clustered table when the table is automatically created. It will use the message_id as the cluster key. - Auto Create Table: if it is set to true, it means to automatically create a table if no table is available. - Auto Update Table: if it is set to true, it means to automatically update the table schema if the BigQuery table schema is incompatible with the Pulsar schema. - Default System Field: enter the system fields when the table is automatically created. You can use commas to separate multiple fields. The supported system fields are: __schema_version__ , __partition__ , __event_time__, __publish_time__ , __message_id__ , __sequence_id__ , and __producer_name__. |
| Field | Description |
|---|---|
| Sink Type | (Read-only) the type of the sink connector. |
| Service Account | Select the service account for creating the sink connector. |
| Sink Name | Enter a name for the sink connector. The text string supports lowercase characters, numeric characters, and the special character hyphen (-). |
| Subscription Name | Enter the subscription name for the consumers that consume messages from the input topic. |
| Input Topic | Configure the input topic for the sink connector. - Tenant: select the tenant you want to export messages from. - Namespace: select the namespace you want to export messages from. - Topic: select the topic you want to export messages from. |
| Replicas | Configure the number of Pulsar instances to run the sink connector. |
| Config | Configure the sink connector. - AWS Endpoint: enter the Kinesis endpoint URL. For details, see AWS service endpoints. - AWS Region: enter the supported AWS region. For example, us-west-1 and us-west-2. - AWS Credential Plugin Name: enter the fully-qualified class name of the AWS credential plugin. If it is empty, a default AWSCredentialsProvider that accepts the JSON map of credentials in AWSCredentialPluginParam will be created. - AWS Credential Plugin Param: enter the JSON-format parameters of the AWS credential plugin, including the Access Key and the Secret Key. - AWS Kinesis Stream Name: enter the name of the AWS Kinesis stream. You must have the Kinesis stream created before creating a sink connector. For more details, see Amazon documentation. |
| Field | Description |
|---|---|
| Sink Type | (Read-only) the type of the sink connector. |
| Service Account | Select the service account for creating the sink connector. |
| Sink Name | Enter a name for the sink connector. The text string supports lowercase characters, numeric characters, and the special character hyphen (-). |
| Subscription Name | Enter the subscription name for the consumers that consume messages from the input topic. |
| Input Topic | Configure the input topic for the sink connector. - Tenant: select the tenant you want to export messages from. - Namespace: select the namespace you want to export messages from. - Topic: select the topic you want to export messages from. |
| Replicas | Configure the number of Pulsar instances to run the sink connector. |
| Enable auto scaling | Enable or disable auto-scaling. If enabled, you should set the maximum number of Pulsar instances to run the sink connector. The maximum number of Pulsar instances must be greater than the value of the Replicas and equal to or smaller than 10. |
| Snowflake User | The user account name of the Snowflake service. |
| Private Key | The private key of the user. |
| Host | The host URL of the Snowflake service. |
| Database | The Snowflake database where the connector will sink data. |
| Schema | The Snowflake schema that belongs to the level below the Snowflake database and consists of a set of tables. |
| Table Name | If the autoCreateTable option is set to false, the Snowflake connector will persist messages to this table. |
| Warehouse | The warehouse name in the Snowflake connector. By default, no warehouse name is set. |
| Buffer Count Records | The number of records that are buffered in the memory before they are ingested to Snowflake. By default, it is set to 10000. |
| Buffer Size Bytes | The cumulative size (in units of bytes) of the records that are buffered in the memory before they are ingested in Snowflake as data files. By default, it is set to 5000000 (5 MB). |
| Buffer Flush Time In Seconds | The number of seconds between buffer flushes, where the flush is from the Pulsar’s memory cache to the internal stage. By default, it is set to 60 seconds. |
| Auto Create Table | If it is set to true, the system will automatically create a table when the table does not exist. By default, it is set to true. |
| Processing Guarantees | Specify the processing guarantee semantics. Currently, the Snowflake connector only supports ATLEAST_ONCE processing guarantee semantics. |
| Topic2table | Specify the mapping relationship between topics and tables. Each topic and the mapped table name should be separated by a colon, such as topic1:table1,topic2:table2. |
| Metadata Field | The metadata fields for each Snowflake record. You can separate multiple fields with commas. The supported metadata fields are: schema_version, partition, event_time, publish_time, message_id, sequence_id, producer_name, topic. Currently, the Snowflake sink connector currently does not support custom metadata. |
See AWS EventBridge Sink Connector Docs for more details.
Update sink connectors
You can update some fields to make changes to the configuration of a sink connector after it is created.- From the left navigation pane, under Resources, click Connectors.
- Select the Created Sinks tab.
- Click the ellipsis at the end of the row of the connector that you want to update, and then click Edit.
- Edit the configuration that you want to change. For details, see create sink connectors.
- Click SUBMIT.
Delete sink connectors
- From the left navigation pane, under Resources, click Connectors.
- Select the Created Sinks tab.
- Click the ellipsis at the end of the row of the connector that you want to delete, and then click Delete.
- Enter the sink connector name and then click Confirm.