> ## Documentation Index
> Fetch the complete documentation index at: https://docs.streamnative.io/llms.txt
> Use this file to discover all available pages before exploring further.
# Deploy StreamNative Platform on Red Hat OpenShift
This page describes how to deploy StreamNative Platform as a cloud-native, stateful container application on [Red Hat OpenShift](https://www.redhat.com/en/technologies/cloud-computing/openshift).
## Deploy Pulsar Operators
Pulsar Operators include the BookKeeper Operator, Pulsar Operator, and ZooKeeper Operator, which can bring up a Pulsar cluster easily on Openshift.
* BookKeeper Operator: provides a full management lifecycle for BookKeeper clusters.
* Pulsar Operator: manages the deployment of the Pulsar Broker and Pulsar Proxy to run Pulsar clusters.
* ZooKeeper Operator: provides a full management lifecycle for ZooKeeper clusters.
You can deploy Pulsar Operators with either cluster-scoped permissions or namespace-scoped permissions. With cluster-scoped permissions, the Pulsar Operators can watch resources across all namespaces in the cluster. With namespace-scoped permissions, the Pulsar Operators can watch resources in a particular namespace.
### OpenShift Web Console
This section describes how to deploy Pulsar Operators using the OpenShift Web Console.
Currently, you can only deploy Pulsar Operators with cluster-scoped permissions.
#### Prerequisites
* Install [kubectl](https://kubernetes.io/docs/tasks/tools/#kubectl) v1.16 or higher.
* Install the [cert-manager](https://cert-manager.io/docs/installation/).
* Deploy an [OpenShift cluster](https://docs.openshift.com/container-platform/4.7/installing/index.html).
#### Steps
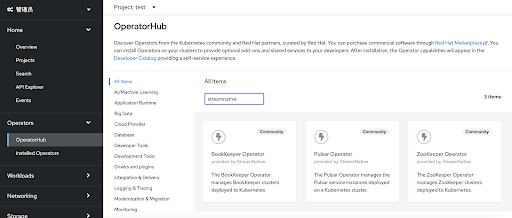
1. Navigate to your OpenShift Web Console and click **OperatorHub**.
2. Enter "StreamNative" or "Pulsar" in the search box. There are three tiles: **BookKeeper Operator**, **Pulsar Operator**, and **ZooKeeper Operator**.
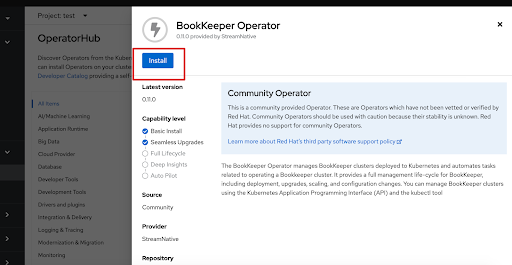
 3. Click the **BookKeeper Operator** tile, and then click **Install**.
This step shows the BookKeeper Operator as an example.
3. Click the **BookKeeper Operator** tile, and then click **Install**.
This step shows the BookKeeper Operator as an example.
 4. Customize the configurations.
* **Installation mode**
* **All namespaces on the cluster(default)**: deploy the Pulsar Operators with cluster-scoped permissions.
* **A specific namespace on the cluster**: deploy the Pulsar Operators with namespace-scoped permissions. Currently, this option is not supported because it needs to pass the parameter through an environment variable.
* **Updated Approval**
* **Automatic**: automatically install or update the Pulsar Operators.
* **Manual**: manually install or update the Pulsar Operators.
4. Customize the configurations.
* **Installation mode**
* **All namespaces on the cluster(default)**: deploy the Pulsar Operators with cluster-scoped permissions.
* **A specific namespace on the cluster**: deploy the Pulsar Operators with namespace-scoped permissions. Currently, this option is not supported because it needs to pass the parameter through an environment variable.
* **Updated Approval**
* **Automatic**: automatically install or update the Pulsar Operators.
* **Manual**: manually install or update the Pulsar Operators.
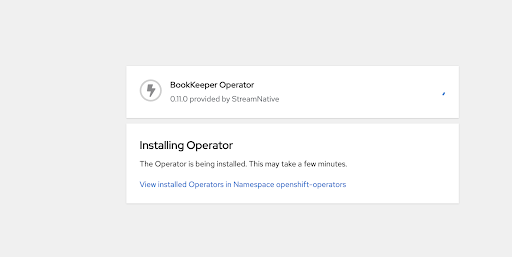
 5. Click **Install**. A page displays, showing the BookKeeper Operator installation process.
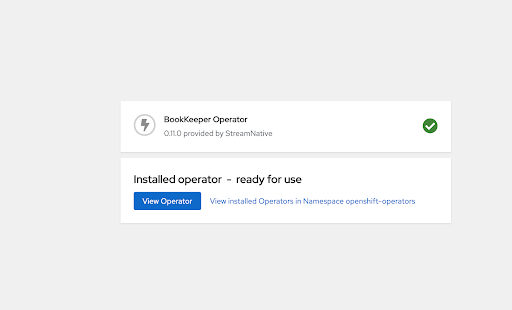
 6. After the BookKeeper Operator is installed, you can see the new status **Installed operator - ready for use**.
 7. Repeat Steps 3 through 6 to install the Pulsar Operator, and then repeat the steps for the ZooKeeper Operator.
8. Confirm that all Pulsar Operators are running. You can find the Pods in the **openshift-operators** namespace.
```bash theme={null}
kubectl -n openshift-operators get pods
NAME READY STATUS RESTARTS AGE
bookkeeper-operator-controller-manager-85df68b588-7pblp 2/2 Running 0 4m53s
pulsar-operator-controller-manager-5ff697757c-2pnl2 2/2 Running 0 96s
zookeeper-operator-controller-manager-7655ff7ff6-8mn2z 2/2 Running 0 13s
```
### CLI
This section describes how to deploy Pulsar Operators using the Command Line Interface (CLI) tool.
You can deploy Pulsar Operators with either cluster-scoped permissions or namespace-scoped permissions.
#### Prerequisites
* Install [kubectl](https://kubernetes.io/docs/tasks/tools/#kubectl) v1.16 or higher.
* Install [Helm](https://helm.sh/docs/intro/install/) v3.0 or higher.
* Install the [cert-manager](https://cert-manager.io/docs/installation/).
* Deploy an [OpenShift cluster](https://docs.openshift.com/container-platform/4.7/installing/index.html).
* Prepare the [Pulsar Operators](https://artifacthub.io/packages/helm/streamnative/pulsar-operator) v0.10.3 or higher.
#### Steps
To deploy Pulsar Operators using the CLI tool, you can define the following options in your `values.yaml` YAML file.
```yaml theme={null}
watchNamespace: # --- [1]
: # --- [2]
serviceAccount: # --- [3]
clusterRole: # --- [4]
```
* \[1] `watchNamespace`: describe the namespace where the Controllers watch updates to Pulsar components.
* \[2] ``: represent the component to configure, such as the Pulsar broker, Pulsar Proxy, and so on.
* \[3] `serviceAccount`: provide an identity for processes that run in a Pod.
* \[4] `clusterRole`: describe whether to grant cluster-scoped permissions to the service account. By default, it is set to `true`.
To deploy Pulsar Operators with cluster-scoped permissions, you can set an empty string to the `watchNamespace` option and set the `clusterRole` option to `true`.
This example shows how to deploy Pulsar Operators with cluster-scoped permissions.
1. Create a Kubernetes namespace.
```bash theme={null}
kubectl create namespace
```
2. Install the Pulsar Operators.
The `pulsar-operator` chart provides default values for [options](https://github.com/streamnative/charts/blob/master/charts/pulsar-operator/values.yaml) that are used to install the Pulsar Operators with cluster-scoped permissions. You can customize the file according to your configuration.
```bash theme={null}
helm upgrade pulsar-operators streamnative/pulsar-operator \
--install \
-n
```
3. Confirm that all Pulsar Operators are running.
```bash theme={null}
kubectl get pods -n
NAME READY STATUS RESTARTS AGE
bookkeeper-operator-controller-manager-85df68b588-7pblp 2/2 Running 0 4m53s
pulsar-operator-controller-manager-5ff697757c-2pnl2 2/2 Running 0 96s
zookeeper-operator-controller-manager-7655ff7ff6-8mn2z 2/2 Running 0 13s
```
To deploy Pulsar Operators with namespace-scoped permissions, you can set a value for the `watchNamespace` option and set the `clusterRole` option to `false`.
If the `clusterRole` option is set to `false` and the `watchNamespace` option is not set, the Controller will watch the namespace where Pulsar Operators are deployed.
This example shows how to deploy Pulsar Operators with namespace-scoped permissions.
1. Create a Kubernetes namespace.
* This example shows how to create a Kubernetes namespace `sn-system` for deploying Pulsar Operators.
```bash theme={null}
kubectl create namespace sn-system
```
* This example shows how to create a Kubernetes namespace `app-sn` for deploying StreamNative Platform. The Pulsar Operators will watch this namespace.
```bash theme={null}
kubectl create namespace app-sn
```
2. Define a `values.yaml` YAML file to install Pulsar Operators.
This is a sample YAML file. You should customize the file according to your configuration.
```yaml theme={null}
watchNamespace: app-sn
pulsar:
serviceAccount:
clusterRole: false
bookkeeper:
serviceAccount:
clusterRole: false
zookeeper:
serviceAccount:
clusterRole: false
```
3. Install the Pulsar Operators.
```bash theme={null}
helm upgrade pulsar-operators streamnative/pulsar-operator \
--install \
-n sn-system -f /path/to/values.yaml
```
## Deploy StreamNative Platform Chart
Before deploying StreamNative Platform on OpenShift, you need to install the [Vault Operator](https://banzaicloud.com/docs/bank-vaults/operator/), configure the [Security Context Constraints (SCCs)](https://docs.openshift.com/container-platform/4.6/authentication/managing-security-context-constraints.html#security-context-constraints-about_configuring-internal-oauth), and disable Pulsar monitoring components (including Prometheus, Grafana, and so on).
### Enable OpenShift Security Context Constraints
SCCs allow you to control permissions for the Pulsar Pods. You can either use the default SCC or use an existing SCC.
If you do not have a SCC yet, a SCC is automatically created when you deploy StreamNative Platform using the Helm Chart. You can set the `openshift.scc.create` option to `true` in your `values.yaml` YAML file and then update the resources.
```yaml theme={null}
openshift:
enabled: true
scc:
enabled: true # --- [1]
create: true # --- [2]
```
* \[1] `scc.enabled`: enable SCC for StreamNative Platform.
* \[2] `scc.create`: create a SCC automatically.
If you already have a SCC, you can just reuse it when deploying StreamNative Platform on OpenShift. You can set the `openshift.scc.create` option to `false` and set the name for the `openshift.scc.name` option in your `values.yaml` YAML file and then update the resources.
```yaml theme={null}
openshift:
enabled: true
scc:
enabled: true # --- [1]
create: false # --- [2]
name: 'existing-scc-name' # --- [3]
```
* \[1] `openshift.scc.enabled`: enable SCC for StreamNative Platform.
* \[2] `openshift.scc.create`: create a SCC automatically.
* \[3] `openshift.scc.name`: represent the SCC name.
### Disable monitoring components
OpenShift is shipped with monitoring components. Therefore, you must disable Pulsar monitoring components by using the `monitoring.` option.
```yaml theme={null}
monitoring:
prometheus: false
grafana: false
node_exporter: false
alert_manager: false
loki: false
datadog: false
```
### Examples
This example shows how to deploy StreamNative Platform on OpenShift with the default SCC and namespace-scoped permissions.
1. Create a Kubernetes namespace for your Pulsar cluster.
This example shows how to create a Kubernetes namespace `app-sn` for your Pulsar cluster.
```
kubectl create namespace app-sn
```
2. Define a YAML file.
This is a sample YAML file. You should customize the file according to your configuration.
```yaml theme={null}
openshift:
enabled: true
scc:
enabled: true
create: true
zookeeper:
customTools:
serviceAccount:
clusterRole: false
securityContext:
runAsUser: 0
bookkeeper:
serviceAccount:
clusterRole: false
securityContext:
runAsUser: 0
broker:
serviceAccount:
clusterRole: false
securityContext:
runAsUser: 0
proxy:
securityContext:
runAsUser: 0
vault:
securityContext:
runAsUser: 0
streamnative_console:
securityContext:
runAsUser: 0
serviceAccount:
use: true
create: true
toolset:
securityContext:
runAsUser: 0
functions:
serviceAccount:
clusterRole: false
prometheus:
serviceAccount:
clusterRole: false
monitoring:
prometheus: false
grafana: false
node_exporter: false
alert_manager: false
loki: false
datadog: false
```
3. Apply the YAML file to deploy StreamNative Platform.
```bash theme={null}
helm install -f /path/to/values.yaml streamnative/sn-platform --set initialize=true -n app-sn
```
## Cleanup
Remember to destroy any resources you create after are finished with StreamNative Platform and the Pulsar cluster.
```bash theme={null}
helm uninstall -n
```
7. Repeat Steps 3 through 6 to install the Pulsar Operator, and then repeat the steps for the ZooKeeper Operator.
8. Confirm that all Pulsar Operators are running. You can find the Pods in the **openshift-operators** namespace.
```bash theme={null}
kubectl -n openshift-operators get pods
NAME READY STATUS RESTARTS AGE
bookkeeper-operator-controller-manager-85df68b588-7pblp 2/2 Running 0 4m53s
pulsar-operator-controller-manager-5ff697757c-2pnl2 2/2 Running 0 96s
zookeeper-operator-controller-manager-7655ff7ff6-8mn2z 2/2 Running 0 13s
```
### CLI
This section describes how to deploy Pulsar Operators using the Command Line Interface (CLI) tool.
You can deploy Pulsar Operators with either cluster-scoped permissions or namespace-scoped permissions.
#### Prerequisites
* Install [kubectl](https://kubernetes.io/docs/tasks/tools/#kubectl) v1.16 or higher.
* Install [Helm](https://helm.sh/docs/intro/install/) v3.0 or higher.
* Install the [cert-manager](https://cert-manager.io/docs/installation/).
* Deploy an [OpenShift cluster](https://docs.openshift.com/container-platform/4.7/installing/index.html).
* Prepare the [Pulsar Operators](https://artifacthub.io/packages/helm/streamnative/pulsar-operator) v0.10.3 or higher.
#### Steps
To deploy Pulsar Operators using the CLI tool, you can define the following options in your `values.yaml` YAML file.
```yaml theme={null}
watchNamespace: # --- [1]
: # --- [2]
serviceAccount: # --- [3]
clusterRole: # --- [4]
```
* \[1] `watchNamespace`: describe the namespace where the Controllers watch updates to Pulsar components.
* \[2] ``: represent the component to configure, such as the Pulsar broker, Pulsar Proxy, and so on.
* \[3] `serviceAccount`: provide an identity for processes that run in a Pod.
* \[4] `clusterRole`: describe whether to grant cluster-scoped permissions to the service account. By default, it is set to `true`.
To deploy Pulsar Operators with cluster-scoped permissions, you can set an empty string to the `watchNamespace` option and set the `clusterRole` option to `true`.
This example shows how to deploy Pulsar Operators with cluster-scoped permissions.
1. Create a Kubernetes namespace.
```bash theme={null}
kubectl create namespace
```
2. Install the Pulsar Operators.
The `pulsar-operator` chart provides default values for [options](https://github.com/streamnative/charts/blob/master/charts/pulsar-operator/values.yaml) that are used to install the Pulsar Operators with cluster-scoped permissions. You can customize the file according to your configuration.
```bash theme={null}
helm upgrade pulsar-operators streamnative/pulsar-operator \
--install \
-n
```
3. Confirm that all Pulsar Operators are running.
```bash theme={null}
kubectl get pods -n
NAME READY STATUS RESTARTS AGE
bookkeeper-operator-controller-manager-85df68b588-7pblp 2/2 Running 0 4m53s
pulsar-operator-controller-manager-5ff697757c-2pnl2 2/2 Running 0 96s
zookeeper-operator-controller-manager-7655ff7ff6-8mn2z 2/2 Running 0 13s
```
To deploy Pulsar Operators with namespace-scoped permissions, you can set a value for the `watchNamespace` option and set the `clusterRole` option to `false`.
If the `clusterRole` option is set to `false` and the `watchNamespace` option is not set, the Controller will watch the namespace where Pulsar Operators are deployed.
This example shows how to deploy Pulsar Operators with namespace-scoped permissions.
1. Create a Kubernetes namespace.
* This example shows how to create a Kubernetes namespace `sn-system` for deploying Pulsar Operators.
```bash theme={null}
kubectl create namespace sn-system
```
* This example shows how to create a Kubernetes namespace `app-sn` for deploying StreamNative Platform. The Pulsar Operators will watch this namespace.
```bash theme={null}
kubectl create namespace app-sn
```
2. Define a `values.yaml` YAML file to install Pulsar Operators.
This is a sample YAML file. You should customize the file according to your configuration.
```yaml theme={null}
watchNamespace: app-sn
pulsar:
serviceAccount:
clusterRole: false
bookkeeper:
serviceAccount:
clusterRole: false
zookeeper:
serviceAccount:
clusterRole: false
```
3. Install the Pulsar Operators.
```bash theme={null}
helm upgrade pulsar-operators streamnative/pulsar-operator \
--install \
-n sn-system -f /path/to/values.yaml
```
## Deploy StreamNative Platform Chart
Before deploying StreamNative Platform on OpenShift, you need to install the [Vault Operator](https://banzaicloud.com/docs/bank-vaults/operator/), configure the [Security Context Constraints (SCCs)](https://docs.openshift.com/container-platform/4.6/authentication/managing-security-context-constraints.html#security-context-constraints-about_configuring-internal-oauth), and disable Pulsar monitoring components (including Prometheus, Grafana, and so on).
### Enable OpenShift Security Context Constraints
SCCs allow you to control permissions for the Pulsar Pods. You can either use the default SCC or use an existing SCC.
If you do not have a SCC yet, a SCC is automatically created when you deploy StreamNative Platform using the Helm Chart. You can set the `openshift.scc.create` option to `true` in your `values.yaml` YAML file and then update the resources.
```yaml theme={null}
openshift:
enabled: true
scc:
enabled: true # --- [1]
create: true # --- [2]
```
* \[1] `scc.enabled`: enable SCC for StreamNative Platform.
* \[2] `scc.create`: create a SCC automatically.
If you already have a SCC, you can just reuse it when deploying StreamNative Platform on OpenShift. You can set the `openshift.scc.create` option to `false` and set the name for the `openshift.scc.name` option in your `values.yaml` YAML file and then update the resources.
```yaml theme={null}
openshift:
enabled: true
scc:
enabled: true # --- [1]
create: false # --- [2]
name: 'existing-scc-name' # --- [3]
```
* \[1] `openshift.scc.enabled`: enable SCC for StreamNative Platform.
* \[2] `openshift.scc.create`: create a SCC automatically.
* \[3] `openshift.scc.name`: represent the SCC name.
### Disable monitoring components
OpenShift is shipped with monitoring components. Therefore, you must disable Pulsar monitoring components by using the `monitoring.` option.
```yaml theme={null}
monitoring:
prometheus: false
grafana: false
node_exporter: false
alert_manager: false
loki: false
datadog: false
```
### Examples
This example shows how to deploy StreamNative Platform on OpenShift with the default SCC and namespace-scoped permissions.
1. Create a Kubernetes namespace for your Pulsar cluster.
This example shows how to create a Kubernetes namespace `app-sn` for your Pulsar cluster.
```
kubectl create namespace app-sn
```
2. Define a YAML file.
This is a sample YAML file. You should customize the file according to your configuration.
```yaml theme={null}
openshift:
enabled: true
scc:
enabled: true
create: true
zookeeper:
customTools:
serviceAccount:
clusterRole: false
securityContext:
runAsUser: 0
bookkeeper:
serviceAccount:
clusterRole: false
securityContext:
runAsUser: 0
broker:
serviceAccount:
clusterRole: false
securityContext:
runAsUser: 0
proxy:
securityContext:
runAsUser: 0
vault:
securityContext:
runAsUser: 0
streamnative_console:
securityContext:
runAsUser: 0
serviceAccount:
use: true
create: true
toolset:
securityContext:
runAsUser: 0
functions:
serviceAccount:
clusterRole: false
prometheus:
serviceAccount:
clusterRole: false
monitoring:
prometheus: false
grafana: false
node_exporter: false
alert_manager: false
loki: false
datadog: false
```
3. Apply the YAML file to deploy StreamNative Platform.
```bash theme={null}
helm install -f /path/to/values.yaml streamnative/sn-platform --set initialize=true -n app-sn
```
## Cleanup
Remember to destroy any resources you create after are finished with StreamNative Platform and the Pulsar cluster.
```bash theme={null}
helm uninstall -n
```