> ## Documentation Index
> Fetch the complete documentation index at: https://docs.streamnative.io/llms.txt
> Use this file to discover all available pages before exploring further.
> The Snowflake sink connector is used to write messages from Apache Pulsar topics to Snowflake tables with snowpipe streaming.
# Snowflake streaming
This connector is available as a built-in connector on StreamNative Cloud.
The [Snowflake](https://www.snowflake.com/) streaming sink connector pulls data from Pulsar topics and persists data to
Snowflake based on the SnowPipe Streaming feature. For more information about connectors,
see [Connector Overview](https://docs.streamnative.io/docs/connector-overview).
 * For a quick start on setting up and using the connector, refer to the [Quick Start](#quick-start) section. It provides
a step-by-step guide to get you up and running quickly.
* To understand the internal workings of the connector, see the [Data Sink Workflow](#data-sink-workflow). This section
explains how data flows from Pulsar to Snowflake.
* The Pulsar Snowflake Streaming Sink Connector supports exactly-once semantics, ensuring data is processed without
duplication. Learn how this is achieved in the [Exactly-Once Semantics](#exactly-once-semantics) section.
* For insights into how the connector maintains reliability and handles errors, check
the [Fault Tolerance](#fault-tolerance) section. It describes mechanisms for recovering from failures.
* To learn how to configure the connector to suit your needs, see the [Configuration](#configuration) section. It
provides details on all available settings and options.
* For instructions on how to sink data into an Iceberg table, visit
the [Sink Data into the Iceberg Table](#sink-data-into-the-iceberg-table) section. This part covers the steps required
to integrate with Iceberg tables.
## Quick start
This section introduces how to get started with creating a Snowflake streaming sink connector and get it up and
running.
### Prerequisites
The prerequisites for connecting a Snowflake streaming sink connector to external systems include:
1. Prepare a snowflake account
2. Get the account URL from the `Admin - Accounts` page and click the link. It should be the format like
`https://.snowflakecomputing.com`.
3. Generate the public key and private key for the authentication. For more details, please
check [this guide](https://docs.snowflake.com/en/user-guide/key-pair-auth#step-1-generate-the-private-key)
```sh theme={null}
openssl genrsa 2048 | openssl pkcs8 -topk8 -inform PEM -out rsa_key.p8 -nocrypt
openssl rsa -in rsa_key.p8 -pubout -out rsa_key.pub
```
It will generate `rsa_key.p8` (the private key) and `rsa_key.pub` (the public key) locally.
4. Log in and configure the public key.
See [Installing SnowSQL](https://docs.snowflake.com/en/user-guide/snowsql-install-config) to install the SnowSQL.
```sh theme={null}
snowsql -a ${account_identifier} -u ${user_name}
```
The `-a` is followed by an account identifier, which is a substring of the account URL before. The `-u` is followed
by your username. After logging in, set the public key passphrase:
```sh theme={null}
ALTER USER ${user_name} SET RSA_PUBLIC_KEY='MIIBIjA...';
```
You can get the public key passphrase `(MIIBIjA…)` by running the following command:
```sh theme={null}
grep -v "\-\-\-" rsa_key.pub | tr -d '\n'
```
### 1. Create Snowflake objects and grant permission
Before creating the connector, you need to grant the permissions in Snowflake. Write the following content into a file,
e.g. name it with `grant.sql`. The script creates a user `snservice` that will be used in the sink config later and
associate it with a role `snrole` that is only used in Snowflake internally. Then it grants the necessary permissions.
```snowsql theme={null}
CREATE DATABASE st_tuts;
CREATE SCHEMA st_tuts.demo;
CREATE ROLE snrole;
GRANT ALL PRIVILEGES ON DATABASE st_tuts TO ROLE snrole;
GRANT ALL PRIVILEGES ON SCHEMA st_tuts.demo TO ROLE snrole;
CREATE USER snservice;
GRANT ROLE snrole TO USER snservice;
ALTER USER snservice SET DEFAULT_ROLE = snrole;
ALTER USER snservice SET RSA_PUBLIC_KEY = 'MIIBI...';
```
Then run the following command to execute the SQL script above.
```sh theme={null}
snowsql -a ${account_identifier} -u ${user_name} -f grant.sql
```
### 2. Create a connector
The following command shows how to use [pulsarctl](https://github.com/streamnative/pulsarctl) to create a `builtin`
connector. If you want to create a `non-builtin` connector,
you need to replace `--sink-type snowflake` with `--archive /path/to/pulsar-io-snowflake.nar`. You can find the button
to download the `nar` package at the beginning of the document.
If you are a StreamNative Cloud user, you
need [set up your environment](https://docs.streamnative.io/docs/connector-setup) first.
```bash theme={null}
pulsarctl sinks create \
--sink-type snowflake-streaming \
--name snowflake \
--tenant public \
--namespace default \
--retain-ordering \
--inputs "Your topic name" \
--parallelism 1 \
--sink-config \
'{
"user": "SNSERVICE",
"url": "https://.snowflakecomputing.com",
"schema": "demo",
"database": "st_tuts",
"privateKey": "...",
"role": "snrole",
"warehouse": "compute_wh"
}'
```
The `--sink-config` is the minimum necessary configuration for starting this connector, and it is a JSON string. You
need to substitute the relevant parameters with your own.
You can get the private key passphrase `(MIIBIjA…)` by running the following command:
```sh theme={null}
grep -v '\-\-\-' rsa_key.p8 | tr -d '\n'
```
If you want to configure more parameters, see [Configuration](#configuration) for reference.
You can also choose to use a variety of other tools to create a connector:
* [pulsar-admin](https://pulsar.apache.org/docs/3.1.x/io-use/): The command arguments for `pulsar-admin` are similar to
those of `pulsarctl`. You can find an example
for [StreamNative Cloud Doc](https://docs.streamnative.io/docs/connector-create#create-a-built-in-connector).
* [RestAPI](https://pulsar.apache.org/sink-rest-api/?version=3.1.1): You can find an example
for [StreamNative Cloud Doc](https://docs.streamnative.io/docs/connector-create#create-a-built-in-connector).
* [Terraform](https://github.com/hashicorp/terraform): You can find an example
for [StreamNative Cloud Doc](https://docs.streamnative.io/docs/connector-create#create-a-built-in-connector).
* [Function Mesh](https://functionmesh.io/docs/connectors/run-connector): The docker image can be found at the beginning
of the document.
### 3. Send messages to the topic
If your connector is created on StreamNative Cloud, you need to authenticate your clients.
See [Build applications using Pulsar clients](https://docs.streamnative.io/docs/qs-connect#jumpstart-for-beginners) for
more information.
```java theme={null}
@Data
public static class TestMessage {
private long index;
}
PulsarClient client = PulsarClient.builder()
.serviceUrl("{{Your Pulsar URL}}")
.build();
var producer = client.newProducer(Schema.JSON(TestMessage.class))
.topic("{{Your topic name}}")
.create();
for (int i = 0; i < 10; i++) {
TestMessage msg = new TestMessage();
msg.index = i;
MessageId msgID = producer.send(msg);
System.out.println("Publish " + message + " and message ID " + msgID);
}
producer.flush();
producer.close();
client.close();
```
### 4. Check the data on Snowflake table
First, you need to execute the following SQL command to grant the role `SNROLE` to the user you logged in.
```sh theme={null}
GRANT ROLE SNROLE TO USER ${account_name};
```
Then, switch the role to `SNROLE`, under `Data - Database - ST_TUTS - DEMO - Tables` you will find table
`PERSISTENT___PUBLIC_DEFAULT_INPUT_SNOWFLAKE_1118738946` is created and records the messages produced above.
## Configuration
This table outlines all the properties and the descriptions.
| Name | Type | Required | Sensitive | Default | Description |
| --------------------------------- | ------- | -------- | --------- | ------------------------------------------- | ------------------------------------------------------------------------------------------------------------------------------------------------------------------------------------------------------------------------------------- |
| `url` | String | Yes | false | "" (empty string) | The URL for accessing your Snowflake account. This URL must include your account identifier. The protocol (https\://) and port number are optional. |
| `user` | String | Yes | false | "" (empty string) | User login name for the Snowflake account. |
| `database` | String | Yes | false | "" (empty string) | The database in Snowflake where the connector will sink data. |
| `schema` | String | Yes | false | "" (empty string) | The schema in Snowflake where the connector will sink data. |
| `role` | String | Yes | false | "" (empty string) | Access control role to use when inserting rows into the table. |
| `warehouse` | String | No | false | "" (empty string) | The warehouse name in Snowflake. Defaults to empty. |
| `privateKey` | String | Yes | true | "" (empty string) | The private key of the user. This is sensitive information used for authentication. |
| `topic2table` | String | No | false | "" (empty string) | Optional parameter to map topics to tables. Separate each topic and table with a colon. Use fully qualified Pulsar topic names or regex. For example: "persistent://public/default/test:table" Each topic must match only one table." |
| `metadataFields` | String | No | false | "message\_id,partition,topic,publish\_time" | The metadata fields for each Snowflake record. Separate multiple fields with commas. Supported fields: schema\_version, partition, event\_time, publish\_time, message\_id, sequence\_id, producer\_name, topic. |
| `icebergEnabled` | boolean | No | false | false | Enable the Iceberg table format. Defaults to false. |
| `maxClientLag` | long | No | false | 1 | Specifies how often Snowflake Ingest SDK flushes data to Snowflake, in seconds. Specify it to 0 or leave it empty to let the connector decide the value. For how the connector decide this value, see section `Ingestion Latency`. |
| `checkCommittedMessageIntervalMs` | long | No | false | 1000 | Specifies how often the connector checks for committed messages, in milliseconds. |
| `enableSchematization` | boolean | No | false | true | Enable schema detection and evolution. Defaults to true. |
While running the connector, please make sure the retain ordering is enabled: `retainOrdering=true`. If you create the
connector on SNCloud, retain ordering is enabled by default and cannot be
disabled. For why retain ordering is necessary, see [Data sink workflow](#data-sink-workflow).
### Authentication
The Snowflake streaming sink connector supports authenticating with Snowflake using a private key. Please complete the
key pair authentication instructions described
in [Snowflake key pair rotation](https://docs.snowflake.com/en/user-guide/key-pair-auth). After that, you can get copy
the entire private key and set it into the configuration `privateKey`.
If you are setting up the connector on the SNCloud UI, you need to create a secret to store the private key. The private
key should not have any headers or footers; it must be a base64 encoded string.
You can get your private key using the following command:
```shell theme={null}
grep -v '\-\-\-' rsa_key.p8 | tr -d '\n'
```
### Table name mapping
When using the Pulsar Snowflake Streaming Connector, Pulsar topics can be mapped to existing Snowflake tables. If no
mapping is specified, the connector will create a new table for each topic based on the topic's name. Note that if the
`icebergEnabled` is true, the connector won't create the table and will throw an exception if the table is not exist.
The connector converts the topic name into a valid Snowflake table name using the following rules:
1. Lowercase topic names are converted to uppercase for table names.
2. If the first character of the topic name is not a letter (a-z, A-Z) or an underscore (\_), an underscore is added at
the beginning of the table name.
3. Any character in the topic name that is not valid for a Snowflake table name is replaced with an underscore. For more
information on valid characters,
see [Snowflake's identifier requirements](https://docs.snowflake.com/en/sql-reference/identifiers-syntax). For
example, the topic name `test-topic` would become `TEST_TOPIC`.
Be aware that if the connector modifies the topic name to create a table, there could be duplicate table names within
the same schema. For example, topics named `numbers+x` and `numbers-x` would both become `NUMBERS_X`. To prevent
duplication, the connector appends a unique suffix to the table name, consisting of an underscore and a generated hash
code.
You can use the configuration parameter `topic2table` to specify a mapping between topics and tables. The parameter
value is a comma-separated list of topic-table pairs, where each pair is separated by a colon. For example:
```yaml theme={null}
topic2table: "persistent://public/default/topic1:table1,persistent://public/default/topic2:table2"
```
Also, you can use the regex to match multiple topics to one table. For example:
```yaml theme={null}
topic2table: ".*:table"
```
### Schema detection and evolution
The Connector offers support for schema detection and evolution. Snowflake
table structures can be automatically defined and adjusted to accommodate new data structures
loaded by the connector. To enable schema detection and evolution for this setup, configure the following configuration:
```yaml theme={null}
enableSchematization: true
```
The schema detection and evolution is only enabled if both the `enableSchematization` is true and the table has the
`ENABLE_SCHEMA_EVOLUTION` enabled. You can set it by running the following SQL command:
```snowsql theme={null}
ALTER TABLE SET ENABLE_SCHEMA_EVOLUTION = TRUE;
```
For more information of this configuration, please
see [Table schema evolution](https://docs.snowflake.com/en/user-guide/data-load-schema-evolution).
Without schema detection and evolution, the Snowflake table loaded by the Pulsar connector contains only two VARIANT
columns: RECORD\_CONTENT and RECORD\_METADATA. When schema detection and evolution is enabled, Snowflake can
automatically identify the schema of streaming data and load it into tables that align with any user-defined schema.
Additionally, Snowflake allows for the addition of new columns or the removal of the NOT NULL constraint from columns
absent in new data files.
Please see more information about the schema in the [Schema](#schema) section.
Before schema detection and evolution is enabled, the table only consists of two VARIANT columns, RECORD\_CONTENT and
RECORD\_METADATA, as the following example demonstrates.
```
+------+---------------------------------------------------------+---------------------------------------------------+
| Row | RECORD_METADATA | RECORD_CONTENT |
|------+---------------------------------------------------------+---------------------------------------------------|
| 1 |{"message_id": "691:0:0:0", "partition": 0, "topic": "...| "account": "ABC123", "symbol": "ZTEST", "side":...|
| 2 |{"message_id": "691:0:0:1", "partition": 0, "topic": "...| "account": "XYZ789", "symbol": "ZABZX", "side":...|
| 3 |{"message_id": "691:0:0:2", "partition": 0, "topic": "...| "account": "XYZ789", "symbol": "ZTEST", "side":...|
| 4 |{"message_id": "691:0:0:3", "partition": 0, "topic": "...| "account": "ABC123", "symbol": "ZABZX", "side":...|
| 5 |{"message_id": "691:0:0:4", "partition": 0, "topic": "...| "account": "ABC123", "symbol": "ZTEST", "side":...|
+------+---------------------------------------------------------+---------------------------------------------------|
```
After schema detection and evolution is enabled, the table contains the columns that match the user-defined schema. The
table can also automatically evolve to support the structure of new data loaded by the connector.
```
+------+---------------------------------------------------------+---------+--------+-------+----------+
| Row | RECORD_METADATA | ACCOUNT | SYMBOL | SIDE | QUANTITY |
|------+---------------------------------------------------------+---------+--------+-------+----------|
| 1 |{"message_id": "691:0:0:0", "partition": 0, "topic": "...| ABC123 | ZTEST | BUY | 3572 |
| 2 |{"message_id": "691:0:0:1", "partition": 0, "topic": "...| XYZ789 | ZABZX | SELL | 3024 |
| 3 |{"message_id": "691:0:0:2", "partition": 0, "topic": "...| XYZ789 | ZTEST | SELL | 799 |
| 4 |{"message_id": "691:0:0:3", "partition": 0, "topic": "...| ABC123 | ZABZX | BUY | 2033 |
| 5 |{"message_id": "691:0:0:4", "partition": 0, "topic": "...| ABC123 | ZTEST | BUY | 1558 |
+------+---------------------------------------------------------+---------+--------+-------+----------|
```
### Ingestion Latency
There are two configuration parameters determining the ingestion latency of the Snowflake streaming sink connector:
* `maxClientLag`: This parameter specifies how often the Snowflake Ingest SDK flushes data to Snowflake, in seconds. If
you find the delay for the connector to load data to the Snowflake table too long,
you can reduce this value. However, setting it too low will result in more frequent data flush operations and result
in a worse query performance. For more instruction for configuring the `maxClientLag`, please
see [Latency recommendations¶](https://docs.snowflake.com/en/user-guide/data-load-snowpipe-streaming-recommendation#label-snowpipe-streaming-recommendations-latency).
* Specify it to 0 or leave it empty to let the connector decide the value based on the table type:
* For the standard snowflake table, the default value is 1 second.
* For the Iceberg table, the default value is 30 seconds.
* `checkCommittedMessageIntervalMs`: This parameter specifies how often the connector checks for committed messages and
acknowledge them in the Pulsar, in milliseconds. The default value is 1 second.
## Data sink workflow
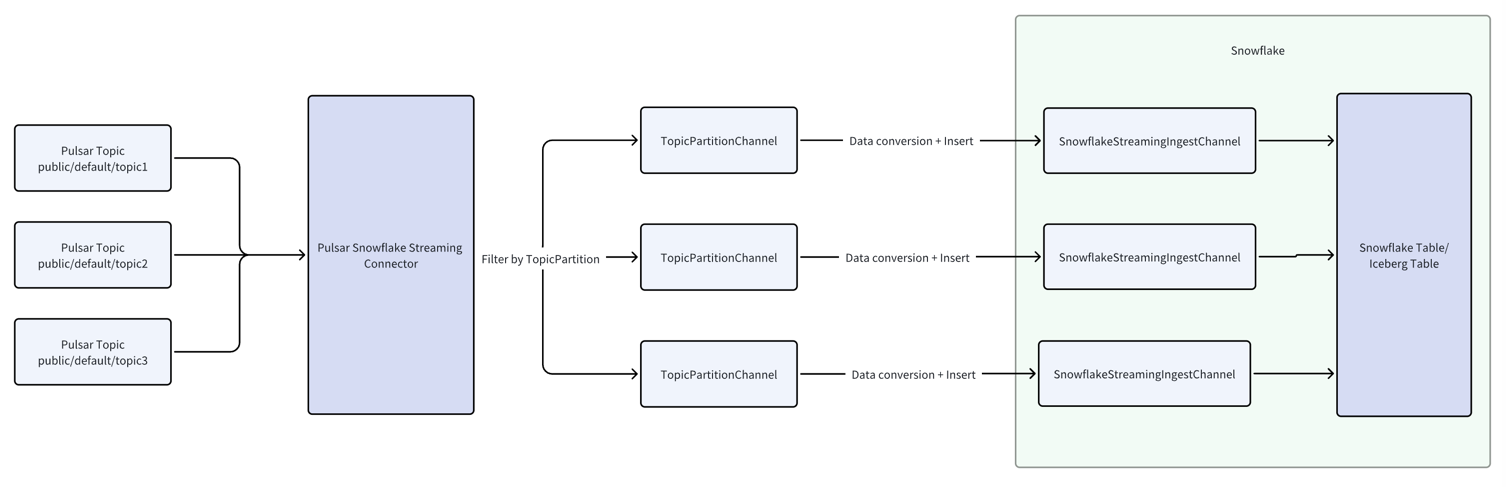
The diagram below illustrates the data sink flow for the Pulsar Snowflake Streaming connector:
1. The connector subscribes to multiple user-specified topics and consumes messages from them.
2. It filters messages by topic-partition and forwards them to the corresponding TopicPartitionChannel. Each
TopicPartitionChannel corresponds to a topic-partition. The connector creates a Snowflake Streaming Ingest channel
for
each TopicPartitionChannel to ingest data into Snowflake. For example, if there is a partitioned topic `test-topic`
with 3 partitions, the connector will create 3 TopicPartitionChannels: `test-topic-partition-0`,
`test-topic-partition-1`, and `test-topic-partition-2`.
3. Within each TopicPartitionChannel, the RecordService converts messages into Snowflake records and inserts them into
the Snowflake Streaming Ingest channel, which then ingests the data into Snowflake.
Please note that this workflow requires message order to be maintained, ensuring that a topic-partition's
TopicPartitionChannel exists only in one connector instance. Therefore, the connector must have the retain ordering
configuration enabled. If you create the connector on SNCloud, retain ordering is enabled by default and cannot be
disabled.
For more information for how Snowflake Channel works, please
see [Snowflake Channel](https://docs.snowflake.com/en/user-guide/data-load-snowpipe-streaming-overview#channels).
## Exactly-once semantics
Currently, the Snowflake streaming sink connector supports the `exactly-once` delivery guarantee semantic.
Exactly-once semantics ensure the delivery of Pulsar messages without duplication or data loss.
The connector uses a one-to-one mapping between partitions and channels, utilizing the Message ID and the Snowflake
Channel Offset Token to achieve exactly-once semantics. For more information,
see [Snowflake Offset Token](https://docs.snowflake.com/en/user-guide/data-load-snowpipe-streaming-overview#offset-tokens).
The connector uses the Message ID as the offset token. For instance, the message ID `0:4:1:3` (Ledger ID: 0; Entry ID:
4; Partition Index: 1; Batch Index: 3) is converted to the offset token `0:4:1`, discarding the partition index. This
offset token is used each time messages are inserted into Snowflake. When the Snowflake SDK flushes the data, the last
committed offset token of the channel is updated, and the connector retrieves it from the SDK.
With `retainOrdering` enabled, the connector ensures that messages in each TopicPartitionChannel are received in order
without skips.
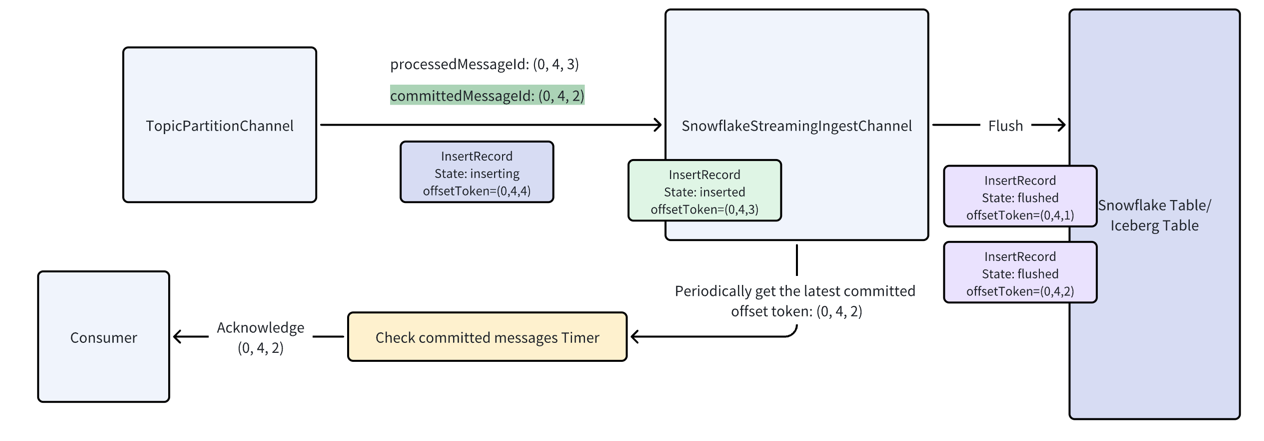
When opening each TopicPartitionChannel, the Snowflake Streaming Ingest channel is opened, retrieving the last committed
offset token, which is stored as `committedMessageId`. Another variable, `processedMessageId`, is updated after each
data insert. The connector discards all messages before the current `processedMessageId`. It periodically checks the
last committed offset token and updates `lastCommittedMessageId`, acknowledging all committed messages if
`lastCommittedMessageId` changes.
Here is an example diagram to show how it works:
Suppose the current `processMessageId` and the `lastCommittedMessageId` are both `0:4:0`.
* For a quick start on setting up and using the connector, refer to the [Quick Start](#quick-start) section. It provides
a step-by-step guide to get you up and running quickly.
* To understand the internal workings of the connector, see the [Data Sink Workflow](#data-sink-workflow). This section
explains how data flows from Pulsar to Snowflake.
* The Pulsar Snowflake Streaming Sink Connector supports exactly-once semantics, ensuring data is processed without
duplication. Learn how this is achieved in the [Exactly-Once Semantics](#exactly-once-semantics) section.
* For insights into how the connector maintains reliability and handles errors, check
the [Fault Tolerance](#fault-tolerance) section. It describes mechanisms for recovering from failures.
* To learn how to configure the connector to suit your needs, see the [Configuration](#configuration) section. It
provides details on all available settings and options.
* For instructions on how to sink data into an Iceberg table, visit
the [Sink Data into the Iceberg Table](#sink-data-into-the-iceberg-table) section. This part covers the steps required
to integrate with Iceberg tables.
## Quick start
This section introduces how to get started with creating a Snowflake streaming sink connector and get it up and
running.
### Prerequisites
The prerequisites for connecting a Snowflake streaming sink connector to external systems include:
1. Prepare a snowflake account
2. Get the account URL from the `Admin - Accounts` page and click the link. It should be the format like
`https://.snowflakecomputing.com`.
3. Generate the public key and private key for the authentication. For more details, please
check [this guide](https://docs.snowflake.com/en/user-guide/key-pair-auth#step-1-generate-the-private-key)
```sh theme={null}
openssl genrsa 2048 | openssl pkcs8 -topk8 -inform PEM -out rsa_key.p8 -nocrypt
openssl rsa -in rsa_key.p8 -pubout -out rsa_key.pub
```
It will generate `rsa_key.p8` (the private key) and `rsa_key.pub` (the public key) locally.
4. Log in and configure the public key.
See [Installing SnowSQL](https://docs.snowflake.com/en/user-guide/snowsql-install-config) to install the SnowSQL.
```sh theme={null}
snowsql -a ${account_identifier} -u ${user_name}
```
The `-a` is followed by an account identifier, which is a substring of the account URL before. The `-u` is followed
by your username. After logging in, set the public key passphrase:
```sh theme={null}
ALTER USER ${user_name} SET RSA_PUBLIC_KEY='MIIBIjA...';
```
You can get the public key passphrase `(MIIBIjA…)` by running the following command:
```sh theme={null}
grep -v "\-\-\-" rsa_key.pub | tr -d '\n'
```
### 1. Create Snowflake objects and grant permission
Before creating the connector, you need to grant the permissions in Snowflake. Write the following content into a file,
e.g. name it with `grant.sql`. The script creates a user `snservice` that will be used in the sink config later and
associate it with a role `snrole` that is only used in Snowflake internally. Then it grants the necessary permissions.
```snowsql theme={null}
CREATE DATABASE st_tuts;
CREATE SCHEMA st_tuts.demo;
CREATE ROLE snrole;
GRANT ALL PRIVILEGES ON DATABASE st_tuts TO ROLE snrole;
GRANT ALL PRIVILEGES ON SCHEMA st_tuts.demo TO ROLE snrole;
CREATE USER snservice;
GRANT ROLE snrole TO USER snservice;
ALTER USER snservice SET DEFAULT_ROLE = snrole;
ALTER USER snservice SET RSA_PUBLIC_KEY = 'MIIBI...';
```
Then run the following command to execute the SQL script above.
```sh theme={null}
snowsql -a ${account_identifier} -u ${user_name} -f grant.sql
```
### 2. Create a connector
The following command shows how to use [pulsarctl](https://github.com/streamnative/pulsarctl) to create a `builtin`
connector. If you want to create a `non-builtin` connector,
you need to replace `--sink-type snowflake` with `--archive /path/to/pulsar-io-snowflake.nar`. You can find the button
to download the `nar` package at the beginning of the document.
If you are a StreamNative Cloud user, you
need [set up your environment](https://docs.streamnative.io/docs/connector-setup) first.
```bash theme={null}
pulsarctl sinks create \
--sink-type snowflake-streaming \
--name snowflake \
--tenant public \
--namespace default \
--retain-ordering \
--inputs "Your topic name" \
--parallelism 1 \
--sink-config \
'{
"user": "SNSERVICE",
"url": "https://.snowflakecomputing.com",
"schema": "demo",
"database": "st_tuts",
"privateKey": "...",
"role": "snrole",
"warehouse": "compute_wh"
}'
```
The `--sink-config` is the minimum necessary configuration for starting this connector, and it is a JSON string. You
need to substitute the relevant parameters with your own.
You can get the private key passphrase `(MIIBIjA…)` by running the following command:
```sh theme={null}
grep -v '\-\-\-' rsa_key.p8 | tr -d '\n'
```
If you want to configure more parameters, see [Configuration](#configuration) for reference.
You can also choose to use a variety of other tools to create a connector:
* [pulsar-admin](https://pulsar.apache.org/docs/3.1.x/io-use/): The command arguments for `pulsar-admin` are similar to
those of `pulsarctl`. You can find an example
for [StreamNative Cloud Doc](https://docs.streamnative.io/docs/connector-create#create-a-built-in-connector).
* [RestAPI](https://pulsar.apache.org/sink-rest-api/?version=3.1.1): You can find an example
for [StreamNative Cloud Doc](https://docs.streamnative.io/docs/connector-create#create-a-built-in-connector).
* [Terraform](https://github.com/hashicorp/terraform): You can find an example
for [StreamNative Cloud Doc](https://docs.streamnative.io/docs/connector-create#create-a-built-in-connector).
* [Function Mesh](https://functionmesh.io/docs/connectors/run-connector): The docker image can be found at the beginning
of the document.
### 3. Send messages to the topic
If your connector is created on StreamNative Cloud, you need to authenticate your clients.
See [Build applications using Pulsar clients](https://docs.streamnative.io/docs/qs-connect#jumpstart-for-beginners) for
more information.
```java theme={null}
@Data
public static class TestMessage {
private long index;
}
PulsarClient client = PulsarClient.builder()
.serviceUrl("{{Your Pulsar URL}}")
.build();
var producer = client.newProducer(Schema.JSON(TestMessage.class))
.topic("{{Your topic name}}")
.create();
for (int i = 0; i < 10; i++) {
TestMessage msg = new TestMessage();
msg.index = i;
MessageId msgID = producer.send(msg);
System.out.println("Publish " + message + " and message ID " + msgID);
}
producer.flush();
producer.close();
client.close();
```
### 4. Check the data on Snowflake table
First, you need to execute the following SQL command to grant the role `SNROLE` to the user you logged in.
```sh theme={null}
GRANT ROLE SNROLE TO USER ${account_name};
```
Then, switch the role to `SNROLE`, under `Data - Database - ST_TUTS - DEMO - Tables` you will find table
`PERSISTENT___PUBLIC_DEFAULT_INPUT_SNOWFLAKE_1118738946` is created and records the messages produced above.
## Configuration
This table outlines all the properties and the descriptions.
| Name | Type | Required | Sensitive | Default | Description |
| --------------------------------- | ------- | -------- | --------- | ------------------------------------------- | ------------------------------------------------------------------------------------------------------------------------------------------------------------------------------------------------------------------------------------- |
| `url` | String | Yes | false | "" (empty string) | The URL for accessing your Snowflake account. This URL must include your account identifier. The protocol (https\://) and port number are optional. |
| `user` | String | Yes | false | "" (empty string) | User login name for the Snowflake account. |
| `database` | String | Yes | false | "" (empty string) | The database in Snowflake where the connector will sink data. |
| `schema` | String | Yes | false | "" (empty string) | The schema in Snowflake where the connector will sink data. |
| `role` | String | Yes | false | "" (empty string) | Access control role to use when inserting rows into the table. |
| `warehouse` | String | No | false | "" (empty string) | The warehouse name in Snowflake. Defaults to empty. |
| `privateKey` | String | Yes | true | "" (empty string) | The private key of the user. This is sensitive information used for authentication. |
| `topic2table` | String | No | false | "" (empty string) | Optional parameter to map topics to tables. Separate each topic and table with a colon. Use fully qualified Pulsar topic names or regex. For example: "persistent://public/default/test:table" Each topic must match only one table." |
| `metadataFields` | String | No | false | "message\_id,partition,topic,publish\_time" | The metadata fields for each Snowflake record. Separate multiple fields with commas. Supported fields: schema\_version, partition, event\_time, publish\_time, message\_id, sequence\_id, producer\_name, topic. |
| `icebergEnabled` | boolean | No | false | false | Enable the Iceberg table format. Defaults to false. |
| `maxClientLag` | long | No | false | 1 | Specifies how often Snowflake Ingest SDK flushes data to Snowflake, in seconds. Specify it to 0 or leave it empty to let the connector decide the value. For how the connector decide this value, see section `Ingestion Latency`. |
| `checkCommittedMessageIntervalMs` | long | No | false | 1000 | Specifies how often the connector checks for committed messages, in milliseconds. |
| `enableSchematization` | boolean | No | false | true | Enable schema detection and evolution. Defaults to true. |
While running the connector, please make sure the retain ordering is enabled: `retainOrdering=true`. If you create the
connector on SNCloud, retain ordering is enabled by default and cannot be
disabled. For why retain ordering is necessary, see [Data sink workflow](#data-sink-workflow).
### Authentication
The Snowflake streaming sink connector supports authenticating with Snowflake using a private key. Please complete the
key pair authentication instructions described
in [Snowflake key pair rotation](https://docs.snowflake.com/en/user-guide/key-pair-auth). After that, you can get copy
the entire private key and set it into the configuration `privateKey`.
If you are setting up the connector on the SNCloud UI, you need to create a secret to store the private key. The private
key should not have any headers or footers; it must be a base64 encoded string.
You can get your private key using the following command:
```shell theme={null}
grep -v '\-\-\-' rsa_key.p8 | tr -d '\n'
```
### Table name mapping
When using the Pulsar Snowflake Streaming Connector, Pulsar topics can be mapped to existing Snowflake tables. If no
mapping is specified, the connector will create a new table for each topic based on the topic's name. Note that if the
`icebergEnabled` is true, the connector won't create the table and will throw an exception if the table is not exist.
The connector converts the topic name into a valid Snowflake table name using the following rules:
1. Lowercase topic names are converted to uppercase for table names.
2. If the first character of the topic name is not a letter (a-z, A-Z) or an underscore (\_), an underscore is added at
the beginning of the table name.
3. Any character in the topic name that is not valid for a Snowflake table name is replaced with an underscore. For more
information on valid characters,
see [Snowflake's identifier requirements](https://docs.snowflake.com/en/sql-reference/identifiers-syntax). For
example, the topic name `test-topic` would become `TEST_TOPIC`.
Be aware that if the connector modifies the topic name to create a table, there could be duplicate table names within
the same schema. For example, topics named `numbers+x` and `numbers-x` would both become `NUMBERS_X`. To prevent
duplication, the connector appends a unique suffix to the table name, consisting of an underscore and a generated hash
code.
You can use the configuration parameter `topic2table` to specify a mapping between topics and tables. The parameter
value is a comma-separated list of topic-table pairs, where each pair is separated by a colon. For example:
```yaml theme={null}
topic2table: "persistent://public/default/topic1:table1,persistent://public/default/topic2:table2"
```
Also, you can use the regex to match multiple topics to one table. For example:
```yaml theme={null}
topic2table: ".*:table"
```
### Schema detection and evolution
The Connector offers support for schema detection and evolution. Snowflake
table structures can be automatically defined and adjusted to accommodate new data structures
loaded by the connector. To enable schema detection and evolution for this setup, configure the following configuration:
```yaml theme={null}
enableSchematization: true
```
The schema detection and evolution is only enabled if both the `enableSchematization` is true and the table has the
`ENABLE_SCHEMA_EVOLUTION` enabled. You can set it by running the following SQL command:
```snowsql theme={null}
ALTER TABLE SET ENABLE_SCHEMA_EVOLUTION = TRUE;
```
For more information of this configuration, please
see [Table schema evolution](https://docs.snowflake.com/en/user-guide/data-load-schema-evolution).
Without schema detection and evolution, the Snowflake table loaded by the Pulsar connector contains only two VARIANT
columns: RECORD\_CONTENT and RECORD\_METADATA. When schema detection and evolution is enabled, Snowflake can
automatically identify the schema of streaming data and load it into tables that align with any user-defined schema.
Additionally, Snowflake allows for the addition of new columns or the removal of the NOT NULL constraint from columns
absent in new data files.
Please see more information about the schema in the [Schema](#schema) section.
Before schema detection and evolution is enabled, the table only consists of two VARIANT columns, RECORD\_CONTENT and
RECORD\_METADATA, as the following example demonstrates.
```
+------+---------------------------------------------------------+---------------------------------------------------+
| Row | RECORD_METADATA | RECORD_CONTENT |
|------+---------------------------------------------------------+---------------------------------------------------|
| 1 |{"message_id": "691:0:0:0", "partition": 0, "topic": "...| "account": "ABC123", "symbol": "ZTEST", "side":...|
| 2 |{"message_id": "691:0:0:1", "partition": 0, "topic": "...| "account": "XYZ789", "symbol": "ZABZX", "side":...|
| 3 |{"message_id": "691:0:0:2", "partition": 0, "topic": "...| "account": "XYZ789", "symbol": "ZTEST", "side":...|
| 4 |{"message_id": "691:0:0:3", "partition": 0, "topic": "...| "account": "ABC123", "symbol": "ZABZX", "side":...|
| 5 |{"message_id": "691:0:0:4", "partition": 0, "topic": "...| "account": "ABC123", "symbol": "ZTEST", "side":...|
+------+---------------------------------------------------------+---------------------------------------------------|
```
After schema detection and evolution is enabled, the table contains the columns that match the user-defined schema. The
table can also automatically evolve to support the structure of new data loaded by the connector.
```
+------+---------------------------------------------------------+---------+--------+-------+----------+
| Row | RECORD_METADATA | ACCOUNT | SYMBOL | SIDE | QUANTITY |
|------+---------------------------------------------------------+---------+--------+-------+----------|
| 1 |{"message_id": "691:0:0:0", "partition": 0, "topic": "...| ABC123 | ZTEST | BUY | 3572 |
| 2 |{"message_id": "691:0:0:1", "partition": 0, "topic": "...| XYZ789 | ZABZX | SELL | 3024 |
| 3 |{"message_id": "691:0:0:2", "partition": 0, "topic": "...| XYZ789 | ZTEST | SELL | 799 |
| 4 |{"message_id": "691:0:0:3", "partition": 0, "topic": "...| ABC123 | ZABZX | BUY | 2033 |
| 5 |{"message_id": "691:0:0:4", "partition": 0, "topic": "...| ABC123 | ZTEST | BUY | 1558 |
+------+---------------------------------------------------------+---------+--------+-------+----------|
```
### Ingestion Latency
There are two configuration parameters determining the ingestion latency of the Snowflake streaming sink connector:
* `maxClientLag`: This parameter specifies how often the Snowflake Ingest SDK flushes data to Snowflake, in seconds. If
you find the delay for the connector to load data to the Snowflake table too long,
you can reduce this value. However, setting it too low will result in more frequent data flush operations and result
in a worse query performance. For more instruction for configuring the `maxClientLag`, please
see [Latency recommendations¶](https://docs.snowflake.com/en/user-guide/data-load-snowpipe-streaming-recommendation#label-snowpipe-streaming-recommendations-latency).
* Specify it to 0 or leave it empty to let the connector decide the value based on the table type:
* For the standard snowflake table, the default value is 1 second.
* For the Iceberg table, the default value is 30 seconds.
* `checkCommittedMessageIntervalMs`: This parameter specifies how often the connector checks for committed messages and
acknowledge them in the Pulsar, in milliseconds. The default value is 1 second.
## Data sink workflow
The diagram below illustrates the data sink flow for the Pulsar Snowflake Streaming connector:
1. The connector subscribes to multiple user-specified topics and consumes messages from them.
2. It filters messages by topic-partition and forwards them to the corresponding TopicPartitionChannel. Each
TopicPartitionChannel corresponds to a topic-partition. The connector creates a Snowflake Streaming Ingest channel
for
each TopicPartitionChannel to ingest data into Snowflake. For example, if there is a partitioned topic `test-topic`
with 3 partitions, the connector will create 3 TopicPartitionChannels: `test-topic-partition-0`,
`test-topic-partition-1`, and `test-topic-partition-2`.
3. Within each TopicPartitionChannel, the RecordService converts messages into Snowflake records and inserts them into
the Snowflake Streaming Ingest channel, which then ingests the data into Snowflake.
Please note that this workflow requires message order to be maintained, ensuring that a topic-partition's
TopicPartitionChannel exists only in one connector instance. Therefore, the connector must have the retain ordering
configuration enabled. If you create the connector on SNCloud, retain ordering is enabled by default and cannot be
disabled.
For more information for how Snowflake Channel works, please
see [Snowflake Channel](https://docs.snowflake.com/en/user-guide/data-load-snowpipe-streaming-overview#channels).
## Exactly-once semantics
Currently, the Snowflake streaming sink connector supports the `exactly-once` delivery guarantee semantic.
Exactly-once semantics ensure the delivery of Pulsar messages without duplication or data loss.
The connector uses a one-to-one mapping between partitions and channels, utilizing the Message ID and the Snowflake
Channel Offset Token to achieve exactly-once semantics. For more information,
see [Snowflake Offset Token](https://docs.snowflake.com/en/user-guide/data-load-snowpipe-streaming-overview#offset-tokens).
The connector uses the Message ID as the offset token. For instance, the message ID `0:4:1:3` (Ledger ID: 0; Entry ID:
4; Partition Index: 1; Batch Index: 3) is converted to the offset token `0:4:1`, discarding the partition index. This
offset token is used each time messages are inserted into Snowflake. When the Snowflake SDK flushes the data, the last
committed offset token of the channel is updated, and the connector retrieves it from the SDK.
With `retainOrdering` enabled, the connector ensures that messages in each TopicPartitionChannel are received in order
without skips.
When opening each TopicPartitionChannel, the Snowflake Streaming Ingest channel is opened, retrieving the last committed
offset token, which is stored as `committedMessageId`. Another variable, `processedMessageId`, is updated after each
data insert. The connector discards all messages before the current `processedMessageId`. It periodically checks the
last committed offset token and updates `lastCommittedMessageId`, acknowledging all committed messages if
`lastCommittedMessageId` changes.
Here is an example diagram to show how it works:
Suppose the current `processMessageId` and the `lastCommittedMessageId` are both `0:4:0`.
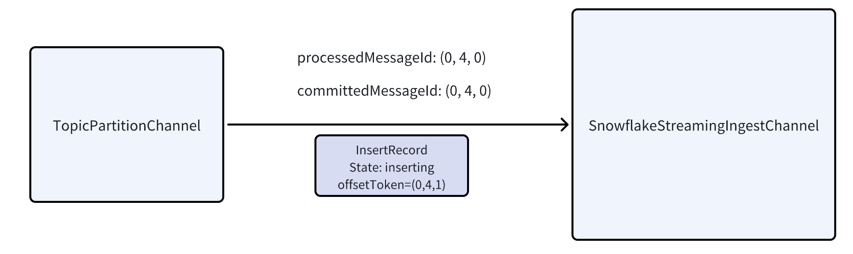 A new record arrives, and since its message ID is greater than `processedMessageId`, the connector inserts it into the
Snowflake channel and updates `processedMessageId` to `0:4:1`.:
A new record arrives, and since its message ID is greater than `processedMessageId`, the connector inserts it into the
Snowflake channel and updates `processedMessageId` to `0:4:1`.:
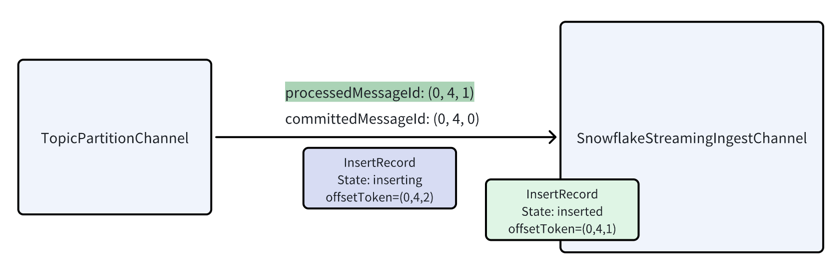 However, now there is a duplicated message `0:4:0` comes in again, it will happen due to the consumer redelivery or some
retry operations. The connector discards it as its message id is less than `processedMessageId`.
However, now there is a duplicated message `0:4:0` comes in again, it will happen due to the consumer redelivery or some
retry operations. The connector discards it as its message id is less than `processedMessageId`.
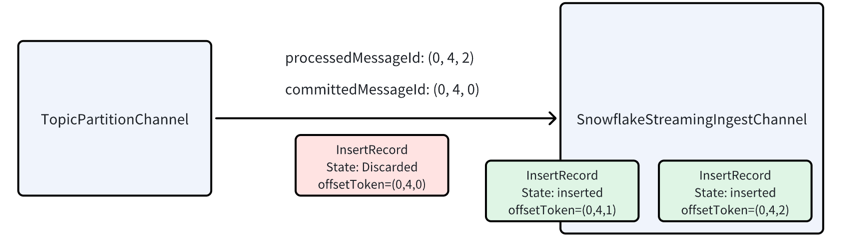 The snowflake channel will flush the data to the snowflake table, and the last committed offset token will be updated to
`0:4:2`. And a dedicated timer will periodically check the last committed offset token and update the
`lastCommittedMessageId`. The periodicity is determined by the configuration `checkCommittedMessageIntervalMs`.
Once the Snowflake channel flushes data, the last committed offset token updates to `0:4:2`. A timer periodically checks
this token, updating `lastCommittedMessageId`. If it changes, the connector acknowledges all messages before
`lastCommittedMessageId` using the cumulative acknowledgment:
The snowflake channel will flush the data to the snowflake table, and the last committed offset token will be updated to
`0:4:2`. And a dedicated timer will periodically check the last committed offset token and update the
`lastCommittedMessageId`. The periodicity is determined by the configuration `checkCommittedMessageIntervalMs`.
Once the Snowflake channel flushes data, the last committed offset token updates to `0:4:2`. A timer periodically checks
this token, updating `lastCommittedMessageId`. If it changes, the connector acknowledges all messages before
`lastCommittedMessageId` using the cumulative acknowledgment:
 ## Schema
### Supported Pulsar Schema
The snowflake streaming sink connector supports converting some of Pulsar schemas, as listed in the following table.
| Pulsar Schema | Supported |
| ---------------- | --------- |
| AVRO | Yes |
| JSON | Yes |
| PRIMITIVE | Yes |
| KEY\_VALUE | No |
| PROTOBUF | No |
| PROTOBUF\_NATIVE | No |
### Table format
If you don't enable the schema detection and evolution, the Snowflake table loaded by the Pulsar connector contains only
two VARIANT columns: `RECORD_CONTENT` and `RECORD_METADATA`.
* `RECORD_CONTENT`: The content of the message. The type of the content is [
`VARIANT`](https://docs.snowflake.com/en/sql-reference/data-types-semistructured#label-data-type-variant).
* `RECORD_METADATA`: The metadata of the message. The type of the metadata is [
`VARIANT`](https://docs.snowflake.com/en/sql-reference/data-types-semistructured#label-data-type-variant)..
If Snowflake creates the table, then the table contains only these two columns. If the user creates the table for the
Connector to add rows to, then the table can contain more than these two columns (any additional columns must allow NULL
values because data from the connector does not include values for those columns).
You can also configure the `metadataFields` to specify the metadata fields for each Snowflake record. The default value
is `message_id,partition,topic,publish_time`. And the supported fields are `schema_version`, `partition`, `event_time`,
`publish_time`, `message_id`, `sequence_id`, `producer_name`, `topic`.
If `enableSchematization` is true and the message is a primitive type, the connector will store the message in the
`RECORD_CONTENT` column.
### Standard snowflake table type mapping
If the schema detection and evolution are enabled, the connector will create and alter the table based on the avro
schema type of the message's field. The following table shows the mapping between the field's schema and the Snowflake
table.
| Field Avro Schema | Snowflake Table Type |
| ----------------- | -------------------- |
| INT | INT |
| LONG | BIGINT |
| FLOAT | FLOAT |
| DOUBLE | DOUBLE |
| BOOLEAN | BOOLEAN |
| STRING | VARCHAR |
| BYTES | BINARY |
| ARRAY | ARRAY |
| ENUM | VARIANT |
| UNION | VARIANT |
| RECORD | VARIANT |
Here is the mapping for the Avro logical type:
| Logical Type | Snowflake Table Type |
| ------------------------------------- | -------------------- |
| `decimal` | VARCHAR |
| `date` | DATE |
| `time-millis`, `time-micros` | TIME(6) |
| `timestamp-millis`,`timestamp-micros` | TIMESTAMP(6) |
| `local-timestamp-millis` | TIMESTAMP\_LTZ |
| `local-timestamp-micros` | TIMESTAMP\_LTZ(6) |
Other types are not supported and will throw an exception.
### Iceberg table type mapping
If the `icebergEnabled` is true and schema detection and evolution are enabled, the connector will alter the Iceberg
table based on the avro schema type of the message's field. The following table shows the mapping between the field's
schema and the Snowflake table.
| Field Avro Schema | Snowflake Table Type |
| ----------------- | -------------------- |
| INT | INT |
| LONG | LONG |
| FLOAT | FLOAT |
| DOUBLE | DOUBLE |
| BOOLEAN | BOOLEAN |
| STRING | VARCHAR |
| BYTES | BINARY |
The Iceberg table doesn't support nested types like ARRAY, RECORD, and UNION.
Here is the mapping for the Avro logical type:
| Logical Type | Snowflake Table Type |
| ------------------------------------- | -------------------- |
| `decimal` | VARCHAR |
| `date` | DATE |
| `time-millis`, `time-micros` | TIME(6) |
| `timestamp-millis`,`timestamp-micros` | TIMESTAMP(6) |
| `local-timestamp-millis` | TIMESTAMP\_LTZ |
| `local-timestamp-micros` | TIMESTAMP\_LTZ(6) |
Other types are not supported and will throw an exception.
## Fault tolerance
The connector can guarantee messages are neither duplicated nor silently dropped. If there are any errors during the
messages processing, the connector will simply get restarted and reprocess the messages from the last committed
messages.
## Sink data into the Iceberg table
The Snowflake streaming sink connector supports sinking data into the Iceberg table. To enable the Iceberg table format,
set the `icebergEnabled` configuration to `true`.
```yaml theme={null}
icebergEnabled: true
```
The connector cannot create Iceberg tables for you, so you must create them manually.
You can follow this
tutorial [Create your first Apache Iceberg™ table](https://docs.snowflake.com/en/user-guide/tutorials/create-your-first-iceberg-table)
to create an Iceberg table.
When `icebergEnabled` is set to `true`, the connector will automatically update the Iceberg table based on the Avro
schema of the message fields. If not, you need to manually update the table to match the Pulsar Avro Schema Type.
For the schema mapping for the Iceberg table, please refer to
the [Iceberg table type mapping](#iceberg-table-type-mapping).
Here is a simple example to create an Iceberg table:
```snowsql theme={null}
create or replace ICEBERG TABLE TEST_DB.TEST_SCHEMA.ICEBERG_TABLE (
RECORD_METADATA OBJECT()
)
EXTERNAL_VOLUME = 'ICEBERG_EXTERNAL_VOLUME'
CATALOG = 'SNOWFLAKE'
BASE_LOCATION = 'ICEBERG_TABLE/';
```
And please make sure the Iceberg table has the `ENABLE_SCHEMA_EVOLUTION` enabled if you wants the connector to
automatically evolve the schema. You can set it by running the following SQL command:
```snowsql theme={null}
ALTER ICEBERG TABLE TEST_DB.TEST_SCHEMA.ICEBERG_TABLE SET ENABLE_SCHEMA_EVOLUTION = TRUE;
```
If you want to manually alter the Iceberg table, you can refer to the following example:
```snowsql theme={null}
CREATE OR REPLACE ICEBERG TABLE TABLE TEST_DB.TEST_SCHEMA.ICEBERG_TABLE (
RECORD_METADATA OBJECT(partition INT, topic STRING, key STRING, schema_version INT, event_time DATE, publish_time DATE, message_id STRING, sequence INT, producer_name STRING),
RECORD_CONTENT OBJECT (
name STRING,
age INTEGER
)
)
CATALOG = 'SNOWFLAKE'
EXTERNAL_VOLUME = 'ICEBERG_EXTERNAL_VOLUME'
ENABLE_SCHEMA_EVOLUTION = 'true
BASE_LOCATION = 'ICEBERG_TABLE';
```
Remember to create the `RECORD_METADATA` column and match the types as shown in the example.
## Schema
### Supported Pulsar Schema
The snowflake streaming sink connector supports converting some of Pulsar schemas, as listed in the following table.
| Pulsar Schema | Supported |
| ---------------- | --------- |
| AVRO | Yes |
| JSON | Yes |
| PRIMITIVE | Yes |
| KEY\_VALUE | No |
| PROTOBUF | No |
| PROTOBUF\_NATIVE | No |
### Table format
If you don't enable the schema detection and evolution, the Snowflake table loaded by the Pulsar connector contains only
two VARIANT columns: `RECORD_CONTENT` and `RECORD_METADATA`.
* `RECORD_CONTENT`: The content of the message. The type of the content is [
`VARIANT`](https://docs.snowflake.com/en/sql-reference/data-types-semistructured#label-data-type-variant).
* `RECORD_METADATA`: The metadata of the message. The type of the metadata is [
`VARIANT`](https://docs.snowflake.com/en/sql-reference/data-types-semistructured#label-data-type-variant)..
If Snowflake creates the table, then the table contains only these two columns. If the user creates the table for the
Connector to add rows to, then the table can contain more than these two columns (any additional columns must allow NULL
values because data from the connector does not include values for those columns).
You can also configure the `metadataFields` to specify the metadata fields for each Snowflake record. The default value
is `message_id,partition,topic,publish_time`. And the supported fields are `schema_version`, `partition`, `event_time`,
`publish_time`, `message_id`, `sequence_id`, `producer_name`, `topic`.
If `enableSchematization` is true and the message is a primitive type, the connector will store the message in the
`RECORD_CONTENT` column.
### Standard snowflake table type mapping
If the schema detection and evolution are enabled, the connector will create and alter the table based on the avro
schema type of the message's field. The following table shows the mapping between the field's schema and the Snowflake
table.
| Field Avro Schema | Snowflake Table Type |
| ----------------- | -------------------- |
| INT | INT |
| LONG | BIGINT |
| FLOAT | FLOAT |
| DOUBLE | DOUBLE |
| BOOLEAN | BOOLEAN |
| STRING | VARCHAR |
| BYTES | BINARY |
| ARRAY | ARRAY |
| ENUM | VARIANT |
| UNION | VARIANT |
| RECORD | VARIANT |
Here is the mapping for the Avro logical type:
| Logical Type | Snowflake Table Type |
| ------------------------------------- | -------------------- |
| `decimal` | VARCHAR |
| `date` | DATE |
| `time-millis`, `time-micros` | TIME(6) |
| `timestamp-millis`,`timestamp-micros` | TIMESTAMP(6) |
| `local-timestamp-millis` | TIMESTAMP\_LTZ |
| `local-timestamp-micros` | TIMESTAMP\_LTZ(6) |
Other types are not supported and will throw an exception.
### Iceberg table type mapping
If the `icebergEnabled` is true and schema detection and evolution are enabled, the connector will alter the Iceberg
table based on the avro schema type of the message's field. The following table shows the mapping between the field's
schema and the Snowflake table.
| Field Avro Schema | Snowflake Table Type |
| ----------------- | -------------------- |
| INT | INT |
| LONG | LONG |
| FLOAT | FLOAT |
| DOUBLE | DOUBLE |
| BOOLEAN | BOOLEAN |
| STRING | VARCHAR |
| BYTES | BINARY |
The Iceberg table doesn't support nested types like ARRAY, RECORD, and UNION.
Here is the mapping for the Avro logical type:
| Logical Type | Snowflake Table Type |
| ------------------------------------- | -------------------- |
| `decimal` | VARCHAR |
| `date` | DATE |
| `time-millis`, `time-micros` | TIME(6) |
| `timestamp-millis`,`timestamp-micros` | TIMESTAMP(6) |
| `local-timestamp-millis` | TIMESTAMP\_LTZ |
| `local-timestamp-micros` | TIMESTAMP\_LTZ(6) |
Other types are not supported and will throw an exception.
## Fault tolerance
The connector can guarantee messages are neither duplicated nor silently dropped. If there are any errors during the
messages processing, the connector will simply get restarted and reprocess the messages from the last committed
messages.
## Sink data into the Iceberg table
The Snowflake streaming sink connector supports sinking data into the Iceberg table. To enable the Iceberg table format,
set the `icebergEnabled` configuration to `true`.
```yaml theme={null}
icebergEnabled: true
```
The connector cannot create Iceberg tables for you, so you must create them manually.
You can follow this
tutorial [Create your first Apache Iceberg™ table](https://docs.snowflake.com/en/user-guide/tutorials/create-your-first-iceberg-table)
to create an Iceberg table.
When `icebergEnabled` is set to `true`, the connector will automatically update the Iceberg table based on the Avro
schema of the message fields. If not, you need to manually update the table to match the Pulsar Avro Schema Type.
For the schema mapping for the Iceberg table, please refer to
the [Iceberg table type mapping](#iceberg-table-type-mapping).
Here is a simple example to create an Iceberg table:
```snowsql theme={null}
create or replace ICEBERG TABLE TEST_DB.TEST_SCHEMA.ICEBERG_TABLE (
RECORD_METADATA OBJECT()
)
EXTERNAL_VOLUME = 'ICEBERG_EXTERNAL_VOLUME'
CATALOG = 'SNOWFLAKE'
BASE_LOCATION = 'ICEBERG_TABLE/';
```
And please make sure the Iceberg table has the `ENABLE_SCHEMA_EVOLUTION` enabled if you wants the connector to
automatically evolve the schema. You can set it by running the following SQL command:
```snowsql theme={null}
ALTER ICEBERG TABLE TEST_DB.TEST_SCHEMA.ICEBERG_TABLE SET ENABLE_SCHEMA_EVOLUTION = TRUE;
```
If you want to manually alter the Iceberg table, you can refer to the following example:
```snowsql theme={null}
CREATE OR REPLACE ICEBERG TABLE TABLE TEST_DB.TEST_SCHEMA.ICEBERG_TABLE (
RECORD_METADATA OBJECT(partition INT, topic STRING, key STRING, schema_version INT, event_time DATE, publish_time DATE, message_id STRING, sequence INT, producer_name STRING),
RECORD_CONTENT OBJECT (
name STRING,
age INTEGER
)
)
CATALOG = 'SNOWFLAKE'
EXTERNAL_VOLUME = 'ICEBERG_EXTERNAL_VOLUME'
ENABLE_SCHEMA_EVOLUTION = 'true
BASE_LOCATION = 'ICEBERG_TABLE';
```
Remember to create the `RECORD_METADATA` column and match the types as shown in the example.