> ## Documentation Index
> Fetch the complete documentation index at: https://docs.streamnative.io/llms.txt
> Use this file to discover all available pages before exploring further.
# Create Universal Links in StreamNative Cloud
StreamNative Cloud provides an intuitive and convenient management interface that allows you to easily create Universal
Links without writing any configuration file code. This document will guide you through the process of creating a
Universal Link in StreamNative Cloud.
Universal Linking offers Data Migration and Schema Migration. Data Migration transfers message data from specified Kafka
topics to the Ursa cluster, while Schema Migration transfers schemas to the KSN Schema Registry. These tools enable
seamless cluster migration.
## Prerequisites
* You have created a Ursa cluster in your organization. Ensure no data or schema is
produced in the Ursa cluster to avoid potential conflicts.
## Create Data Migration
In the UI, you will create a UniLink Data migration job within your organization.
Ensure no data is produced in replicated topics in the destination cluster during data migration to prevent conflicts.
1. Navigate to the [**Organization Dashboard**](/cloud/get-started/cloud-console#organization-dashboard).
2. Click **Unilink** in the left navigation pane to access the **UniLink** page.
3. Click the **Create** button at the top right corner and select **Data Migration** to initiate the job creation
process.
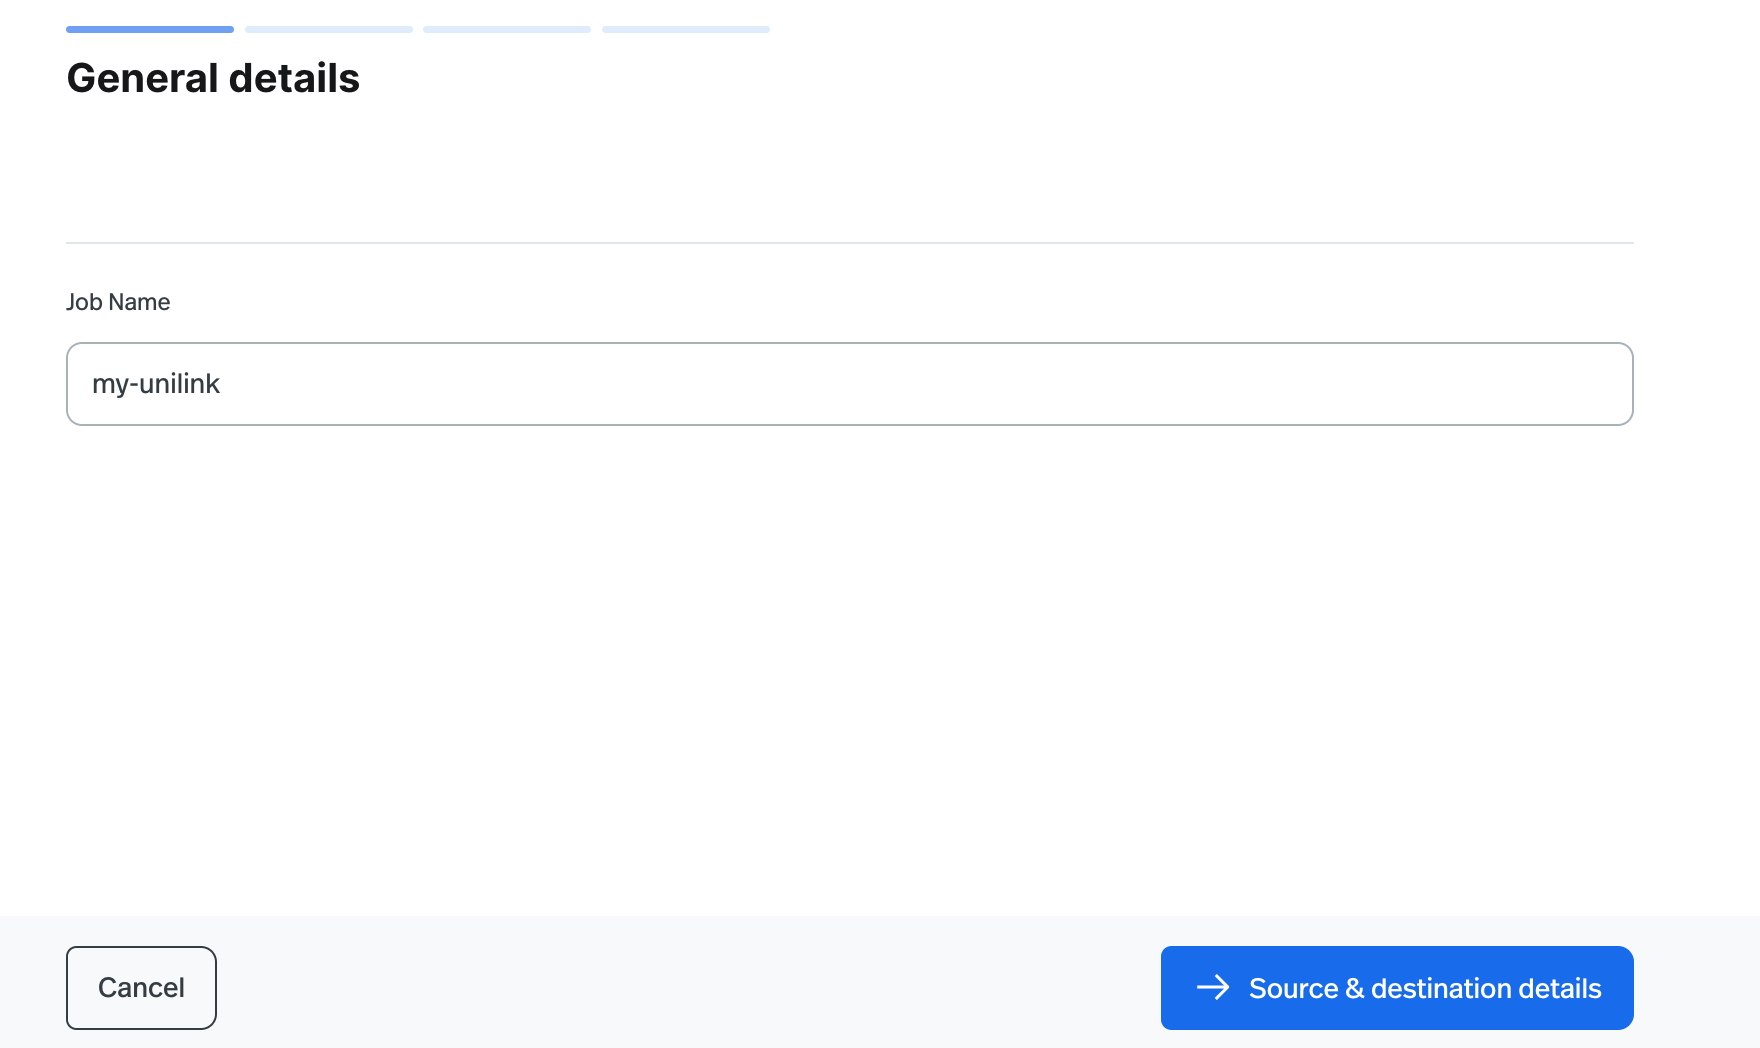
4. Enter the Job Name for this UniLink instance. Then click **Source & Destination Details** to proceed.
 ### Source & Destination Cluster Configuration
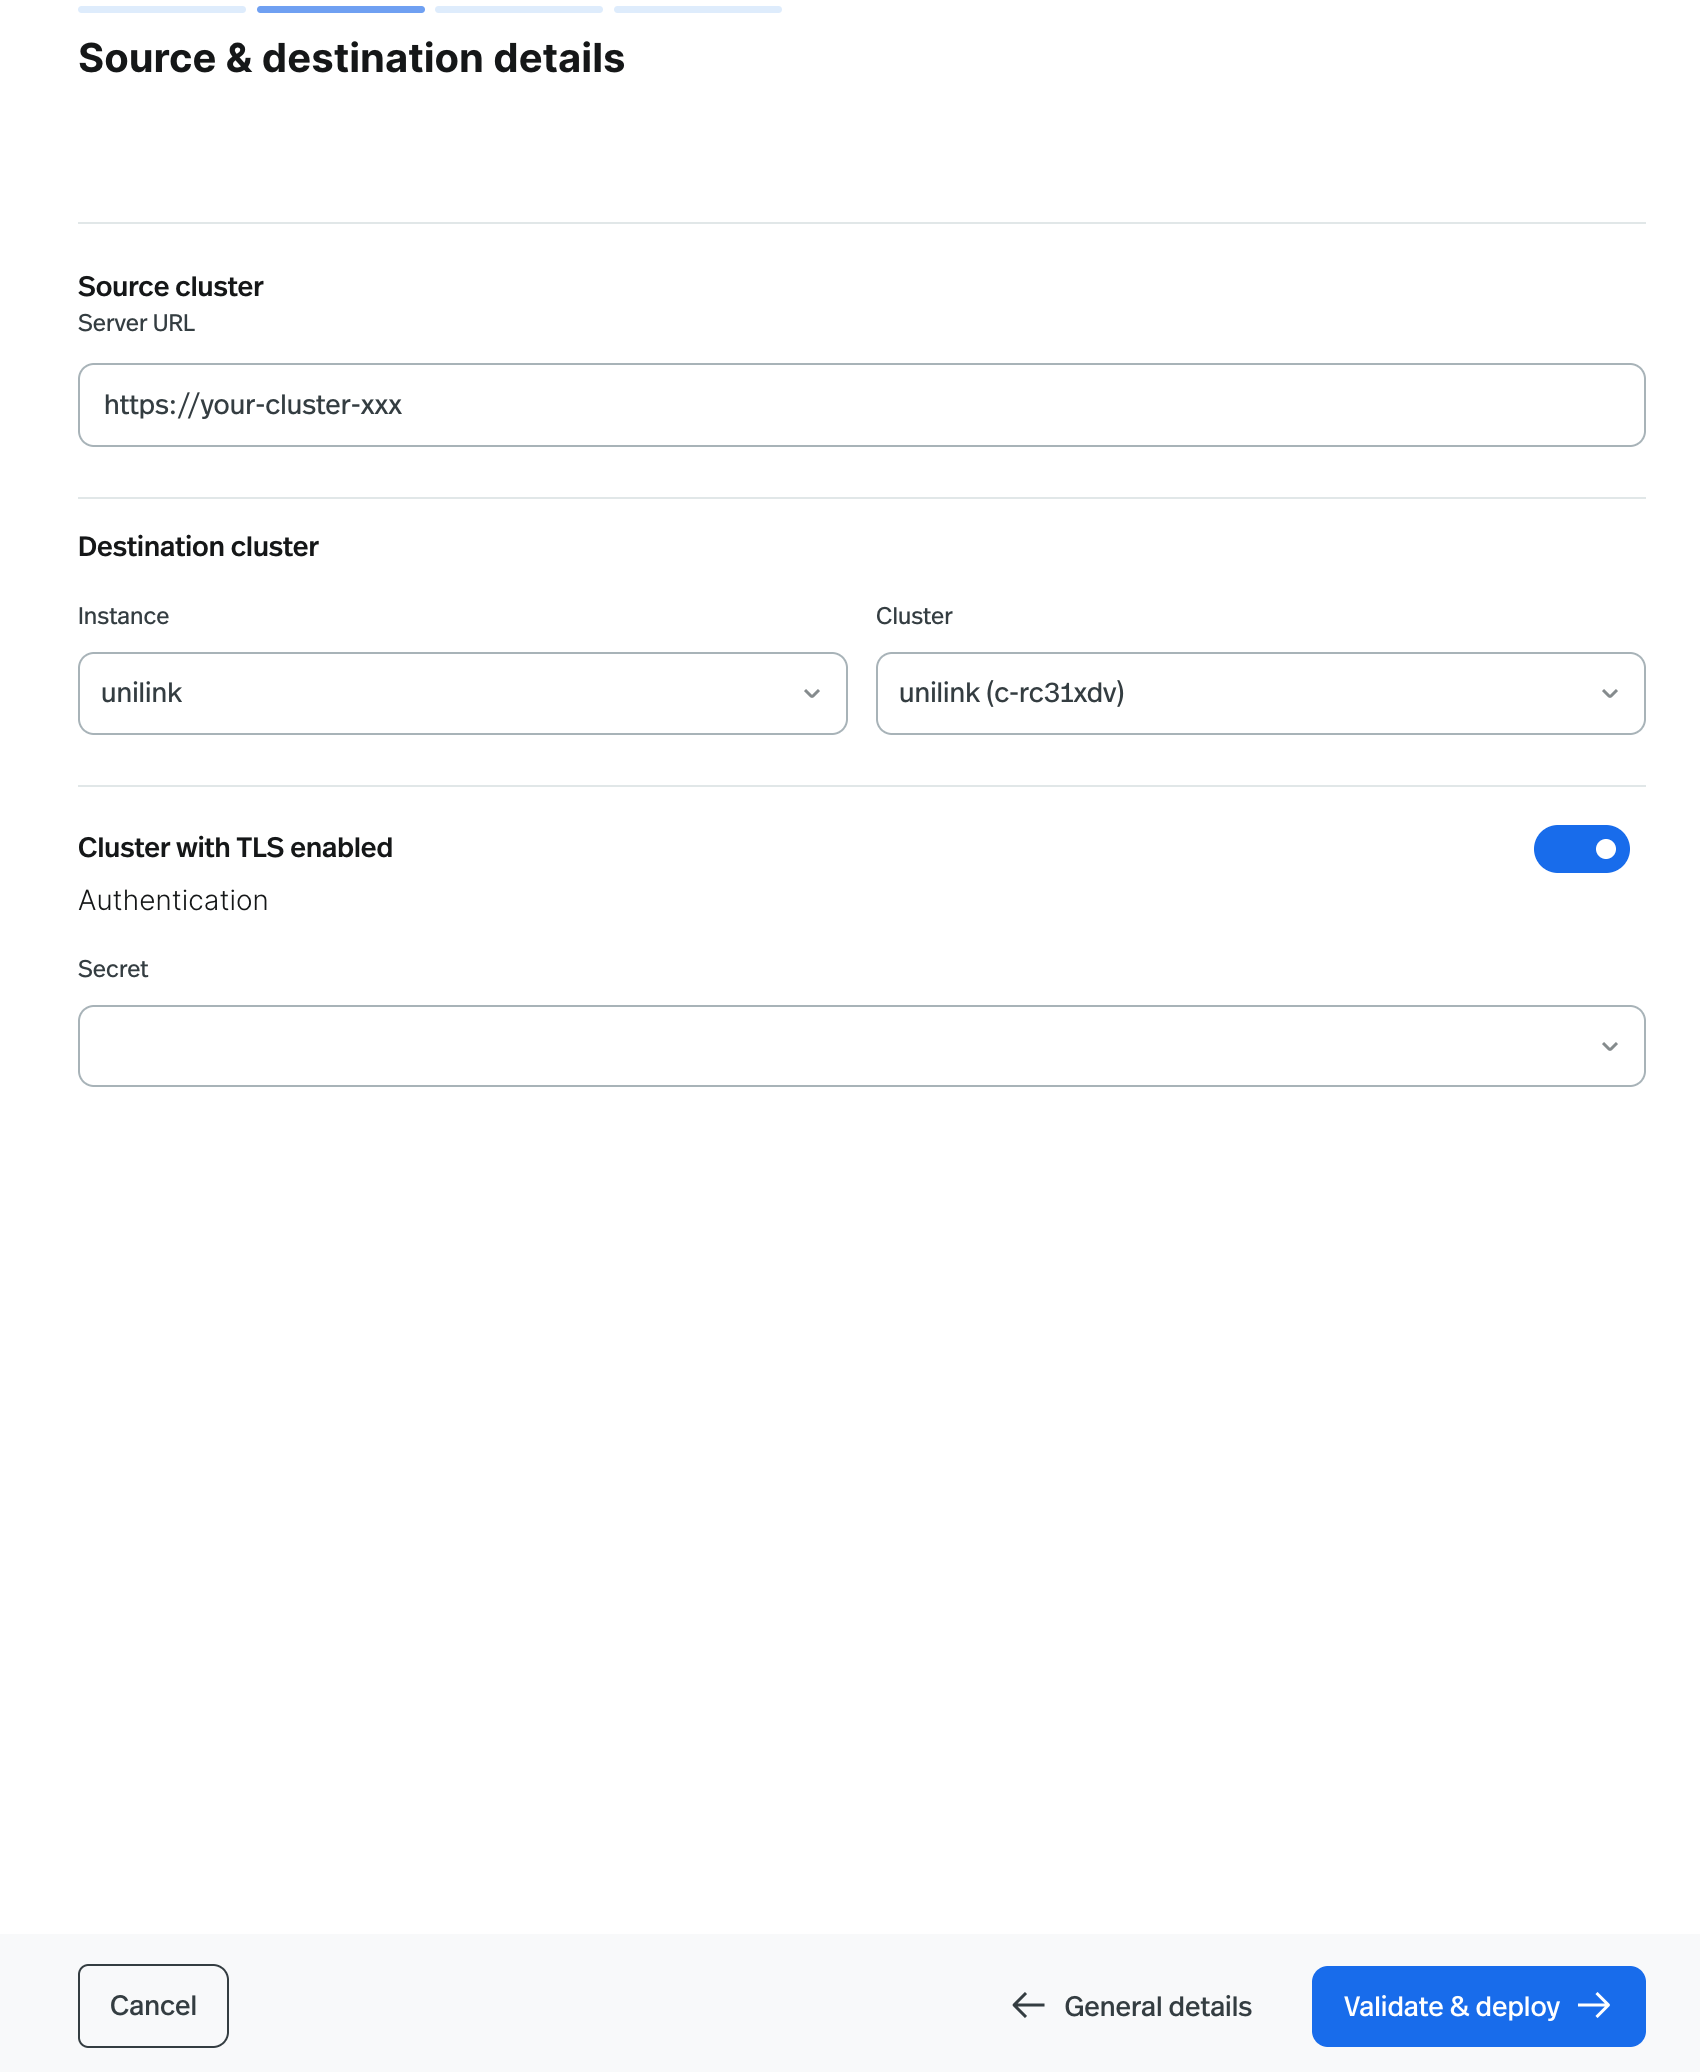
1. On the **Source & Destination Details** page, enter the **Source Cluster** and **Destination Cluster** information.
Provide the URL for the source cluster and select the destination cluster from the dropdown list.
2. If your source cluster has TLS enabled, toggle the **Cluster with TLS enabled** switch.
### Source & Destination Cluster Configuration
1. On the **Source & Destination Details** page, enter the **Source Cluster** and **Destination Cluster** information.
Provide the URL for the source cluster and select the destination cluster from the dropdown list.
2. If your source cluster has TLS enabled, toggle the **Cluster with TLS enabled** switch.
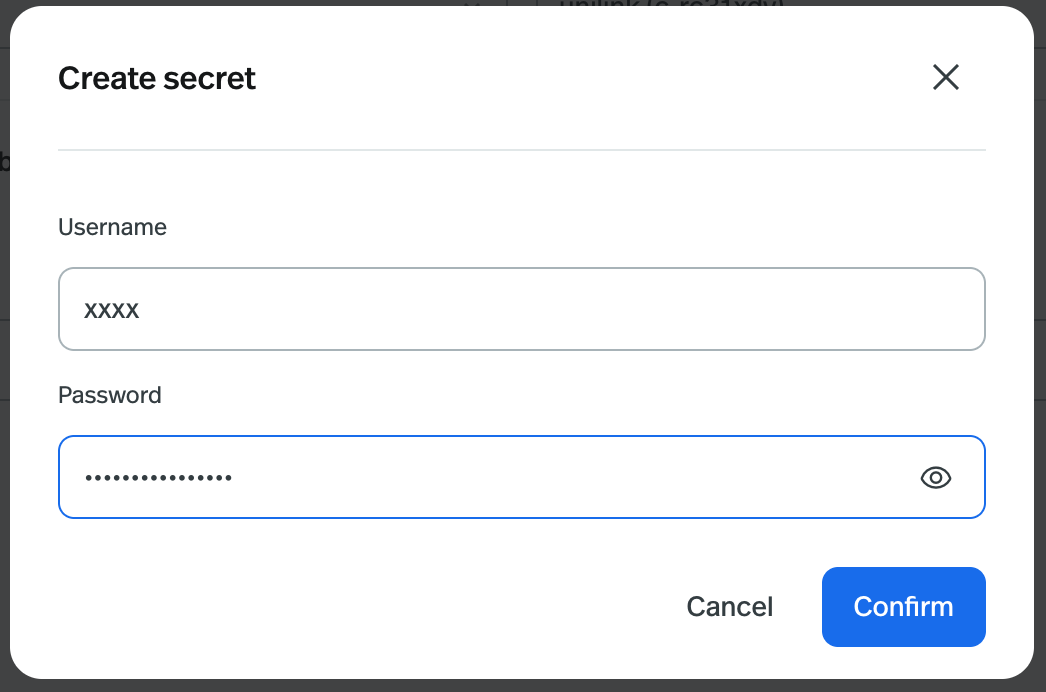
 Create a secret for the source cluster. Click **Create Secret** to generate a secret for the source cluster. The
UniLink job supports SASL authentication for the source cluster. Enter the **username** and **password** for the
source cluster, then click **Create**. You can also select an existing secret from the dropdown list.
Create a secret for the source cluster. Click **Create Secret** to generate a secret for the source cluster. The
UniLink job supports SASL authentication for the source cluster. Enter the **username** and **password** for the
source cluster, then click **Create**. You can also select an existing secret from the dropdown list.
 Click **Validate & Deploy**. This checks the connection to the source cluster. If successful, click **Continue** for
**Topic Configuration**. If the connection fails, check the source cluster URL and secret.
### Topic Configuration
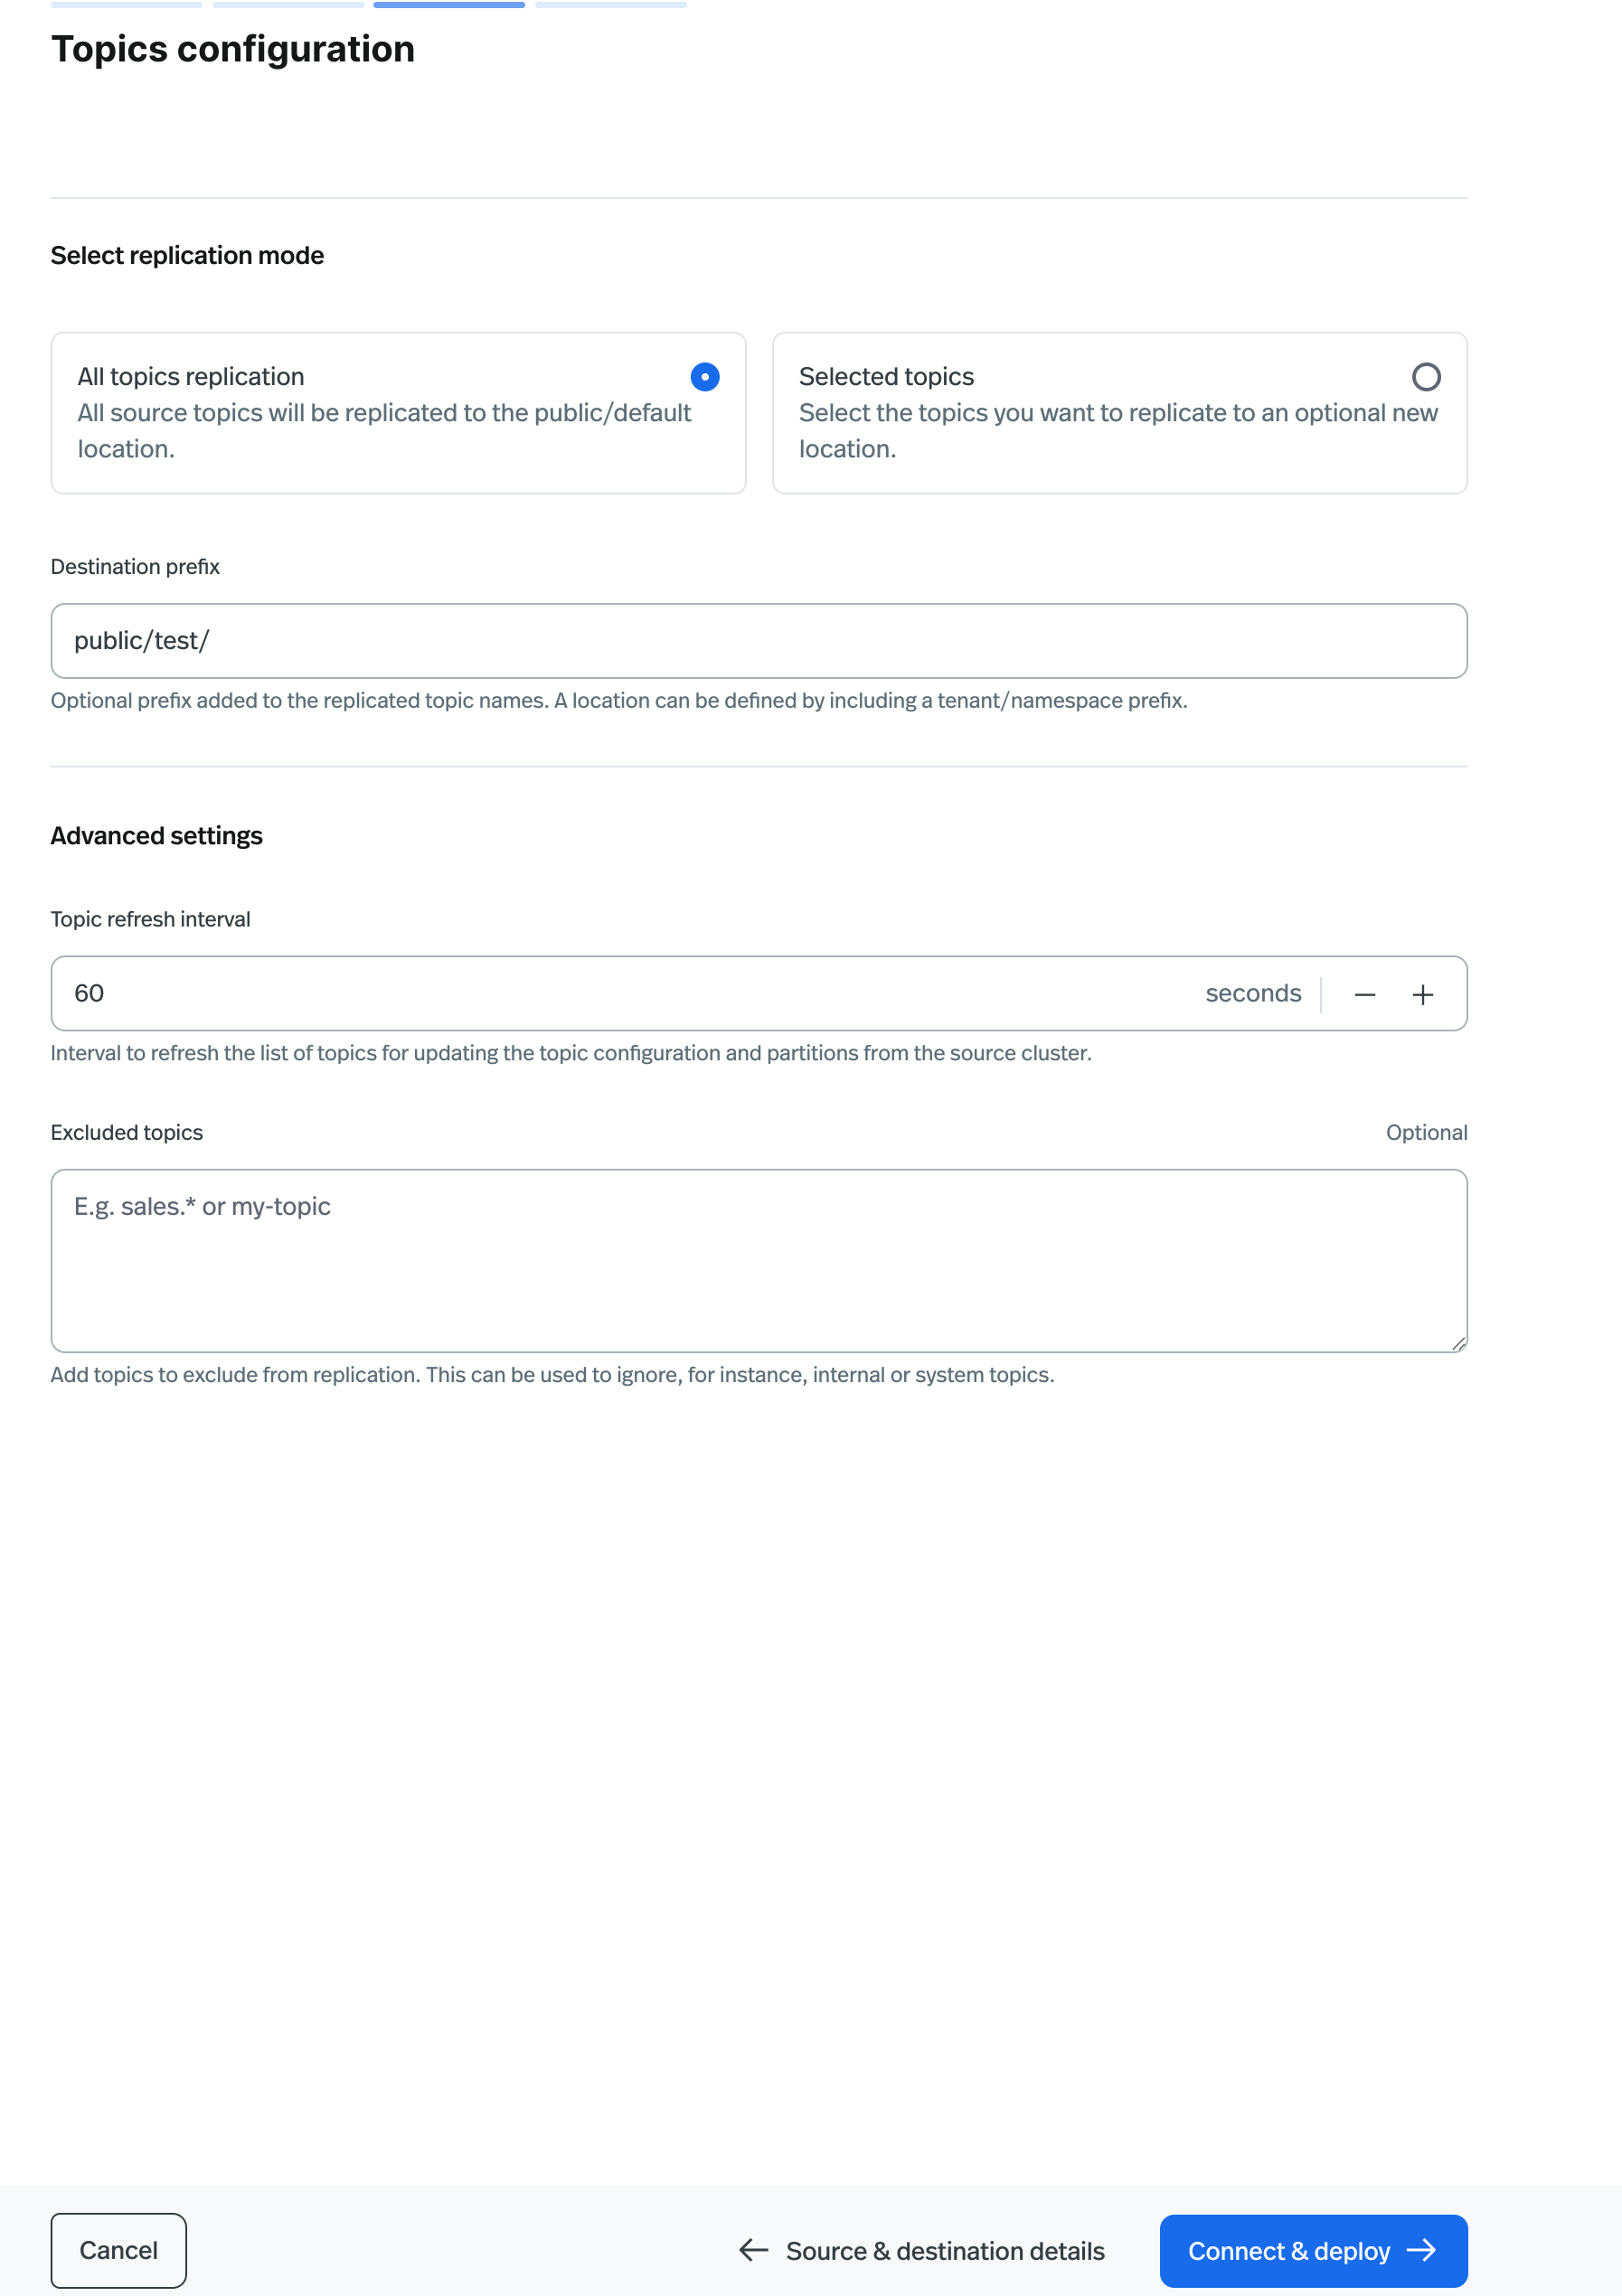
1. On the **Topic Configuration** page, select the topics you want to migrate from the source cluster to the destination
cluster. Choose **All topics replications** to replicate all topics or **Selected topics** to replicate specific
topics.
If you select **Selected topics**, enter the topic name in the **Include topics** input box. It supports multiple
regex patterns separated by commas, e.g., `topic1,topic2,topic3-.*`.
2. Enter the **Destination prefix** for the topics in the destination cluster. The prefix will be added to the topic
name in the destination cluster. For example, if the prefix is `public/test/`, `topic1` will be migrated to
`public/test/topic1`. This helps migrate topics to a specific namespace. The prefix must be in the format of
tenant/namespace/ or any string ending with an underscore.
3. UniLink will periodically check the source cluster for new topics and automatically migrate them to the destination
cluster. Set the **Topic refresh interval** to specify the interval in seconds for checking new topics.
4. Optionally, enter **Excluded topics** to exclude certain topics from migration. It supports multiple regex patterns
separated by commas, e.g., `topic1,topic2,topic3-.*`.
5. Click **Connect & Deploy**. This builds a topic mapping between the source and destination cluster for review. Click
**Continue** to proceed to the next step.
Click **Validate & Deploy**. This checks the connection to the source cluster. If successful, click **Continue** for
**Topic Configuration**. If the connection fails, check the source cluster URL and secret.
### Topic Configuration
1. On the **Topic Configuration** page, select the topics you want to migrate from the source cluster to the destination
cluster. Choose **All topics replications** to replicate all topics or **Selected topics** to replicate specific
topics.
If you select **Selected topics**, enter the topic name in the **Include topics** input box. It supports multiple
regex patterns separated by commas, e.g., `topic1,topic2,topic3-.*`.
2. Enter the **Destination prefix** for the topics in the destination cluster. The prefix will be added to the topic
name in the destination cluster. For example, if the prefix is `public/test/`, `topic1` will be migrated to
`public/test/topic1`. This helps migrate topics to a specific namespace. The prefix must be in the format of
tenant/namespace/ or any string ending with an underscore.
3. UniLink will periodically check the source cluster for new topics and automatically migrate them to the destination
cluster. Set the **Topic refresh interval** to specify the interval in seconds for checking new topics.
4. Optionally, enter **Excluded topics** to exclude certain topics from migration. It supports multiple regex patterns
separated by commas, e.g., `topic1,topic2,topic3-.*`.
5. Click **Connect & Deploy**. This builds a topic mapping between the source and destination cluster for review. Click
**Continue** to proceed to the next step.
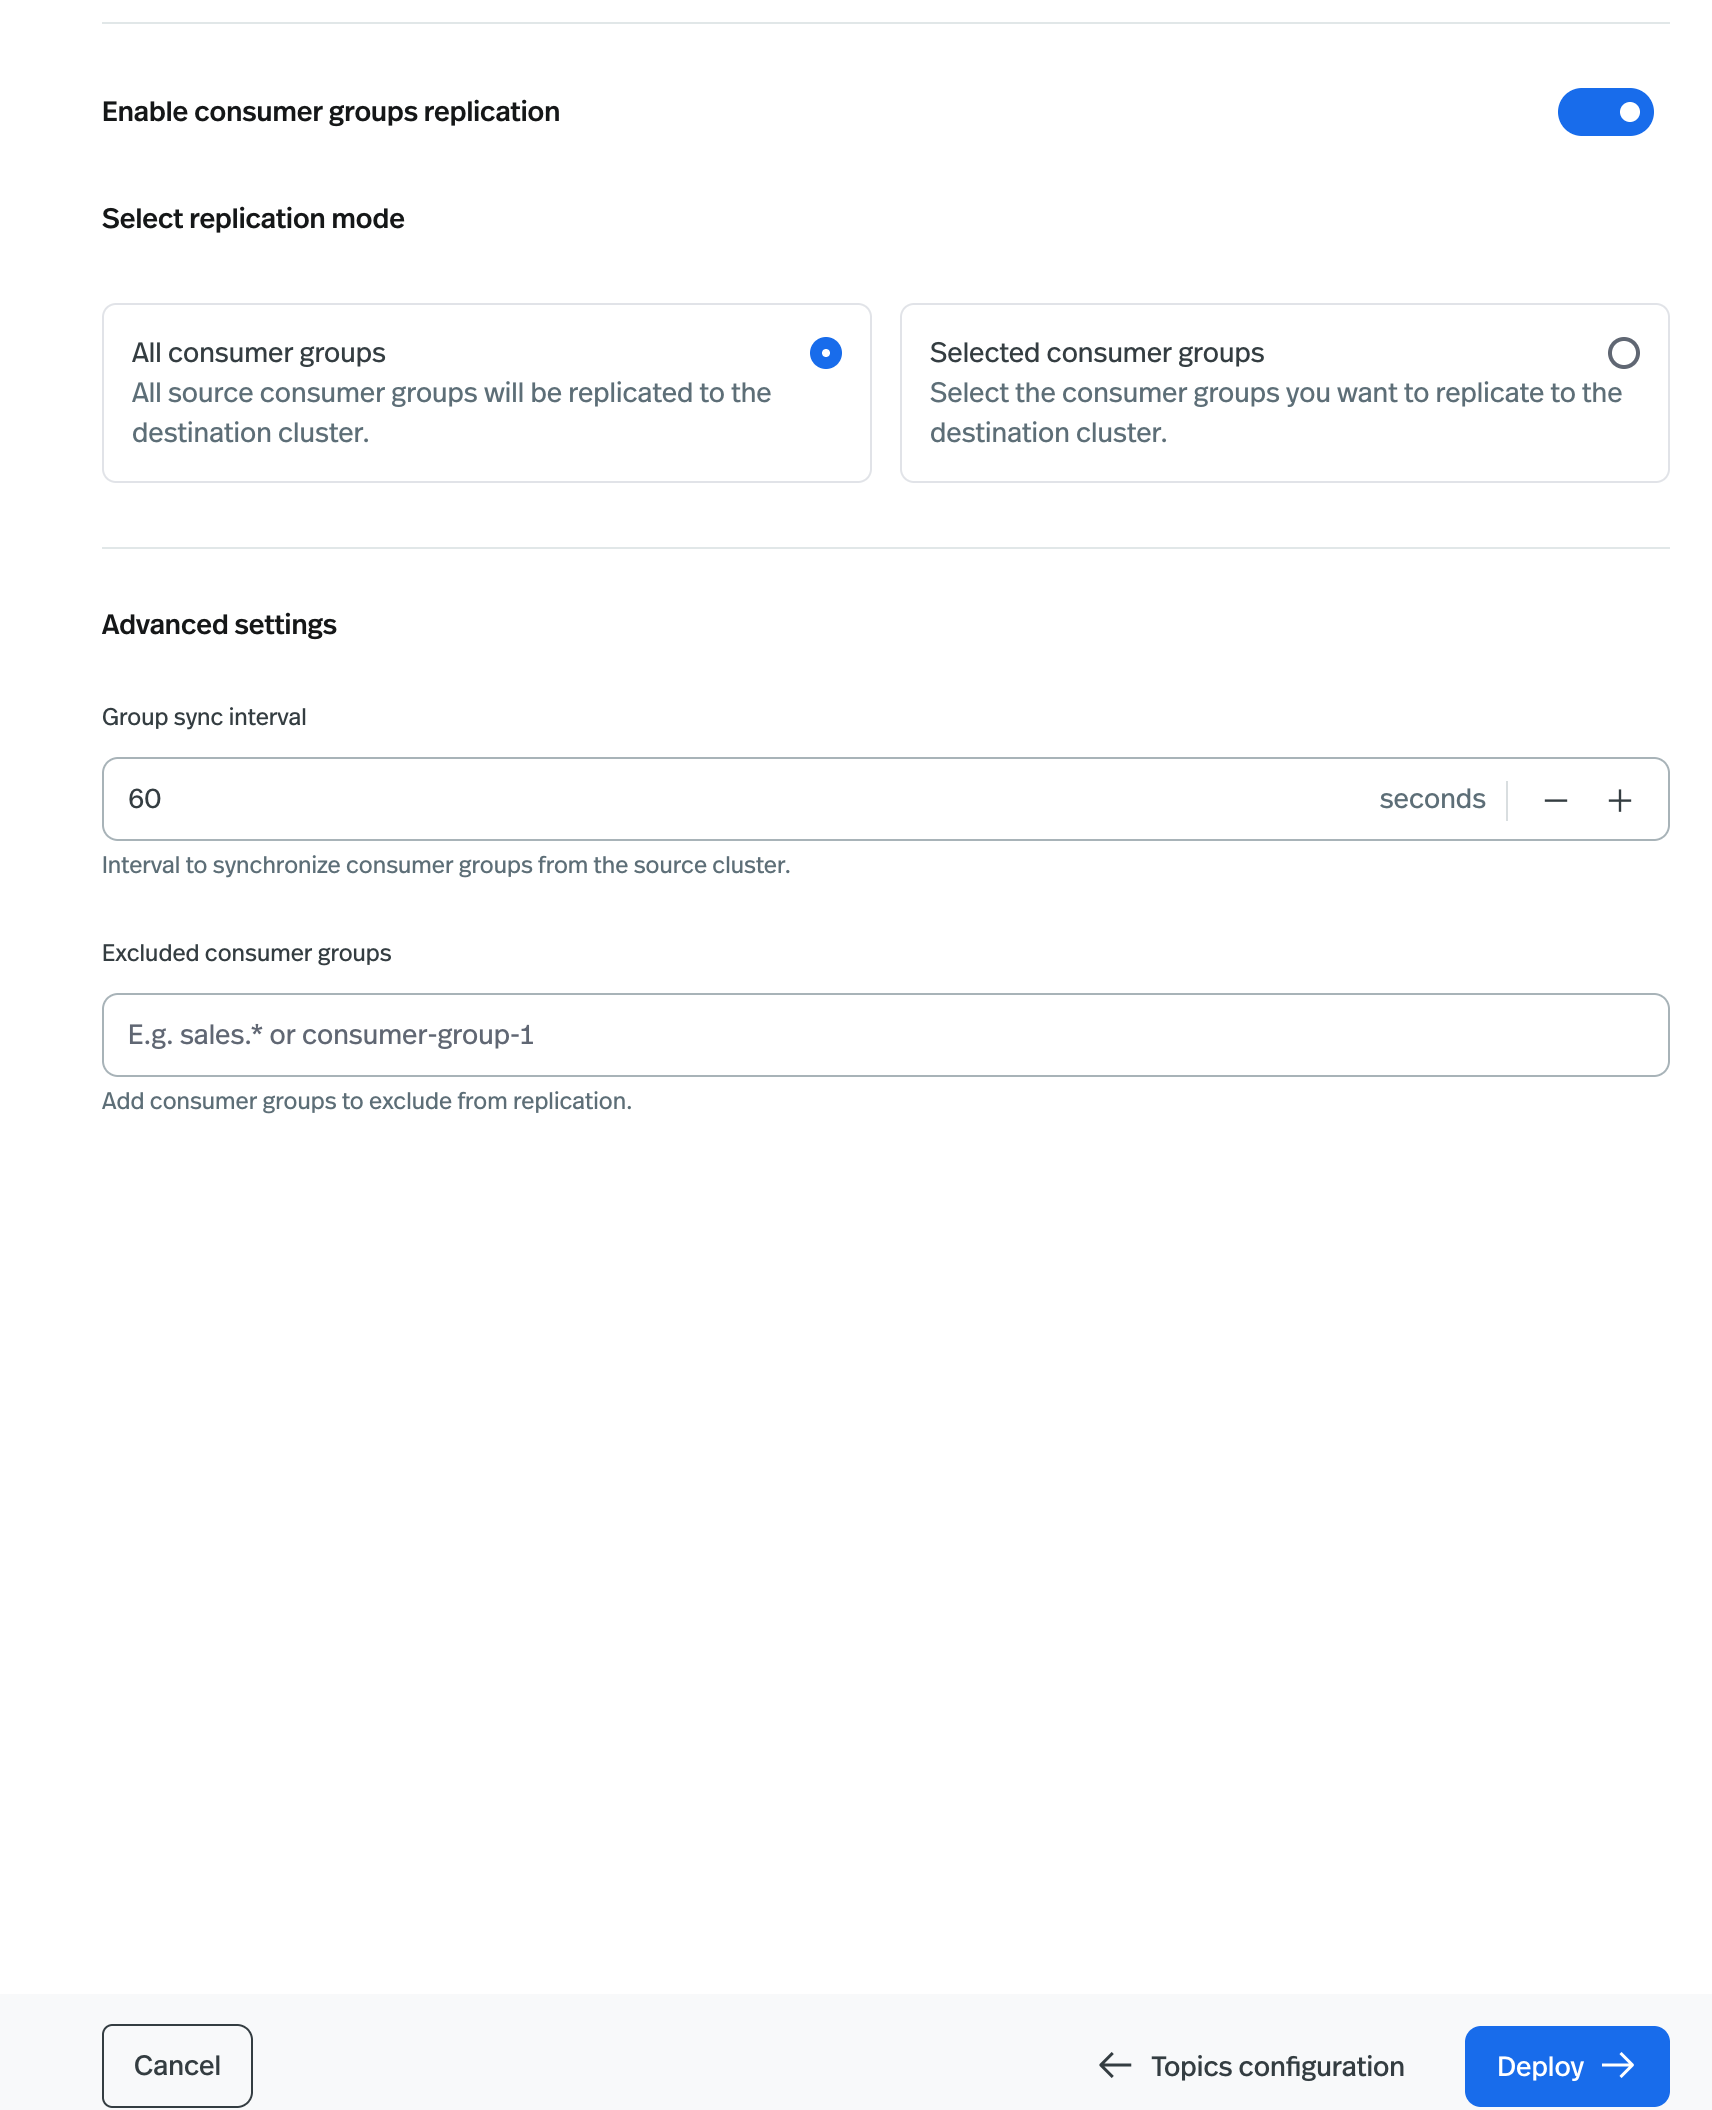
 ### Consumer Groups Configuration
UniLink will periodically check the source cluster for new consumer groups and automatically migrate them to the
destination cluster. Configure the consumer groups migration in this step.
1. Enable **Enable consumer groups replication** to migrate consumer groups.
2. Choose **All consumer groups** to migrate all consumer groups or **Selected consumer groups** to migrate specific
ones.
If you select **Selected consumer groups**, enter the consumer group name in the **Include consumer groups** input
box. It supports multiple regex patterns separated by commas, e.g., `group1,group2,group3-.*`.
3. Set the **Consumer group refresh interval** to specify the interval in seconds for checking new consumer groups.
4. Optionally, enter **Excluded consumer groups** to exclude certain groups from migration. It supports multiple regex
patterns separated by commas, e.g., `group1,group2,group3-.*`.
5. Click **Deploy**. This builds a consumer group mapping between the source and destination cluster for review. Click \*
\*Continue\*\* to deploy the UniLink job.
### Consumer Groups Configuration
UniLink will periodically check the source cluster for new consumer groups and automatically migrate them to the
destination cluster. Configure the consumer groups migration in this step.
1. Enable **Enable consumer groups replication** to migrate consumer groups.
2. Choose **All consumer groups** to migrate all consumer groups or **Selected consumer groups** to migrate specific
ones.
If you select **Selected consumer groups**, enter the consumer group name in the **Include consumer groups** input
box. It supports multiple regex patterns separated by commas, e.g., `group1,group2,group3-.*`.
3. Set the **Consumer group refresh interval** to specify the interval in seconds for checking new consumer groups.
4. Optionally, enter **Excluded consumer groups** to exclude certain groups from migration. It supports multiple regex
patterns separated by commas, e.g., `group1,group2,group3-.*`.
5. Click **Deploy**. This builds a consumer group mapping between the source and destination cluster for review. Click \*
\*Continue\*\* to deploy the UniLink job.
 The UniLink job has been successfully created.
## Create Schema Migration
Using UniLink Schema Migration, you can migrate schemas from the source cluster to the destination cluster. UniLink
Schema Migration periodically checks the source cluster for new schemas and automatically migrates them to the
destination cluster.
During schema migration, UniLink will set the destination cluster schema registry to import mode, preventing it from
accepting new schemas from your client. After deleting the UniLink Schema Migration job, the registry will revert to
read-write mode to allow new schema submissions.
1. Navigate to the [**Organization Dashboard**](/cloud/get-started/cloud-console#organization-dashboard).
2. Click **Unilink** in the left navigation pane to access the **UniLink** page.
3. Click the **Create** button at the top right corner and select **Schema Migration** to start the job creation
process.
4. Enter the Job Name for this UniLink Schema instance. Then click **Source & destination Details** to proceed.
### Source & Destination Cluster Configuration
1. On the **Source & Destination Details** page, enter the **Source Cluster** and **Destination Cluster** information.
Provide the URL for the source cluster schema registry and select the destination cluster from the dropdown list.
2. Create a secret for the source cluster. Click **Create Secret** to generate a secret for the source cluster. Enter
the **API Key** and **API Secret** for the source cluster, then click **Create**. You can also select an existing
secret from the dropdown list.
The UniLink job has been successfully created.
## Create Schema Migration
Using UniLink Schema Migration, you can migrate schemas from the source cluster to the destination cluster. UniLink
Schema Migration periodically checks the source cluster for new schemas and automatically migrates them to the
destination cluster.
During schema migration, UniLink will set the destination cluster schema registry to import mode, preventing it from
accepting new schemas from your client. After deleting the UniLink Schema Migration job, the registry will revert to
read-write mode to allow new schema submissions.
1. Navigate to the [**Organization Dashboard**](/cloud/get-started/cloud-console#organization-dashboard).
2. Click **Unilink** in the left navigation pane to access the **UniLink** page.
3. Click the **Create** button at the top right corner and select **Schema Migration** to start the job creation
process.
4. Enter the Job Name for this UniLink Schema instance. Then click **Source & destination Details** to proceed.
### Source & Destination Cluster Configuration
1. On the **Source & Destination Details** page, enter the **Source Cluster** and **Destination Cluster** information.
Provide the URL for the source cluster schema registry and select the destination cluster from the dropdown list.
2. Create a secret for the source cluster. Click **Create Secret** to generate a secret for the source cluster. Enter
the **API Key** and **API Secret** for the source cluster, then click **Create**. You can also select an existing
secret from the dropdown list.
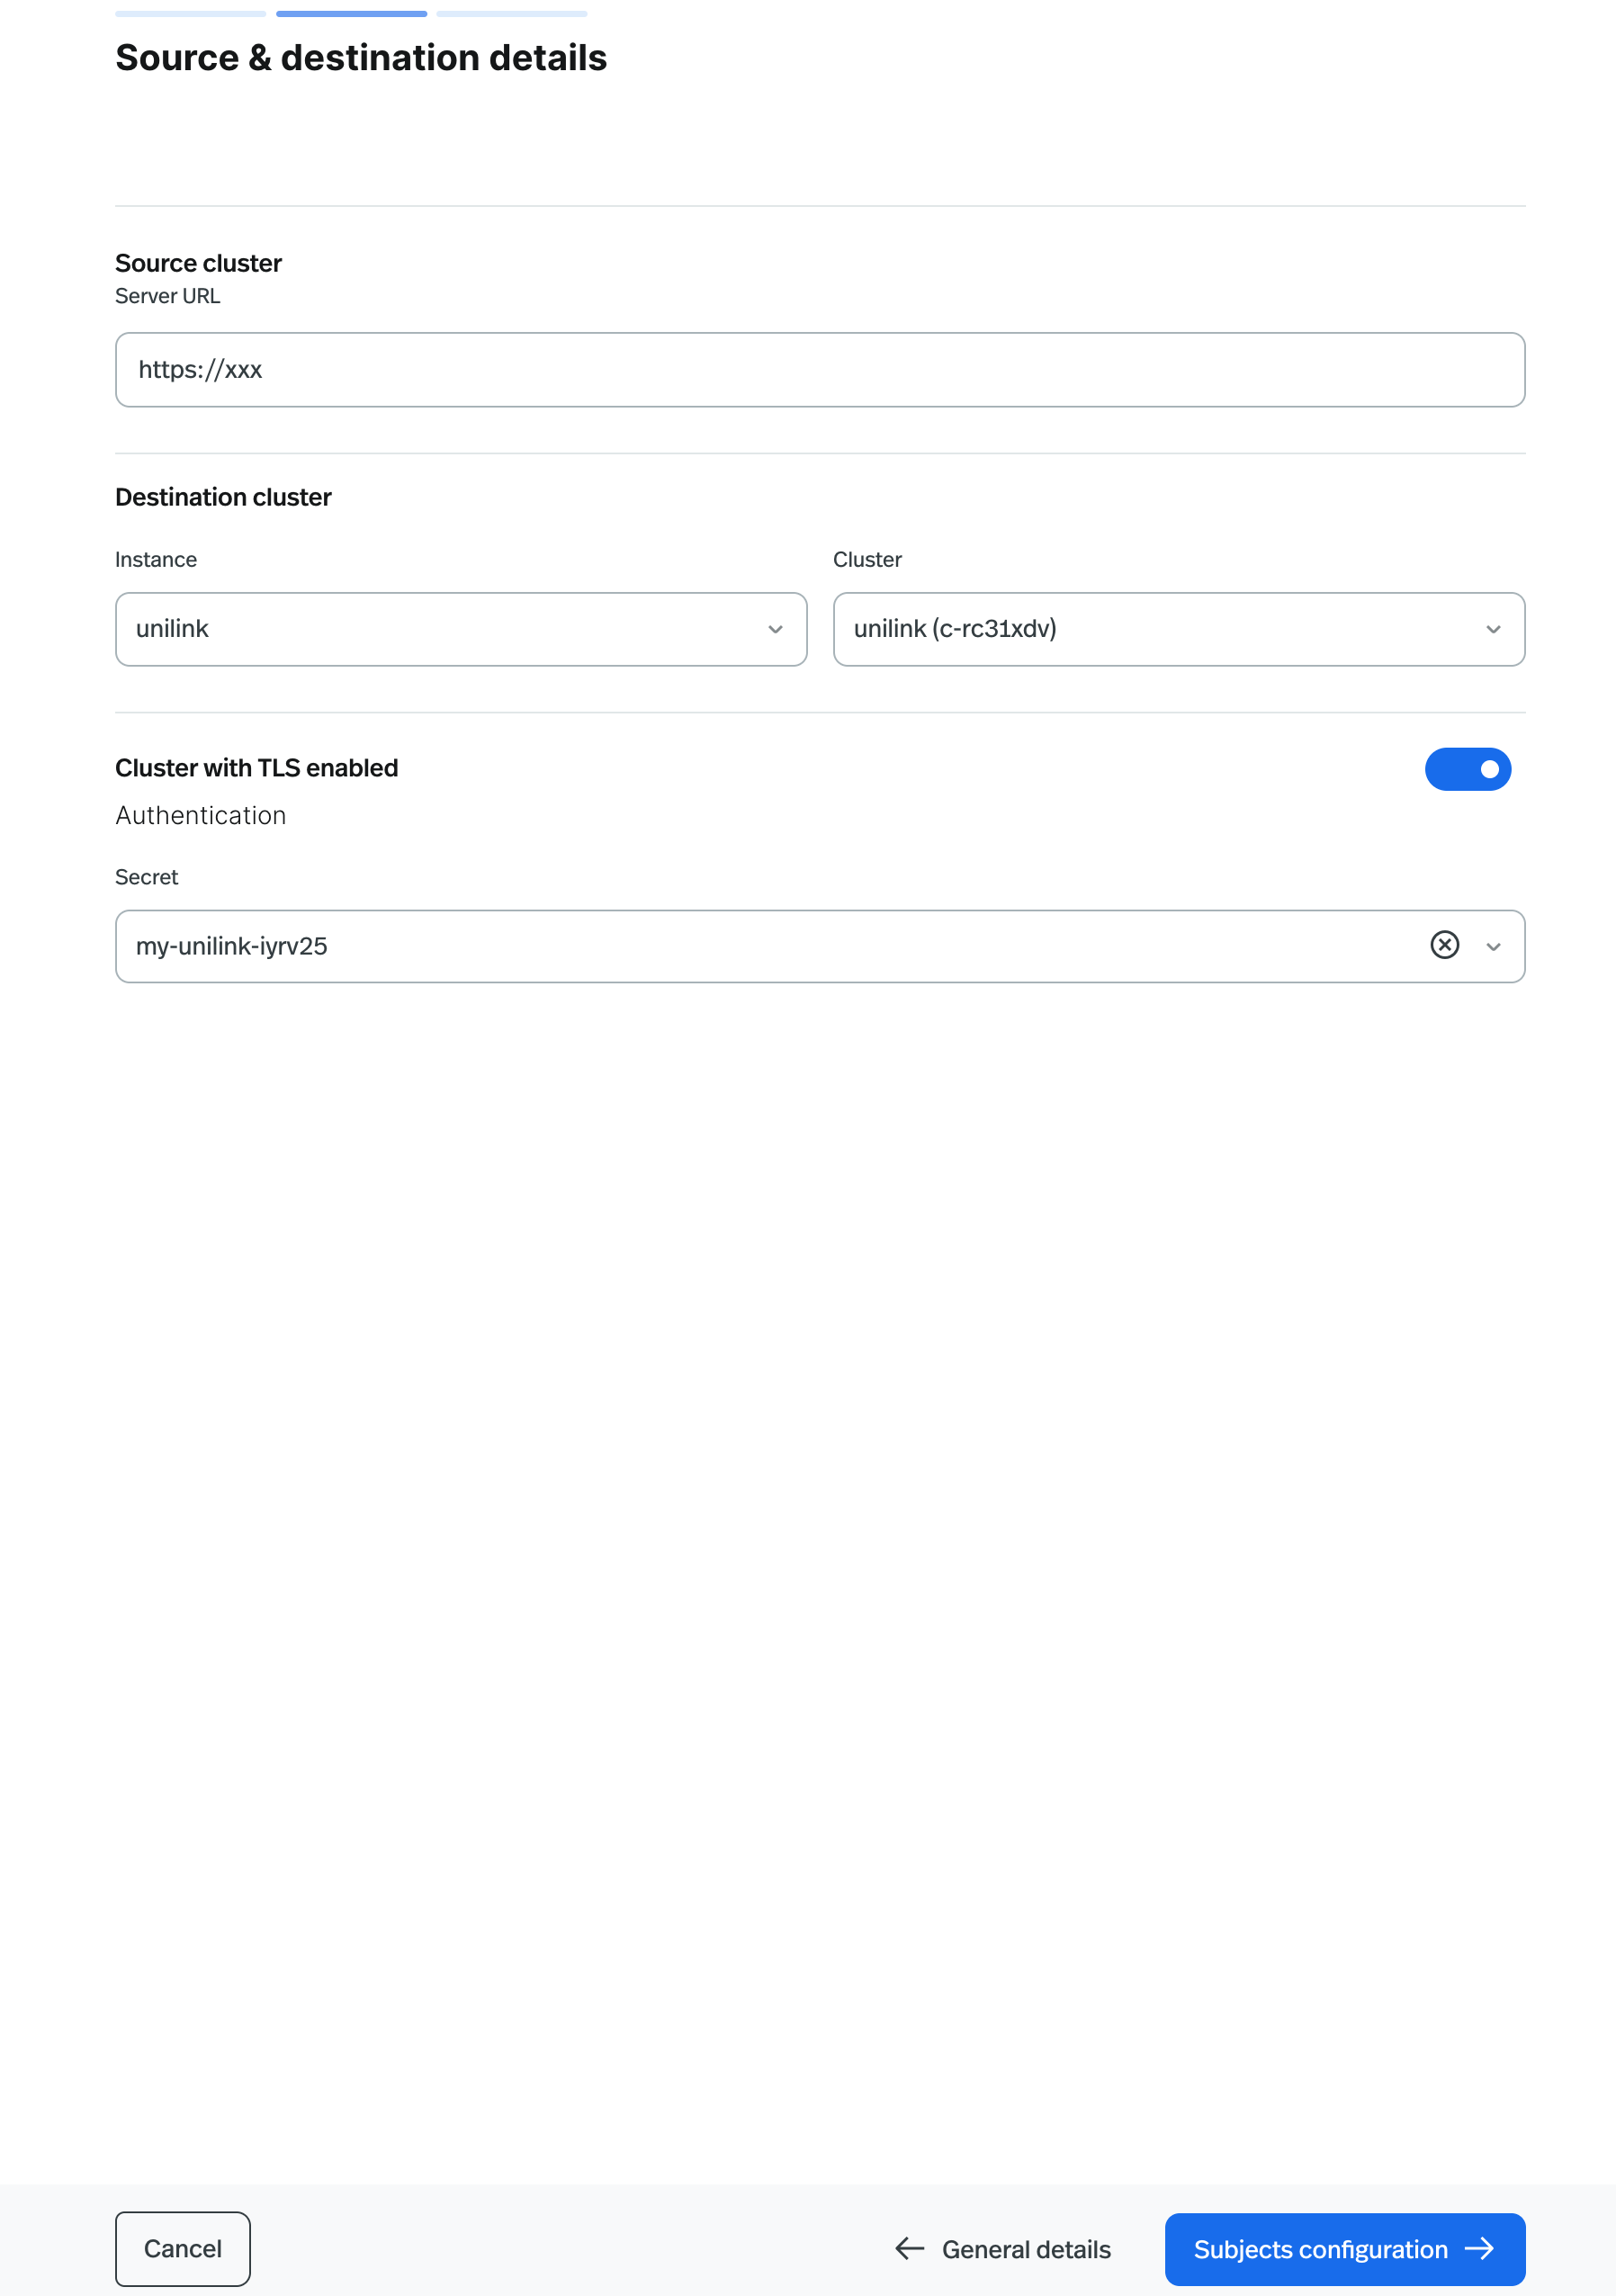 Click **Subjects Configuration** to continue.
### Subjects Configuration
1. On the **Subjects Configuration** page, select the subjects you want to migrate from the source cluster to the
destination cluster. Choose **All subjects replication** to migrate all subjects or **Selected subjects** to migrate
specific ones.
If you select **Selected subjects**, enter the subject name in the **Include subjects** input box. It supports
multiple regex patterns separated by commas, e.g., `subject1,subject2,subject3-.*`.
2. Enter the **Destination prefix** for the subjects in the destination cluster. The prefix will be added to the subject
name in the destination cluster. For example, if the prefix is `public/test/`, `subject1` will be migrated to
`public/test/subject1`. This helps migrate subjects to a specific namespace. The prefix must be in the format of
tenant/namespace/ or any string ending with an underscore.
Ensure this subject mapping configuration is consistent with the topic mapping configuration in the Data Migration
job.
Click **Subjects Configuration** to continue.
### Subjects Configuration
1. On the **Subjects Configuration** page, select the subjects you want to migrate from the source cluster to the
destination cluster. Choose **All subjects replication** to migrate all subjects or **Selected subjects** to migrate
specific ones.
If you select **Selected subjects**, enter the subject name in the **Include subjects** input box. It supports
multiple regex patterns separated by commas, e.g., `subject1,subject2,subject3-.*`.
2. Enter the **Destination prefix** for the subjects in the destination cluster. The prefix will be added to the subject
name in the destination cluster. For example, if the prefix is `public/test/`, `subject1` will be migrated to
`public/test/subject1`. This helps migrate subjects to a specific namespace. The prefix must be in the format of
tenant/namespace/ or any string ending with an underscore.
Ensure this subject mapping configuration is consistent with the topic mapping configuration in the Data Migration
job.
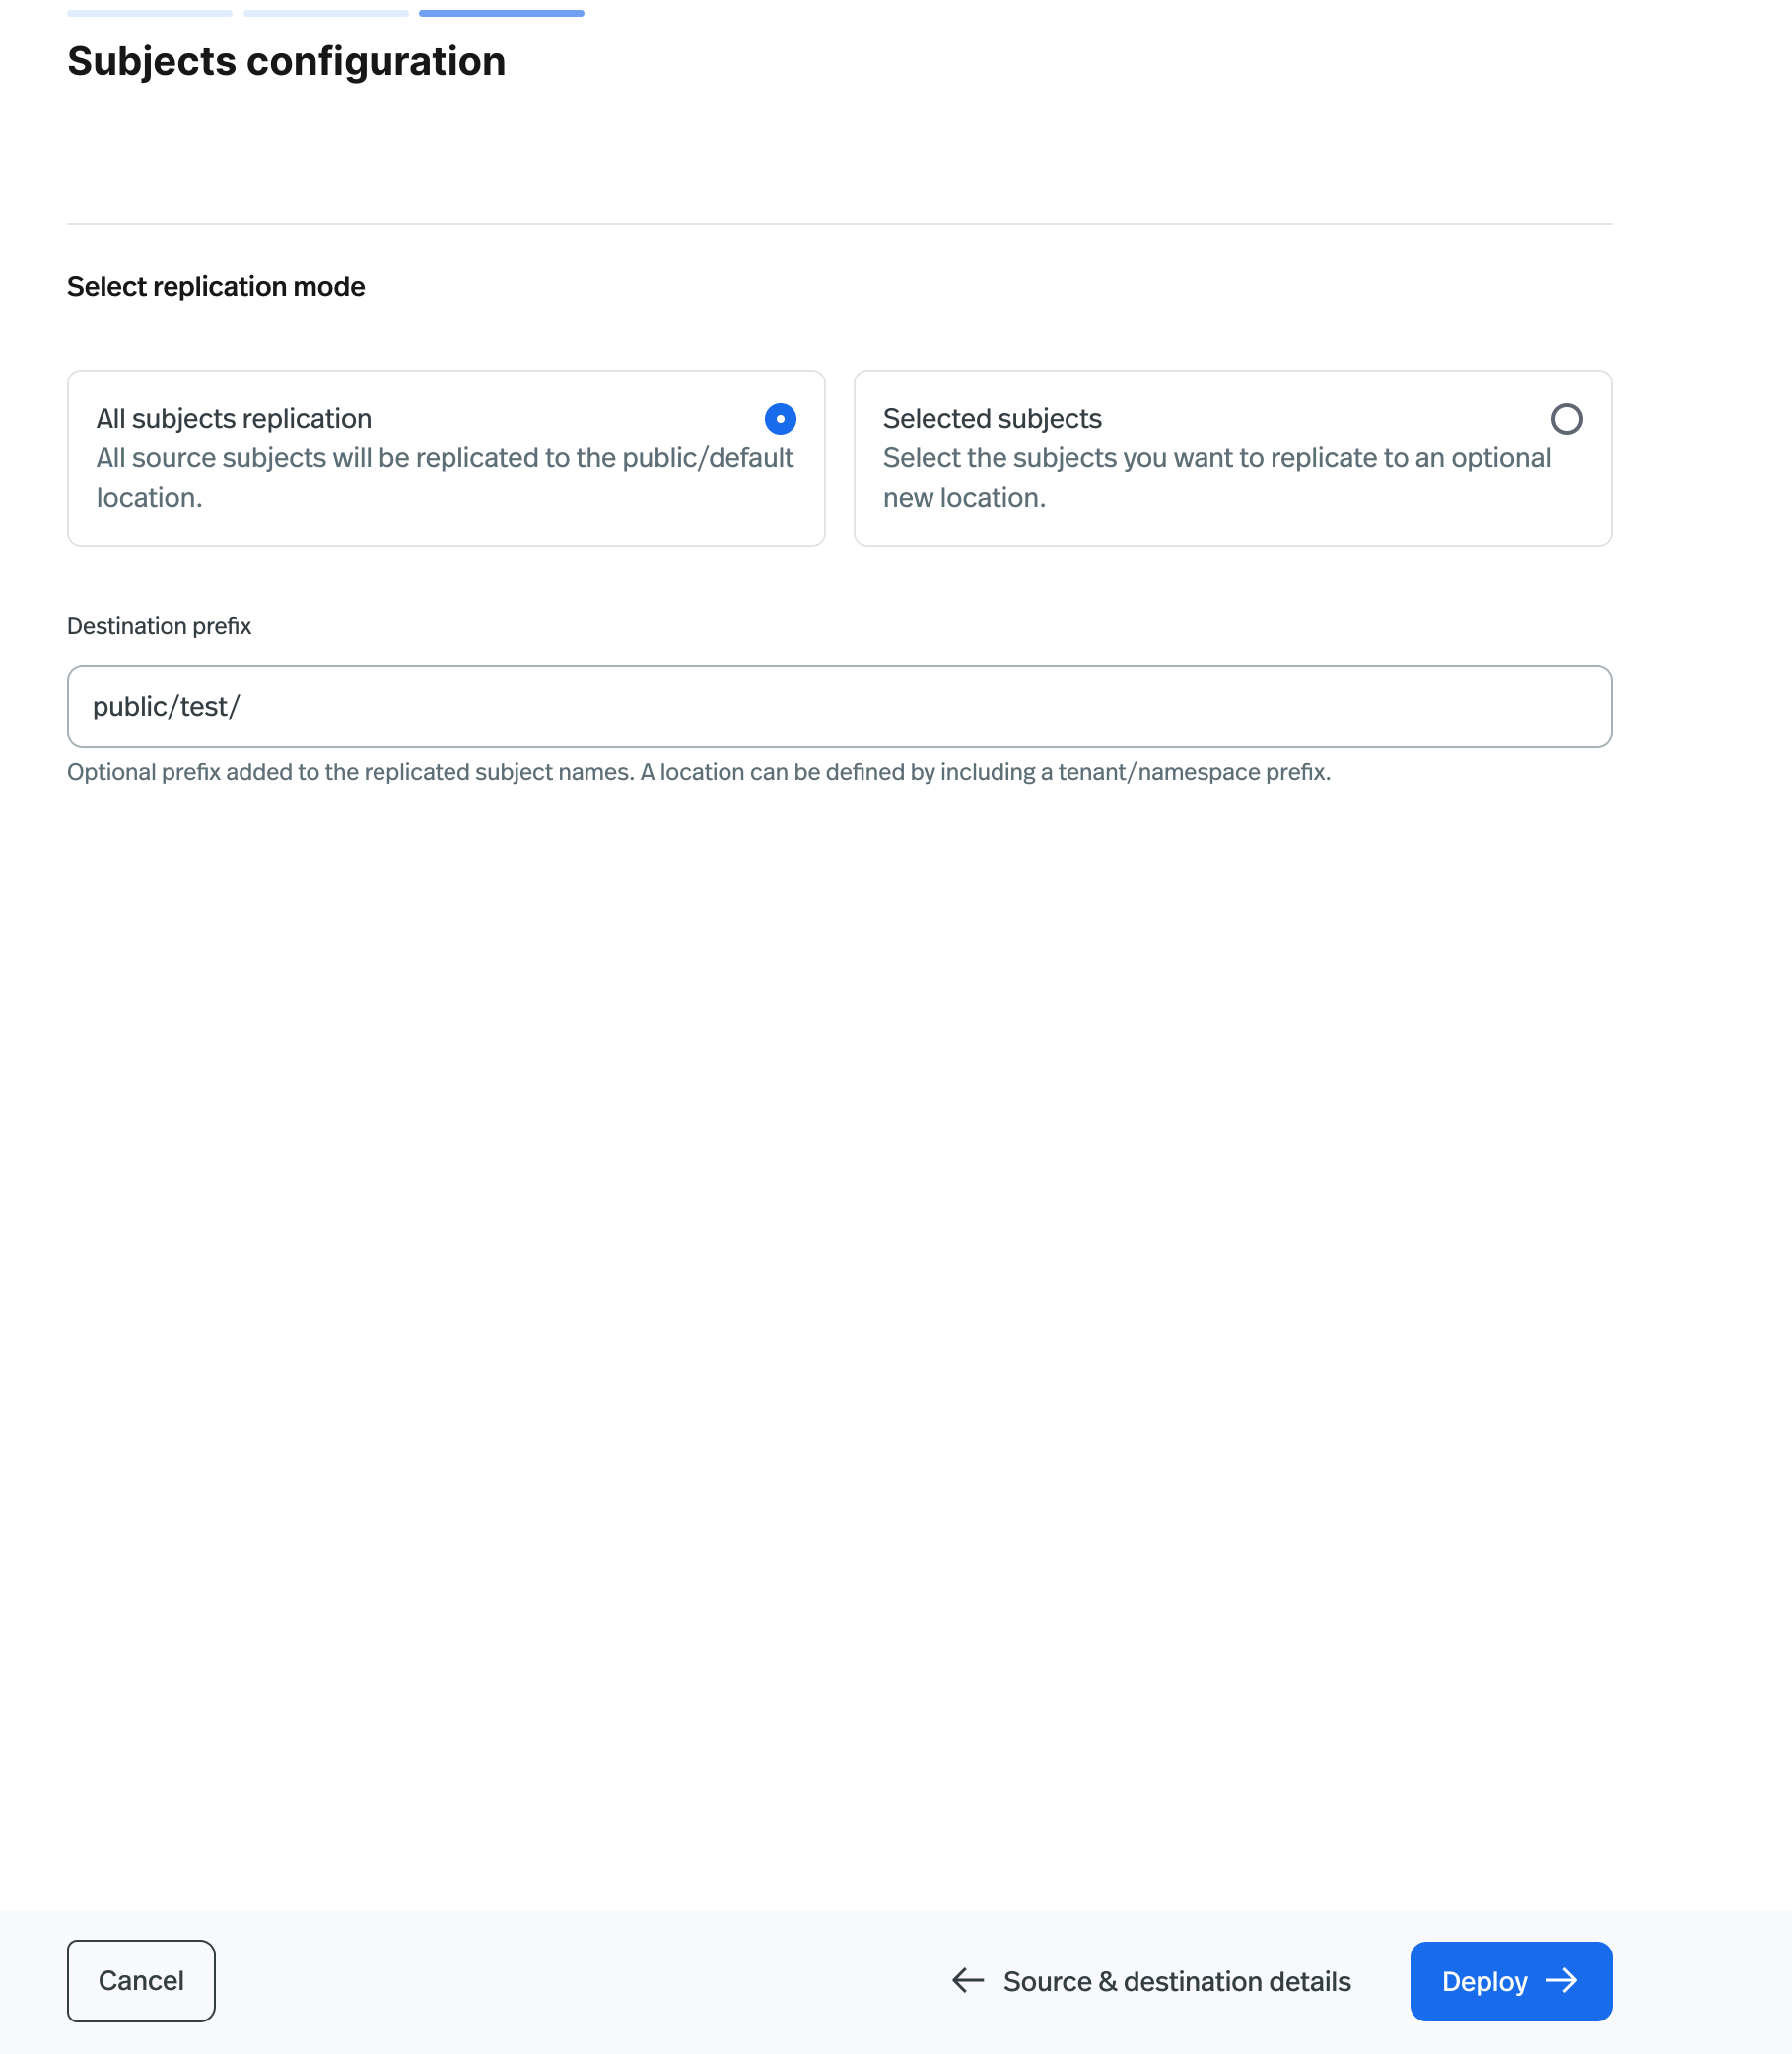 Click **Deploy**. This builds a subject mapping between the source and destination cluster for review. Click \*
\*Continue\*\* to deploy the UniLink Schema Replication Job.
The UniLink Schema job has been successfully created.
Click **Deploy**. This builds a subject mapping between the source and destination cluster for review. Click \*
\*Continue\*\* to deploy the UniLink Schema Replication Job.
The UniLink Schema job has been successfully created.