> ## Documentation Index
> Fetch the complete documentation index at: https://docs.streamnative.io/llms.txt
> Use this file to discover all available pages before exploring further.
# Set up Your Environment
This section introduces how to set up a new service account with the minimum permissions to run functions. To perform the following operations, you need to be the cluster administrator beforehand.
## Prerequisites
* [Install](/tools/cli/snctl/snctl-overview#install-snctl) and [configure](/tools/cli/snctl/snctl-overview#configure-snctl) the `snctl` CLI tool.
* [Install](https://github.com/streamnative/pulsarctl#install-pulsarctl) the `pulsarctl` CLI tool.
* [Log in to StreamNative Cloud Console](https://console.streamnative.cloud/?defaultMethod=signup).
* Create a [Pulsar cluster](/cloud/clusters/manage-clusters/cluster#create-a-cluster) and [connect to](/tools/cli/pulsarctl/pulsarctl-overview) your Pulsar cluster using the `pulsarctl` CLI tool.
* Create a [tenant](/cloud/manage-data-streams/tenant#create-a-tenant) and a [namespace](/cloud/manage-data-streams/namespace#create-a-namespace).
## Create a service account for Pulsar users
1. On the left navigation pane of StreamNative Cloud Console, click **Service Accounts**.
2. Click **Create Service Account**.
3. Enter a name for the service account, and then click **Confirm**.
Do **NOT** check the **Super Admin** option when creating this service account.
## Authorize the service account
To make the service account work, you need to make the service account granted with proper permissions (`functions`, `packages`, `produce`, and `consume`).
To grant the service account permissions on the namespace level, follow these steps:
1. Navigate to the **Namespace Dashboard** page by [switching to the namespace workspace](/cloud/get-started/cloud-console#switch-a-namespace).
2. On the **Namespace Dashboard** page, click **Configuration** on the left navigation pane.
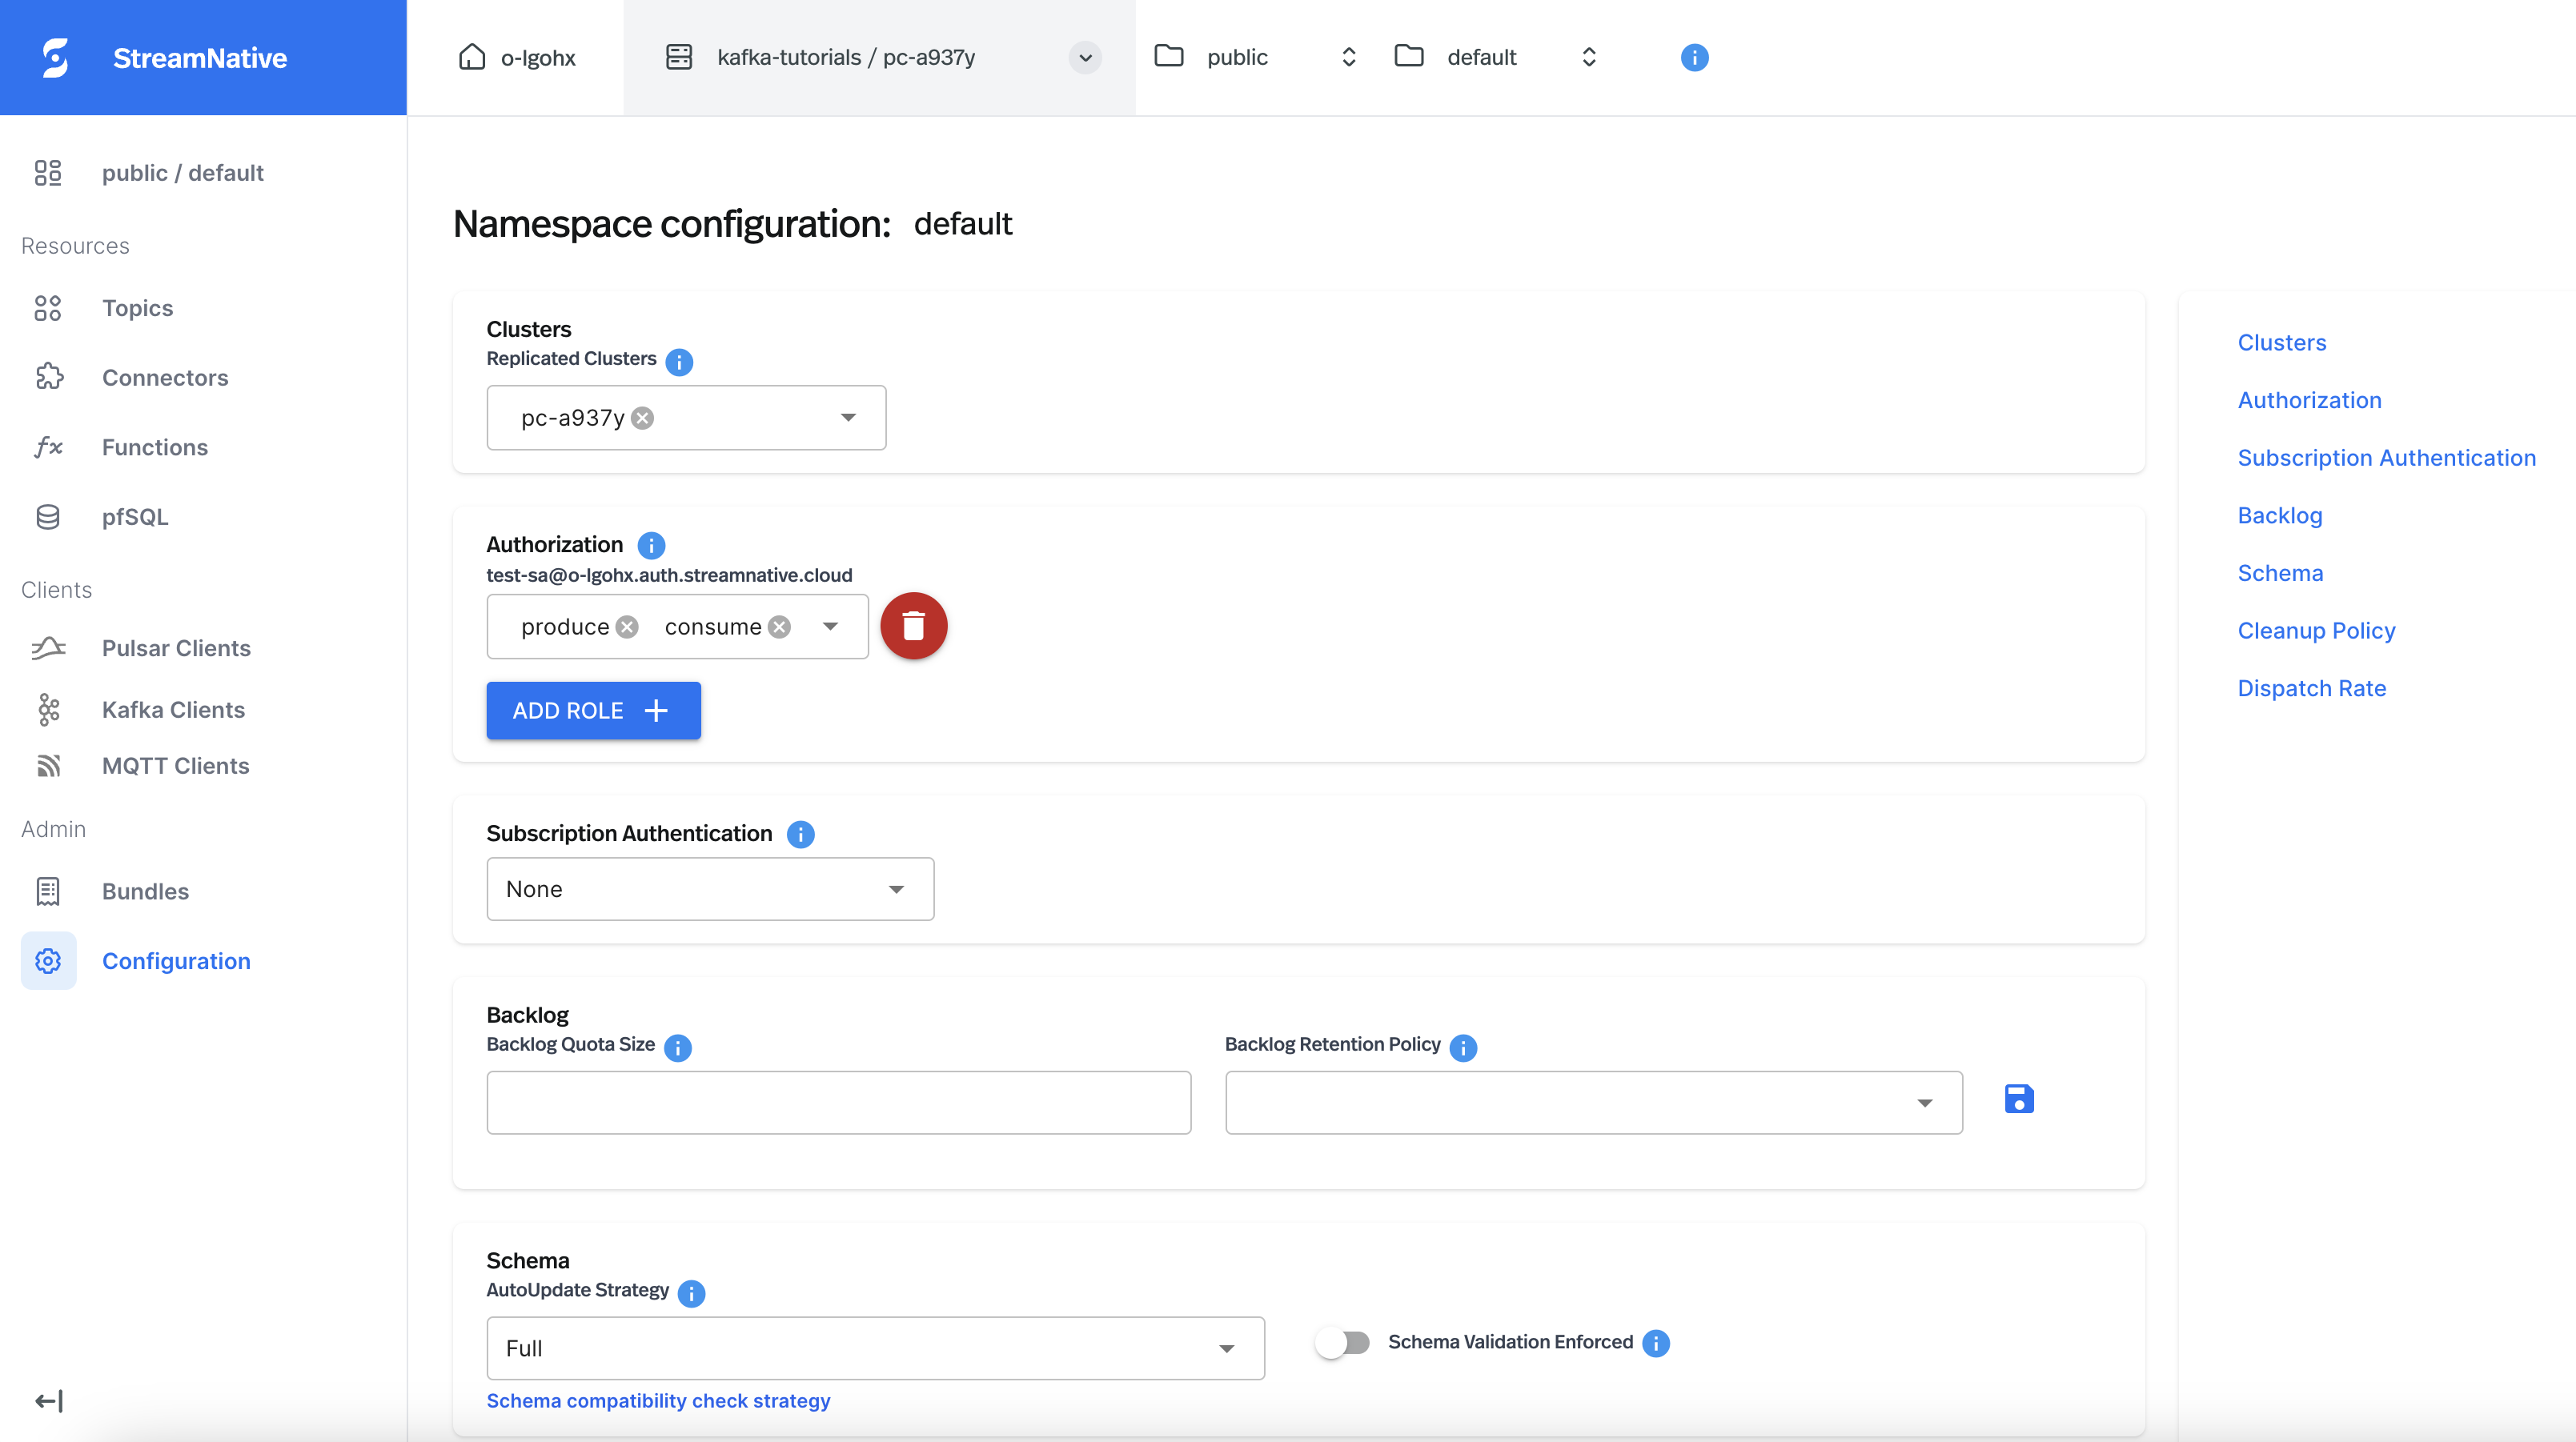
3. On the **Namespace configuration** page, click **ADD ROLE**, and select the service account that you want to authorize.
4. On the drop-down menu below the service account, select the proper permissions to assign to the service account. There are six permissions in total:
* `consume`: allow the service account to consume messages.
* `produce`: allow the service account to publish messages.
* `functions`: allow the service account to submit and manage functions.
* `sinks`: allow the service account to create and manage sink connectors.
* `sources`: allow the service account to create and manage source connectors.
* `packages`: allow the service account to upload and manage pulsar packages. If you want to submit a customized function/connector, then you will need to upload the function/connector’s JAR/NAR/Python file first, which requires the `packages` permission.
 ## Grant access to the service account
To grant the underlying infrastructure with access to the newly created service account's OAuth2 key file, you need to create a service account binding via UI.
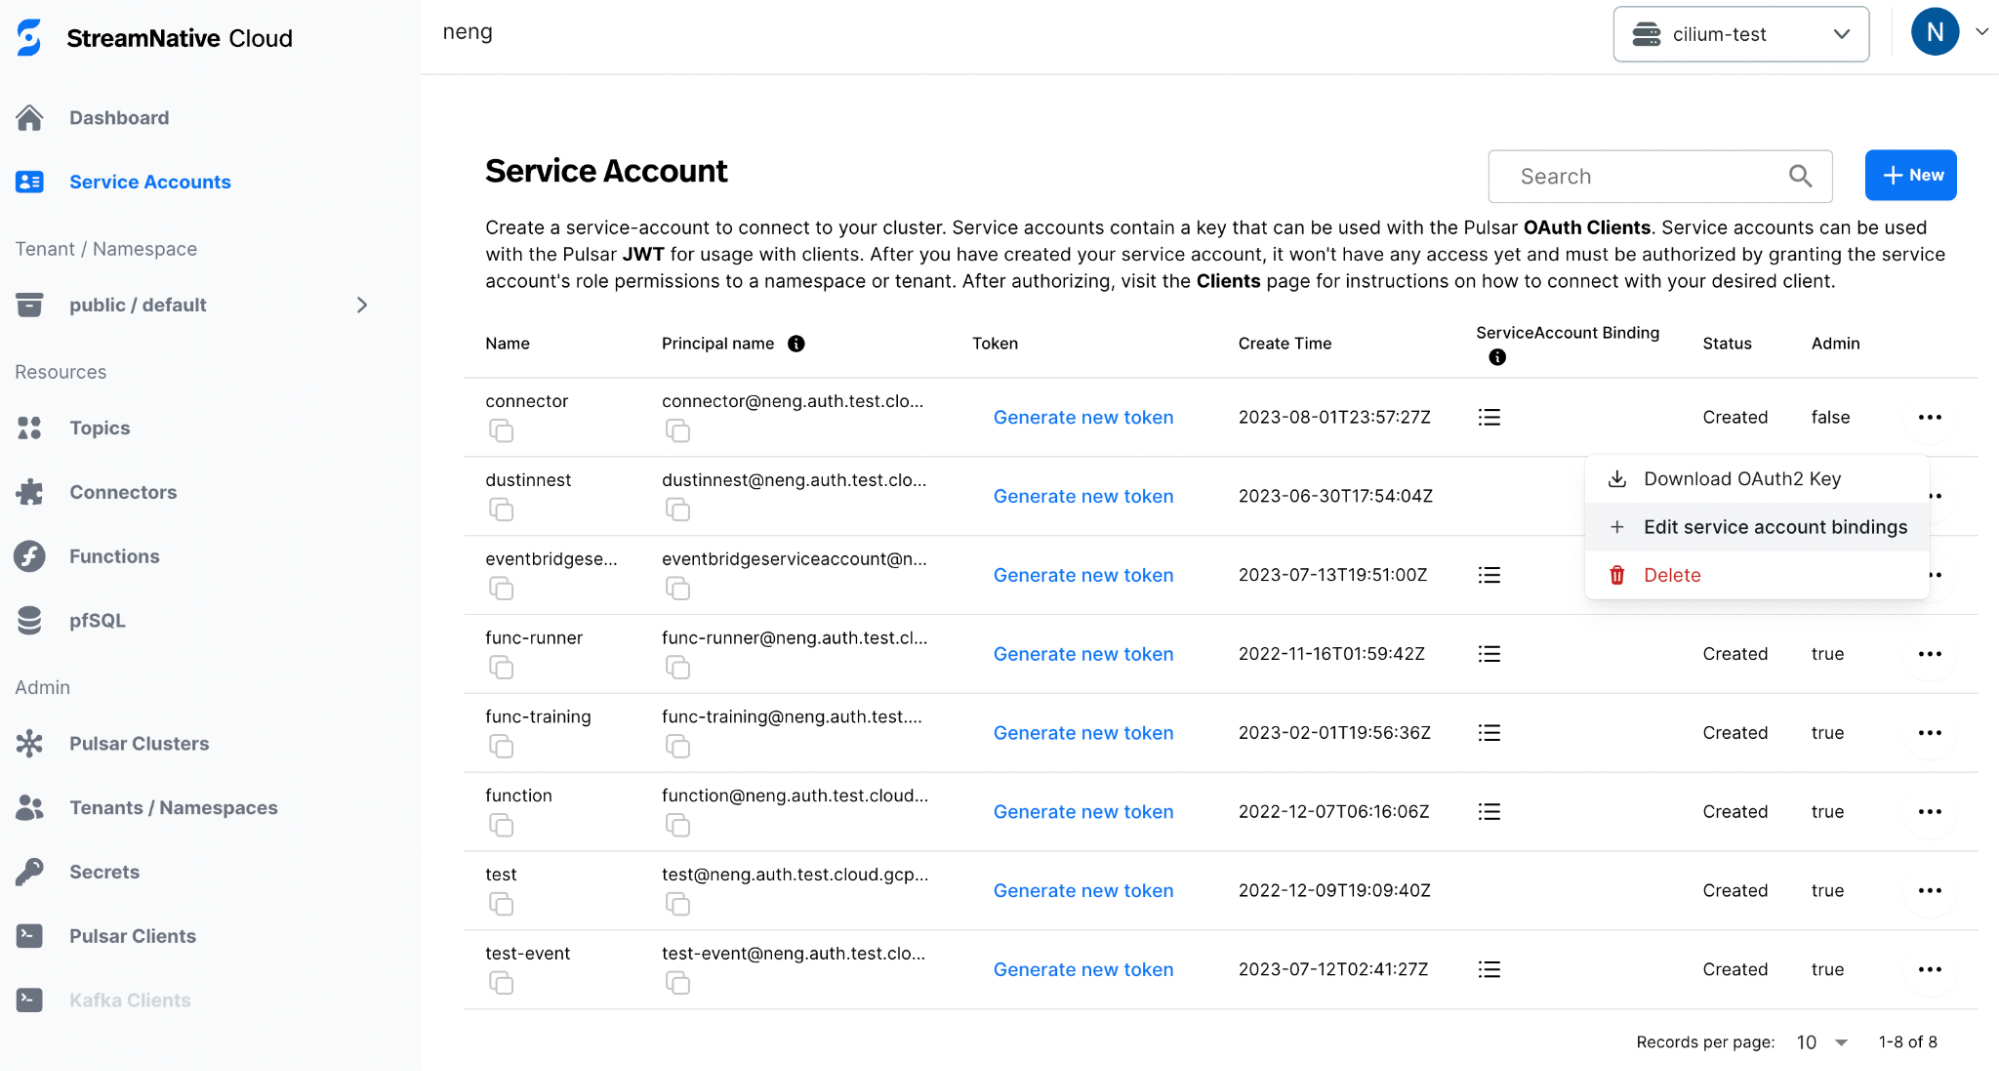
Go to the `Service Accounts` tab and choose the service account you want to use for running the connector. Clicking on the right button and there will be a `Edit service account bindings` option.
## Grant access to the service account
To grant the underlying infrastructure with access to the newly created service account's OAuth2 key file, you need to create a service account binding via UI.
Go to the `Service Accounts` tab and choose the service account you want to use for running the connector. Clicking on the right button and there will be a `Edit service account bindings` option.
 Click the `Edit service account bindings`, choose the desired pool member and confirm.
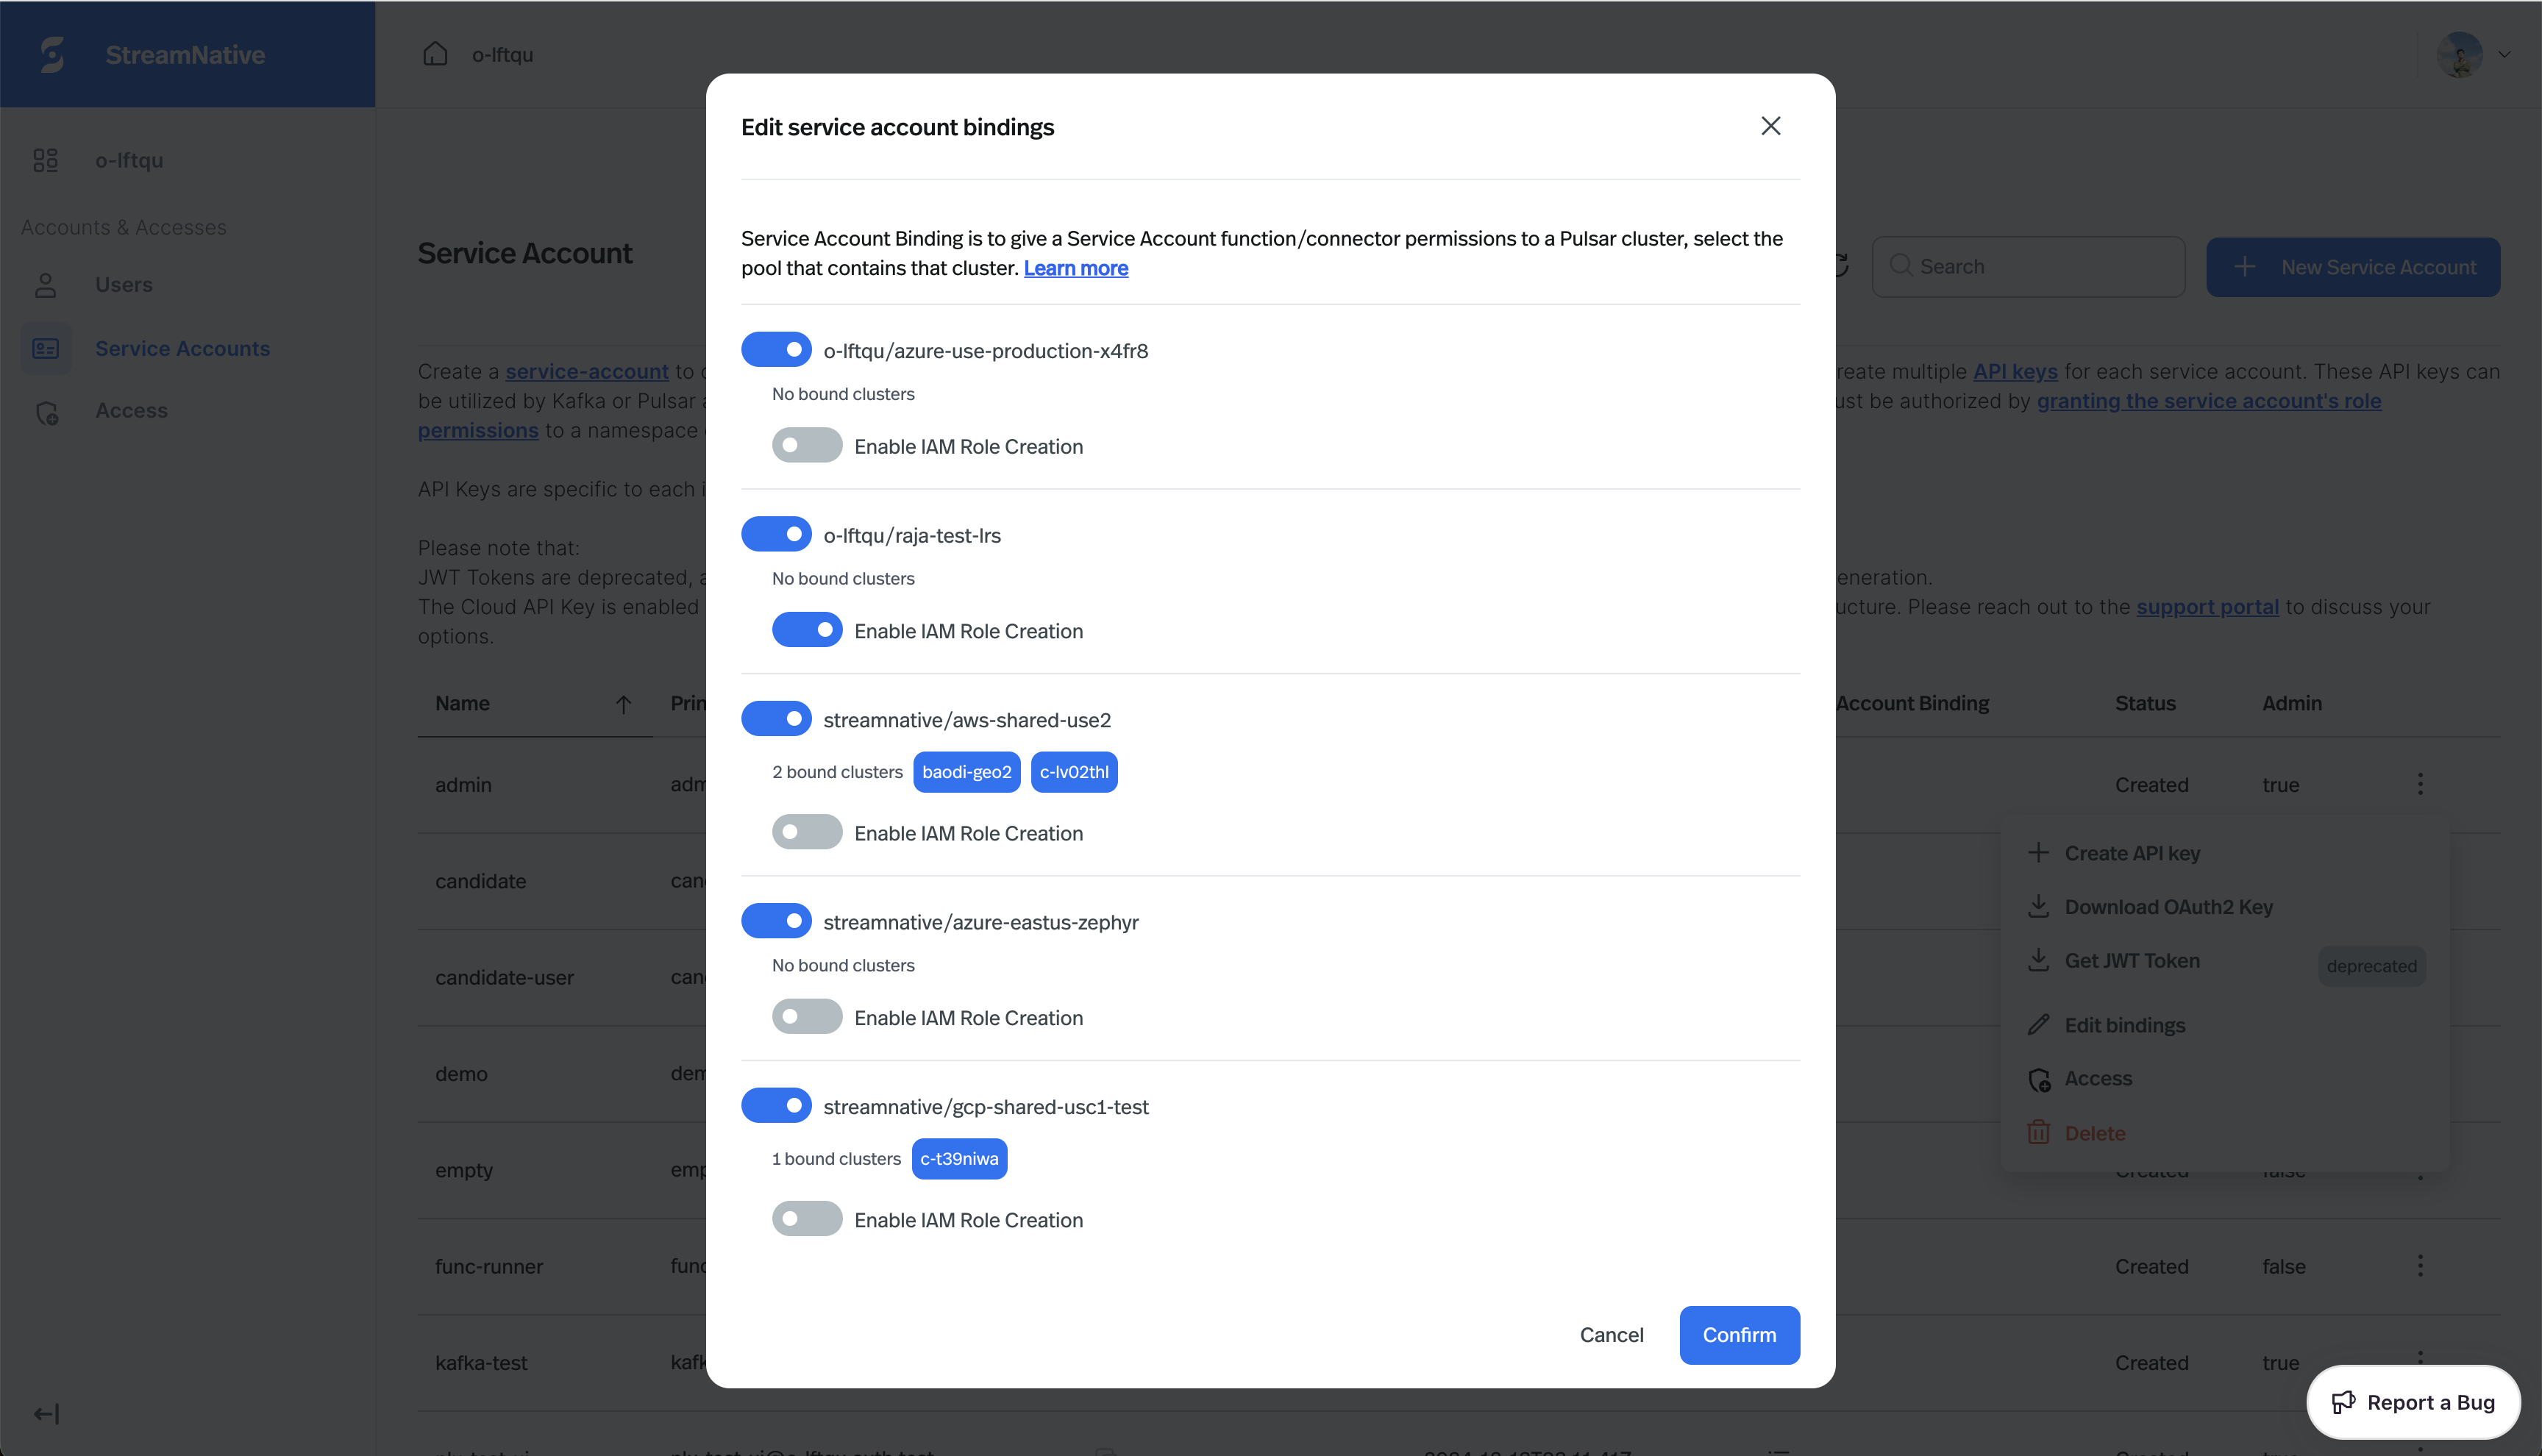 You can also enable the `Enable IAM Role Creation` option to create a separate IAM role for the service account.
Now your connector is ready to use the service account in StreamNative environments.
## (Optional) Create a separate IAM role for the service account
StreamNative's I/O components (Pulsar Functions, Pulsar Connectors, and Kafka Connectors) run as cloud-native workloads on AWS, GCP, and Azure infrastructures.
Use the cloud providers' native IAM (Identity and Access Management) services to control access to infrastructure resources such as S3, GCS, and Azure Blob Storage. This removes the need for password-based authentication for the service accounts that run connectors in StreamNative Cloud.
By default, StreamNative uses a single service account per `PulsarCluster` for all I/O components (Pulsar Functions, Pulsar Connectors, and Kafka Connectors) to access underlying infrastructure resources. This means all I/O Components in the same cluster share one service account and the same permissions.
Using a single service account for all I/O components means all functions and connectors share the same permissions. If one component is compromised, it could access resources intended for other components.
So it's better to leave the default service account with no permissions and use it for running IO components that do not require access to external resources.
And create separate service accounts with the minimum required permissions for each IO component that need to access external resources.
To enhance security and improve isolation, you can create a separate IAM role for each service account used to run connectors. This let you grant only the permissions each service account needs.
Create a separate IAM role for your service account:
This feature is available in [snctl](/tools/cli/snctl/snctl-overview) v1.3.0 or later.
1. Get the `PoolMember` name and namespace from the `PulsarCluster`
```shell theme={null}
snctl get pulsarcluster -o yaml
```
In the output, find the `poolMemberRef` block, which looks like:
```yaml theme={null}
poolMemberRef:
name:
namespace:
```
Multiple clusters may be located in the same `PoolMember`. You do not need to create separate IAM roles for each cluster within the same `PoolMember`.
2. Create a new `ServiceAccountBinding` that binds the service account to the `PoolMember`
```shell theme={null}
snctl create serviceaccountbinding \
--pool-member / \
--enable-iam-account-creation \
--service-account-name
```
**AWS only:** You can specify one or more `AWS Assume Role ARNs` that can be assumed by the IAM role created for the service account (repeat the flag for each ARN):
```shell theme={null}
snctl create serviceaccountbinding \
--pool-member / \
--enable-iam-account-creation \
--service-account-name \
--aws-assume-role-arns \
--aws-assume-role-arns
```
The IAM role created by StreamNative will include permissions to call `sts:AssumeRole` on `arn1` and `arn2`. You must still add a trust policy on `arn1` and `arn2` to allow the newly created role to assume them, an example likes below:
```json theme={null}
{
"Version": "2012-10-17",
"Statement": [
{
"Effect": "Allow",
"Principal": {
"AWS": "arn:aws:iam::[aws-account-id]:role/StreamNative/sncloud-role/authorization.streamnative.io/iamaccounts/IamAccount-[org-id]-sab-[binding-name]"
},
"Action": "sts:AssumeRole"
}
]
}
```
3. (Optional) Update an existing `ServiceAccountBinding` to create the IAM role
```shell theme={null}
snctl edit serviceaccountbinding
```
4. Verify the IAM role was created successfully
```shell theme={null}
snctl get serviceaccountbinding -o yaml
```
Expected output (example):
```yaml theme={null}
apiVersion: cloud.streamnative.io/v1alpha1
kind: ServiceAccountBinding
metadata:
creationTimestamp: "2025-06-25T08:45:35Z"
finalizers:
- serviceaccountbinding.finalizers.cloud.streamnative.io
generation: 1
name: test-admin
namespace: o-lftqu
ownerReferences:
- apiVersion: cloud.streamnative.io/v1alpha1
kind: ServiceAccount
name: admin
uid: 4ef639aa-6278-4863-9a23-f1da50cea448
resourceVersion: "54707713"
uid: 918d40ad-551d-416b-a2ae-d41548d6608e
spec:
enableIamRoleCreation: true
poolMemberRef:
name: azure-eastus-zephyr
namespace: streamnative
serviceAccountName: admin
status:
conditions:
- lastTransitionTime: "2025-06-25T08:45:35Z"
status: "True"
type: IAMAccountReady
- lastTransitionTime: "2025-06-25T08:45:35Z"
status: "True"
type: ServiceAccountReady
- lastTransitionTime: "2025-07-16T13:56:17Z"
status: "True"
type: ResourceExists
- lastTransitionTime: "2025-07-16T13:56:17Z"
status: "True"
type: PoolMemberReady
- lastTransitionTime: "2025-07-16T13:56:17Z"
reason: AllConditionStatusTrue
status: "True"
type: Ready
```
In the output, the `status.conditions` array should include a condition with `type: IAMAccountReady` and `status: "True"`, indicating the IAM role was created successfully.
You can also enable the `Enable IAM Role Creation` option to create a separate IAM role for the service account.
Now your connector is ready to use the service account in StreamNative environments.
## (Optional) Create a separate IAM role for the service account
StreamNative's I/O components (Pulsar Functions, Pulsar Connectors, and Kafka Connectors) run as cloud-native workloads on AWS, GCP, and Azure infrastructures.
Use the cloud providers' native IAM (Identity and Access Management) services to control access to infrastructure resources such as S3, GCS, and Azure Blob Storage. This removes the need for password-based authentication for the service accounts that run connectors in StreamNative Cloud.
By default, StreamNative uses a single service account per `PulsarCluster` for all I/O components (Pulsar Functions, Pulsar Connectors, and Kafka Connectors) to access underlying infrastructure resources. This means all I/O Components in the same cluster share one service account and the same permissions.
Using a single service account for all I/O components means all functions and connectors share the same permissions. If one component is compromised, it could access resources intended for other components.
So it's better to leave the default service account with no permissions and use it for running IO components that do not require access to external resources.
And create separate service accounts with the minimum required permissions for each IO component that need to access external resources.
To enhance security and improve isolation, you can create a separate IAM role for each service account used to run connectors. This let you grant only the permissions each service account needs.
Create a separate IAM role for your service account:
This feature is available in [snctl](/tools/cli/snctl/snctl-overview) v1.3.0 or later.
1. Get the `PoolMember` name and namespace from the `PulsarCluster`
```shell theme={null}
snctl get pulsarcluster -o yaml
```
In the output, find the `poolMemberRef` block, which looks like:
```yaml theme={null}
poolMemberRef:
name:
namespace:
```
Multiple clusters may be located in the same `PoolMember`. You do not need to create separate IAM roles for each cluster within the same `PoolMember`.
2. Create a new `ServiceAccountBinding` that binds the service account to the `PoolMember`
```shell theme={null}
snctl create serviceaccountbinding \
--pool-member / \
--enable-iam-account-creation \
--service-account-name
```
**AWS only:** You can specify one or more `AWS Assume Role ARNs` that can be assumed by the IAM role created for the service account (repeat the flag for each ARN):
```shell theme={null}
snctl create serviceaccountbinding \
--pool-member / \
--enable-iam-account-creation \
--service-account-name \
--aws-assume-role-arns \
--aws-assume-role-arns
```
The IAM role created by StreamNative will include permissions to call `sts:AssumeRole` on `arn1` and `arn2`. You must still add a trust policy on `arn1` and `arn2` to allow the newly created role to assume them, an example likes below:
```json theme={null}
{
"Version": "2012-10-17",
"Statement": [
{
"Effect": "Allow",
"Principal": {
"AWS": "arn:aws:iam::[aws-account-id]:role/StreamNative/sncloud-role/authorization.streamnative.io/iamaccounts/IamAccount-[org-id]-sab-[binding-name]"
},
"Action": "sts:AssumeRole"
}
]
}
```
3. (Optional) Update an existing `ServiceAccountBinding` to create the IAM role
```shell theme={null}
snctl edit serviceaccountbinding
```
4. Verify the IAM role was created successfully
```shell theme={null}
snctl get serviceaccountbinding -o yaml
```
Expected output (example):
```yaml theme={null}
apiVersion: cloud.streamnative.io/v1alpha1
kind: ServiceAccountBinding
metadata:
creationTimestamp: "2025-06-25T08:45:35Z"
finalizers:
- serviceaccountbinding.finalizers.cloud.streamnative.io
generation: 1
name: test-admin
namespace: o-lftqu
ownerReferences:
- apiVersion: cloud.streamnative.io/v1alpha1
kind: ServiceAccount
name: admin
uid: 4ef639aa-6278-4863-9a23-f1da50cea448
resourceVersion: "54707713"
uid: 918d40ad-551d-416b-a2ae-d41548d6608e
spec:
enableIamRoleCreation: true
poolMemberRef:
name: azure-eastus-zephyr
namespace: streamnative
serviceAccountName: admin
status:
conditions:
- lastTransitionTime: "2025-06-25T08:45:35Z"
status: "True"
type: IAMAccountReady
- lastTransitionTime: "2025-06-25T08:45:35Z"
status: "True"
type: ServiceAccountReady
- lastTransitionTime: "2025-07-16T13:56:17Z"
status: "True"
type: ResourceExists
- lastTransitionTime: "2025-07-16T13:56:17Z"
status: "True"
type: PoolMemberReady
- lastTransitionTime: "2025-07-16T13:56:17Z"
reason: AllConditionStatusTrue
status: "True"
type: Ready
```
In the output, the `status.conditions` array should include a condition with `type: IAMAccountReady` and `status: "True"`, indicating the IAM role was created successfully.
5. Use the service account when creating I/O components
You can now select this service account in Console (or use its API key with the CLI) when creating I/O components (Pulsar Functions, Pulsar Connectors, and Kafka Connectors). The components will inherit the permissions granted to the IAM role created in the previous step.
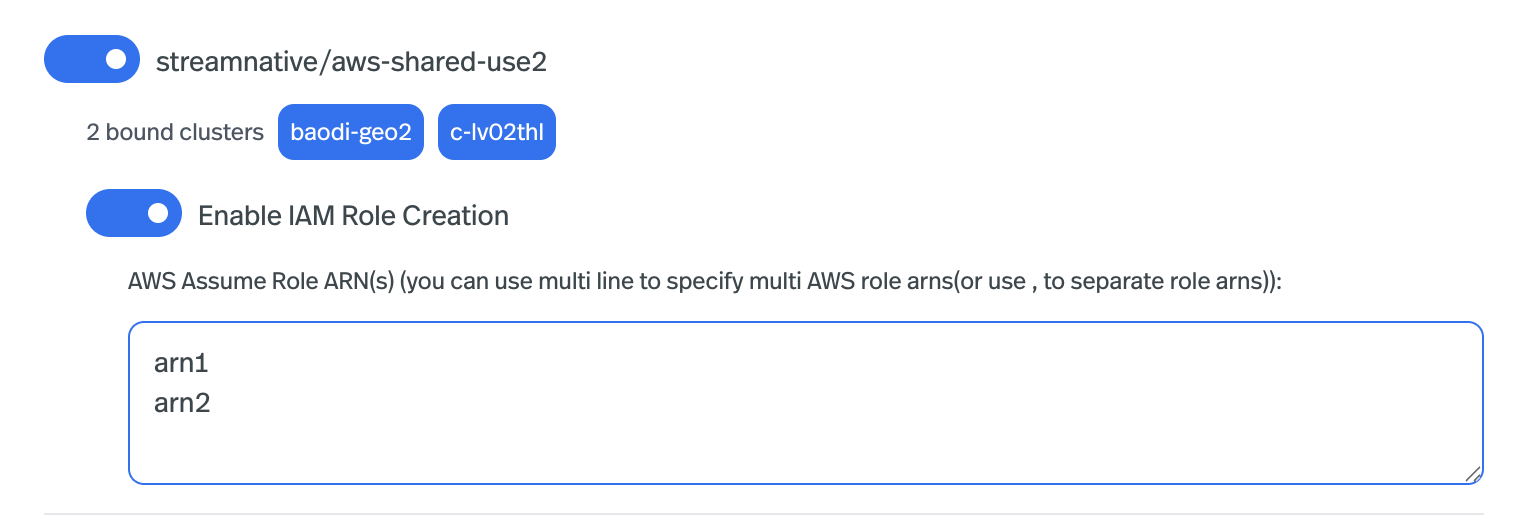
You can also create a separate IAM role for your service account via StreamNative Cloud Console. Just enable the `Enable IAM Role Creation` option when creating or editing a service account binding.
**AWS only:** You can specify one or more `AWS Assume Role ARNs` that can be assumed by the IAM role created for the service account (use one line for each ARN)
 The IAM role created by StreamNative will include permissions to call `sts:AssumeRole` on `arn1` and `arn2`. You must still add a trust policy on `arn1` and `arn2` to allow the newly created role to assume them, an example likes below:
```json theme={null}
{
"Version": "2012-10-17",
"Statement": [
{
"Effect": "Allow",
"Principal": {
"AWS": "arn:aws:iam::[aws-account-id]:role/StreamNative/sncloud-role/authorization.streamnative.io/iamaccounts/IamAccount-[org-id]-sab-[binding-name]"
},
"Action": "sts:AssumeRole"
}
]
}
```
In Azure, a Managed Identity `sab-[binding-name]-[org-id]` is created;
In AWS, an IAM role `role/StreamNative/sncloud-role/authorization.streamnative.io/iamaccounts/IamAccount-[org-id]-sab-[binding-name]` is created;
In GCP, a service account with display name: `IamAccount/[org-id]/sab-[binding-name]` is created.
## Set up client tools
### Use `snctl` to manage Pulsar IO Connectors with Service Account
StreamNative CLI `snctl` integrates the pulsar admin apis and allows to be used as the pulsar admin CLI to directly access to the StreamNative Cloud cluster. You can use `snctl` to make the target StreamNative Cloud cluster as the service context, and access to it with selected Service Account.
1. use `snctl config set --organization $ORG` to your StreamNative Cloud organization.
2. use `snctl context use` to interactivly select your target StreamNative Cloud cluster.
3. use `snctl pulsar admin --as-service-account $SERVICE_ACCOUNT_NAME ...` or `snctl pulsar admin --use-service-account ...` to send pulsar admin requests with selected Service Account.
### Use `pulsarctl` or `pulsar-admin`, `Rest Api` to manage Pulsar IO Connectors with Service Account
StreamNative Cloud Console provides a step-by-step wizard to walk you through the basic client setup process. You can connect your Pulsar client that uses the previously created service account to interact with your Pulsar cluster.
1. On the left navigation pane of StreamNative Cloud Console, in the **Admin** section, click **Pulsar Clients**.
The IAM role created by StreamNative will include permissions to call `sts:AssumeRole` on `arn1` and `arn2`. You must still add a trust policy on `arn1` and `arn2` to allow the newly created role to assume them, an example likes below:
```json theme={null}
{
"Version": "2012-10-17",
"Statement": [
{
"Effect": "Allow",
"Principal": {
"AWS": "arn:aws:iam::[aws-account-id]:role/StreamNative/sncloud-role/authorization.streamnative.io/iamaccounts/IamAccount-[org-id]-sab-[binding-name]"
},
"Action": "sts:AssumeRole"
}
]
}
```
In Azure, a Managed Identity `sab-[binding-name]-[org-id]` is created;
In AWS, an IAM role `role/StreamNative/sncloud-role/authorization.streamnative.io/iamaccounts/IamAccount-[org-id]-sab-[binding-name]` is created;
In GCP, a service account with display name: `IamAccount/[org-id]/sab-[binding-name]` is created.
## Set up client tools
### Use `snctl` to manage Pulsar IO Connectors with Service Account
StreamNative CLI `snctl` integrates the pulsar admin apis and allows to be used as the pulsar admin CLI to directly access to the StreamNative Cloud cluster. You can use `snctl` to make the target StreamNative Cloud cluster as the service context, and access to it with selected Service Account.
1. use `snctl config set --organization $ORG` to your StreamNative Cloud organization.
2. use `snctl context use` to interactivly select your target StreamNative Cloud cluster.
3. use `snctl pulsar admin --as-service-account $SERVICE_ACCOUNT_NAME ...` or `snctl pulsar admin --use-service-account ...` to send pulsar admin requests with selected Service Account.
### Use `pulsarctl` or `pulsar-admin`, `Rest Api` to manage Pulsar IO Connectors with Service Account
StreamNative Cloud Console provides a step-by-step wizard to walk you through the basic client setup process. You can connect your Pulsar client that uses the previously created service account to interact with your Pulsar cluster.
1. On the left navigation pane of StreamNative Cloud Console, in the **Admin** section, click **Pulsar Clients**.
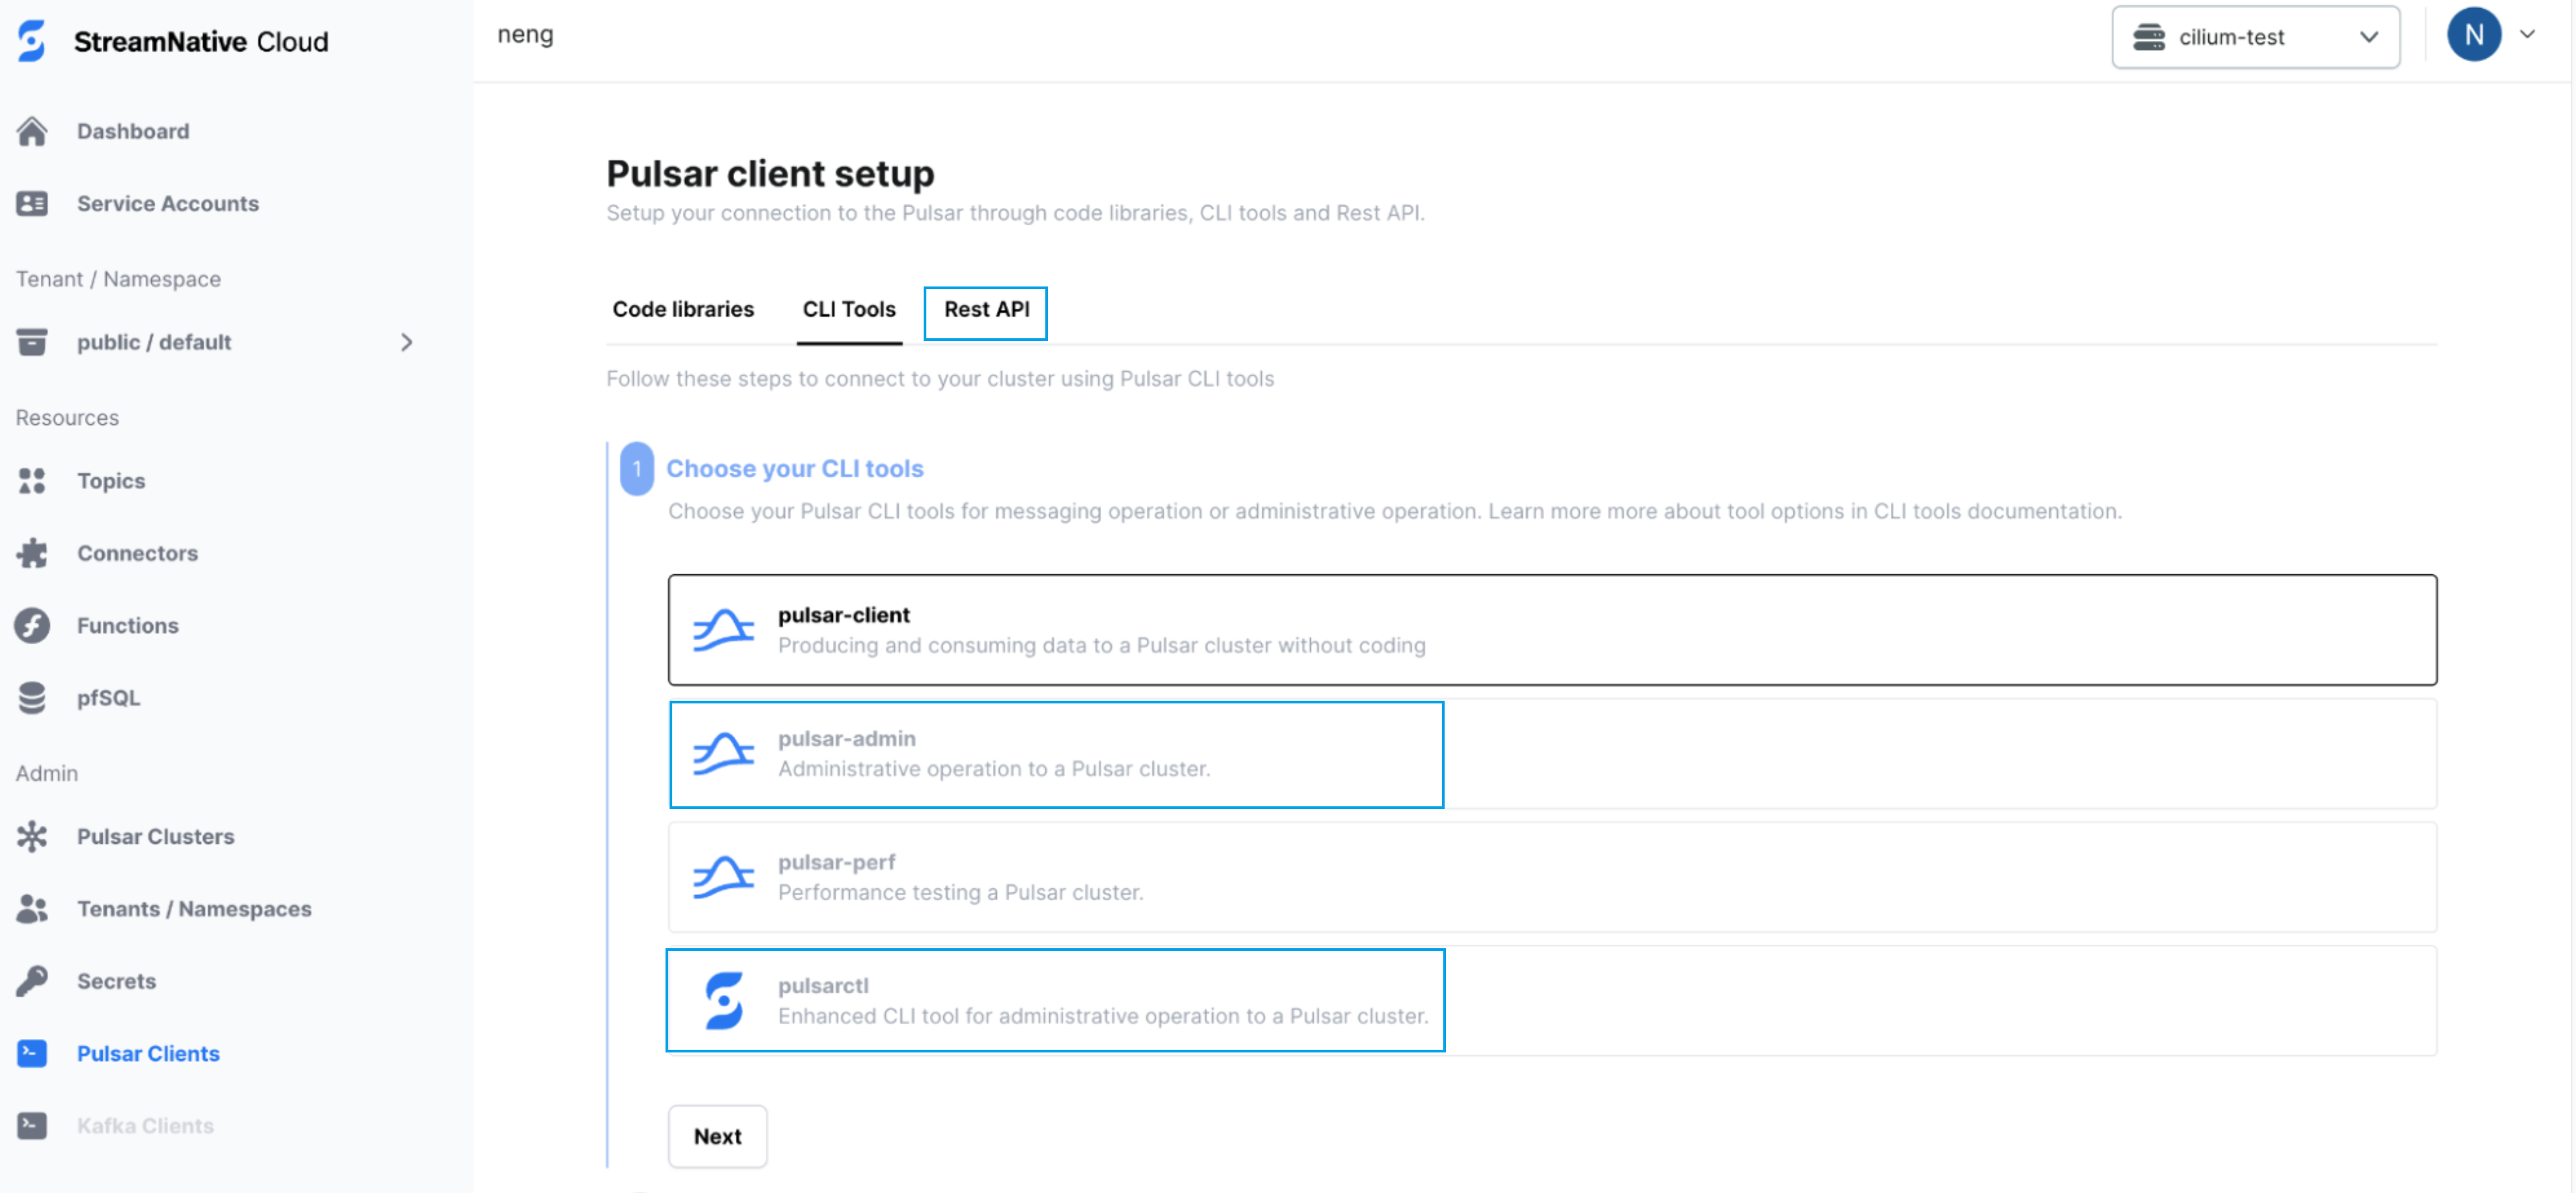 2. Select the **CLI Tools** tab and follow the wizard to generate the sample code you need for connecting to your Pulsar cluster. The steps may vary depending on the tool you use.
a. Select either `pulsarctl` or `pulsar-admin`.
b. Download the selected CLI tool.
c. Select the service account you created.
d. Select **OAuth2** as the authentication type and download the key file to your local machine.
e. Set up your CLI tool with that key file, and the steps vary depending on the CLI tool you use.
f. Copy the command for setting client configurations to your terminal, update the path of the OAuth2 key file, and run it.
g. Select the target tenant, namespace and topic, and copy the sample command to run.
f. Select the target tenant, namespace and topic, and copy the sample command to your terminal and update the path of the OAuth2 key file before running.
## What’s next?
* Learn how to [develop functions](/cloud/process/pulsar-functions/develop-functions/function-develop-overview).
* Learn how to [manage functions](/cloud/process/pulsar-functions/function-manage).
* Learn how to [configure stateful functions](/cloud/process/pulsar-functions/function-state).
* Learn how to [monitor functions](/cloud/process/pulsar-functions/function-monitoring).
* Reference [common configurations](/cloud/process/pulsar-functions/function-config).
2. Select the **CLI Tools** tab and follow the wizard to generate the sample code you need for connecting to your Pulsar cluster. The steps may vary depending on the tool you use.
a. Select either `pulsarctl` or `pulsar-admin`.
b. Download the selected CLI tool.
c. Select the service account you created.
d. Select **OAuth2** as the authentication type and download the key file to your local machine.
e. Set up your CLI tool with that key file, and the steps vary depending on the CLI tool you use.
f. Copy the command for setting client configurations to your terminal, update the path of the OAuth2 key file, and run it.
g. Select the target tenant, namespace and topic, and copy the sample command to run.
f. Select the target tenant, namespace and topic, and copy the sample command to your terminal and update the path of the OAuth2 key file before running.
## What’s next?
* Learn how to [develop functions](/cloud/process/pulsar-functions/develop-functions/function-develop-overview).
* Learn how to [manage functions](/cloud/process/pulsar-functions/function-manage).
* Learn how to [configure stateful functions](/cloud/process/pulsar-functions/function-state).
* Learn how to [monitor functions](/cloud/process/pulsar-functions/function-monitoring).
* Reference [common configurations](/cloud/process/pulsar-functions/function-config).