> ## Documentation Index
> Fetch the complete documentation index at: https://docs.streamnative.io/llms.txt
> Use this file to discover all available pages before exploring further.

# Unity Catalog for Delta Lake on Azure

This guide describes how to prepare a Databricks Unity Catalog for use with StreamNative Ursa as a Delta Lake catalog on Microsoft Azure.

## Prerequisites

* An Azure subscription with permissions to create storage accounts and Access Connectors
* A Databricks workspace on Azure

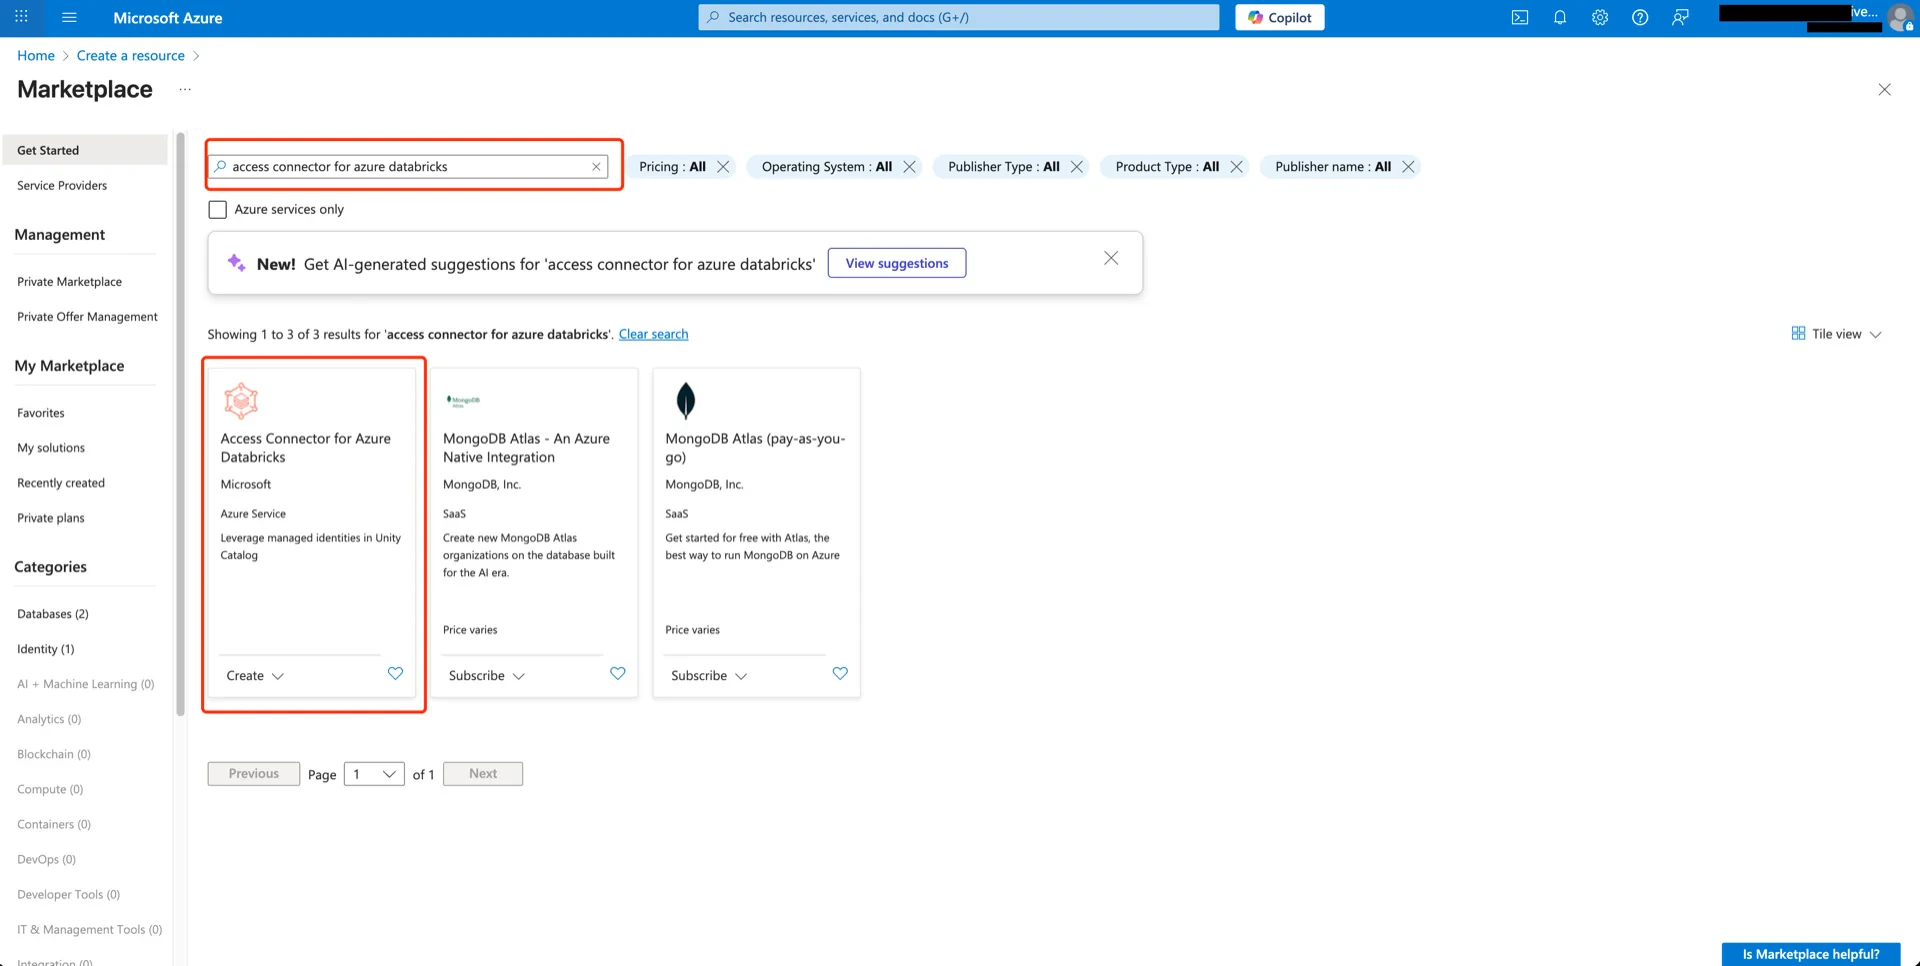
## 1. Create an Access Connector for Azure Databricks

In the Azure Marketplace, search for **Access Connector for Azure Databricks** and click **Create**.

<img src="https://mintcdn.com/streamnative/RcAw7mp1LdooFmHe/images/ursa-lakehouse/uc-delta-azure-01.webp?fit=max&auto=format&n=RcAw7mp1LdooFmHe&q=85&s=0600173f7b1756db34a5d4f995e88222" alt="Search Access Connector" width="1920" height="966" data-path="images/ursa-lakehouse/uc-delta-azure-01.webp" />

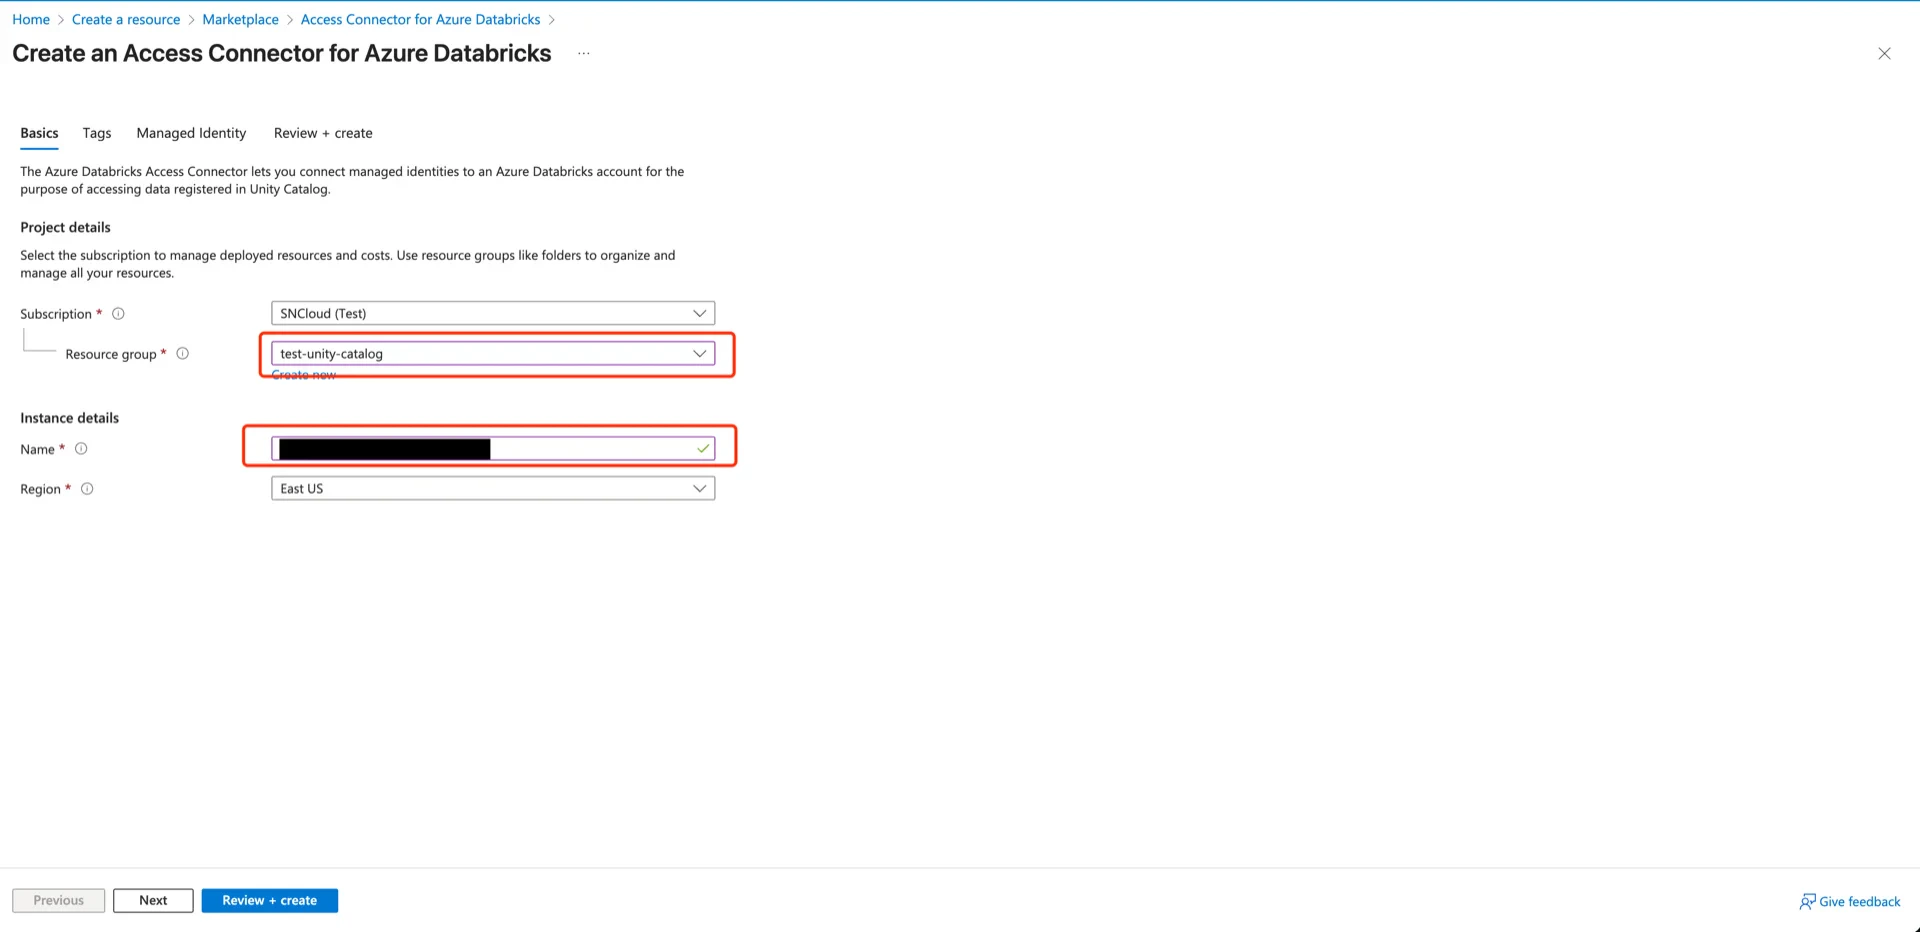
Choose the resource group, provide a connector name (for example, `unity-catalog-access-connector`), and click **Next**.

<img src="https://mintcdn.com/streamnative/RcAw7mp1LdooFmHe/images/ursa-lakehouse/uc-delta-azure-02.webp?fit=max&auto=format&n=RcAw7mp1LdooFmHe&q=85&s=8e370476c4705cfd0f1a68ad769a9f28" alt="Connector configuration" width="1920" height="932" data-path="images/ursa-lakehouse/uc-delta-azure-02.webp" />

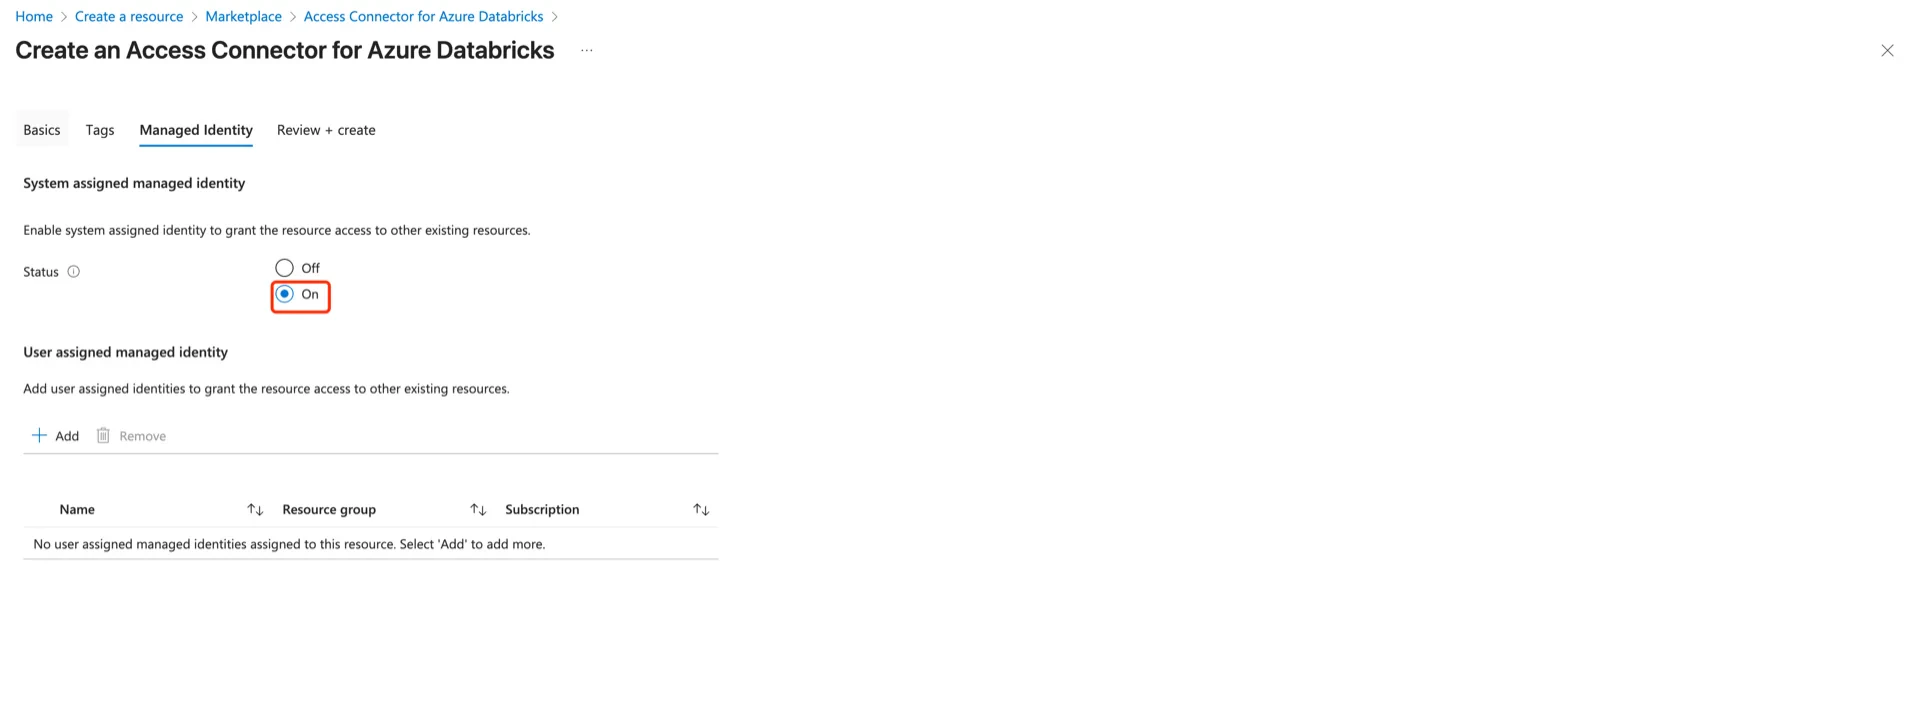
In the **Managed Identity** panel, enable **System assigned identity**, then click **Next** -> **Create**.

<img src="https://mintcdn.com/streamnative/RcAw7mp1LdooFmHe/images/ursa-lakehouse/uc-delta-azure-03.webp?fit=max&auto=format&n=RcAw7mp1LdooFmHe&q=85&s=90f9a47dfa81755fd2a7766a5865a4f2" alt="Enable managed identity" width="1920" height="721" data-path="images/ursa-lakehouse/uc-delta-azure-03.webp" />

<img src="https://mintcdn.com/streamnative/RcAw7mp1LdooFmHe/images/ursa-lakehouse/uc-delta-azure-04.webp?fit=max&auto=format&n=RcAw7mp1LdooFmHe&q=85&s=0d75ab1343070759cc5d6162b9ed42d3" alt="Connector created" width="1920" height="968" data-path="images/ursa-lakehouse/uc-delta-azure-04.webp" />

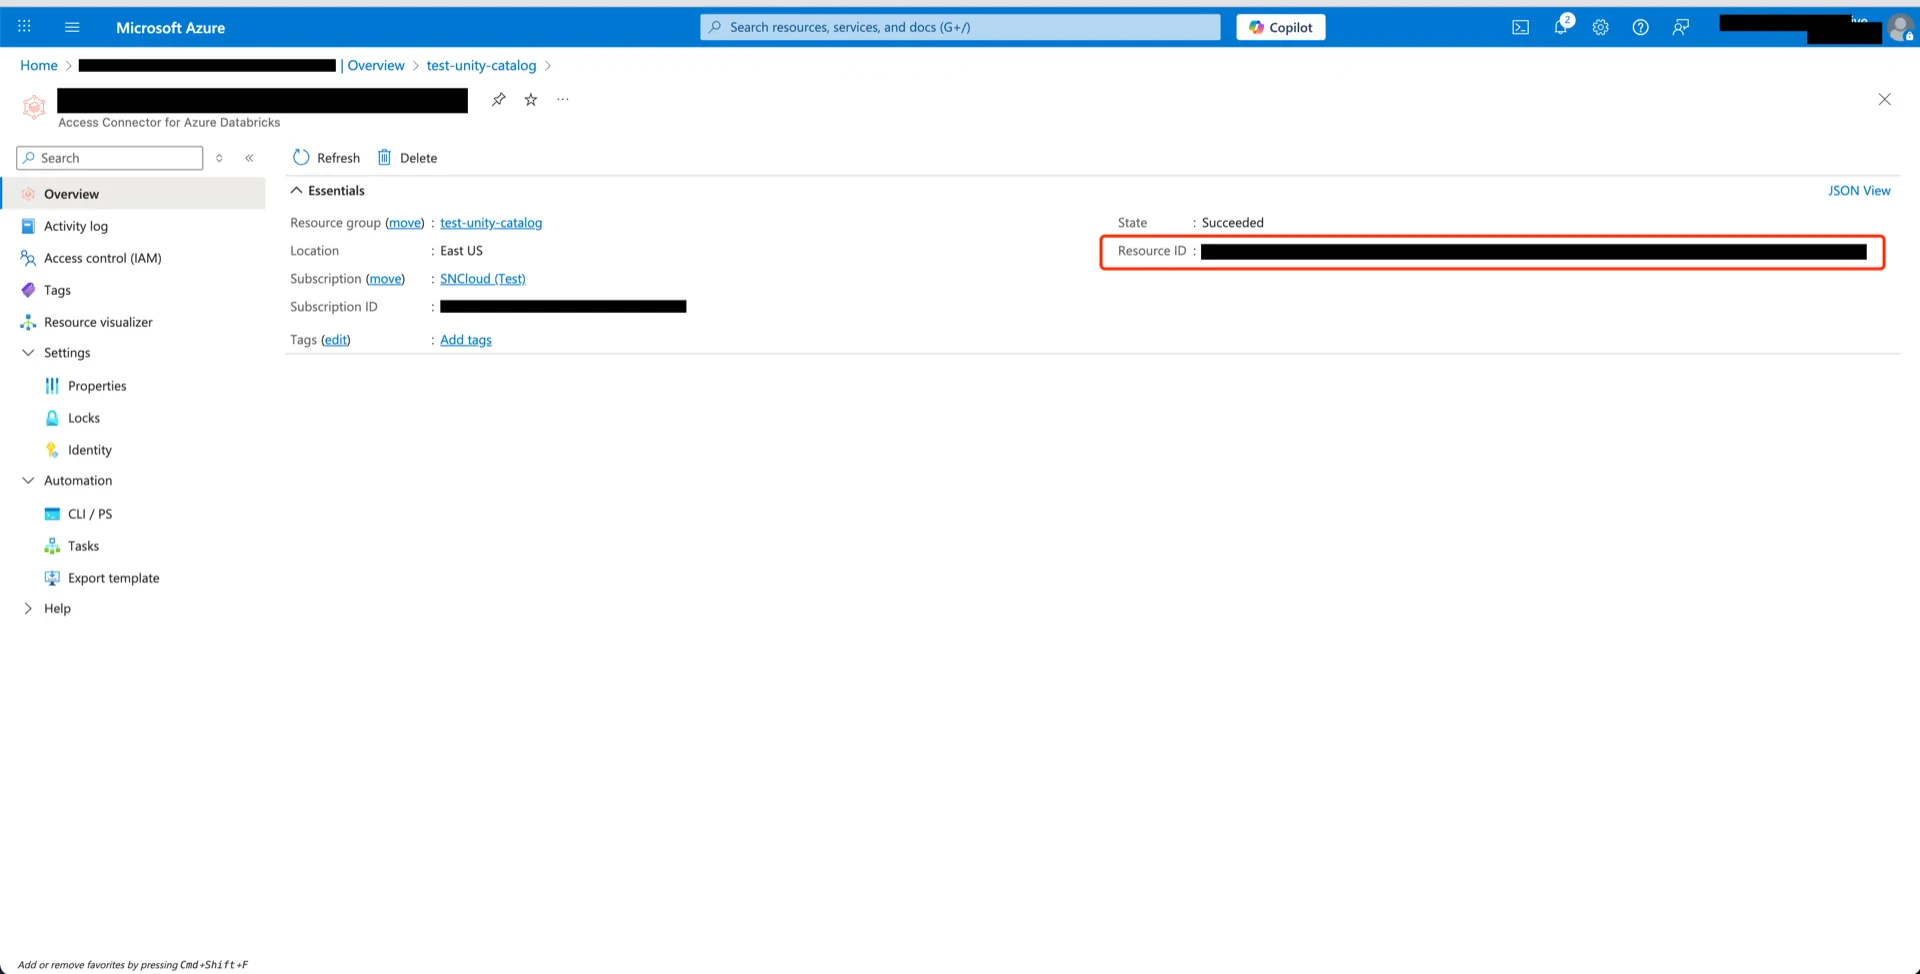
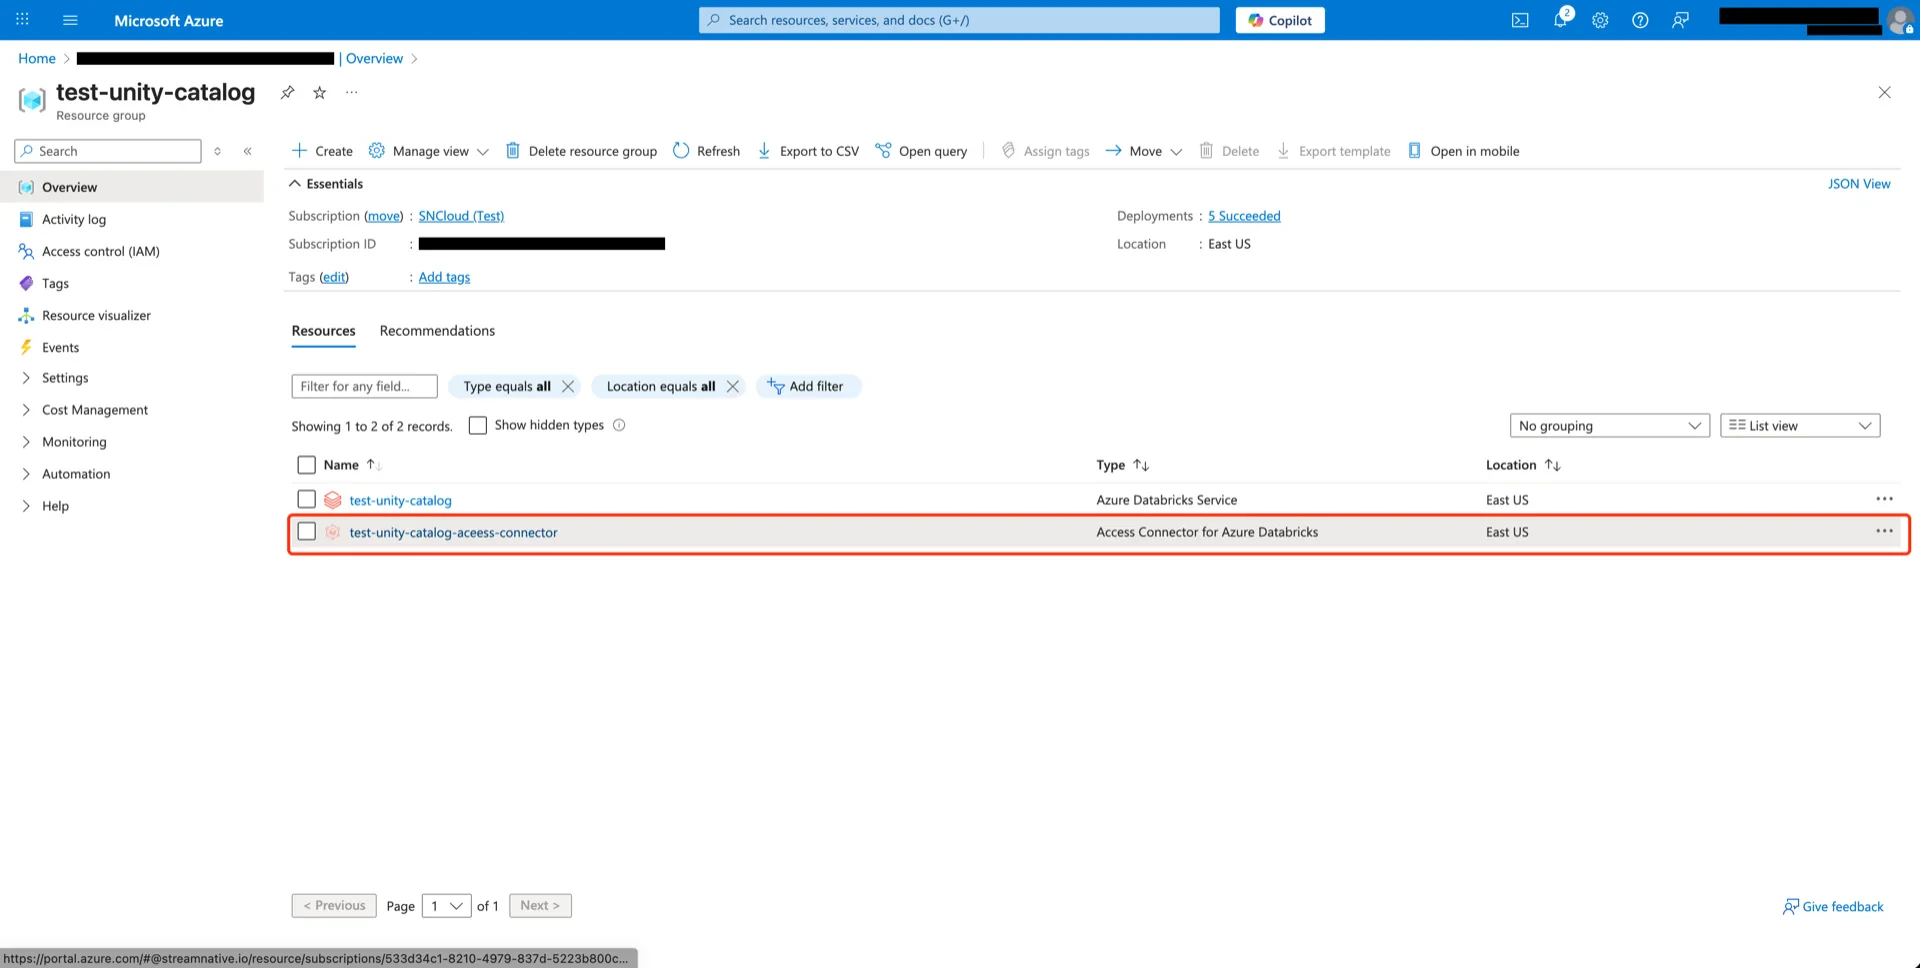
Record the connector **Resource ID**:

<img src="https://mintcdn.com/streamnative/RcAw7mp1LdooFmHe/images/ursa-lakehouse/uc-delta-azure-05.webp?fit=max&auto=format&n=RcAw7mp1LdooFmHe&q=85&s=53ecfde6ddbee7ee0d8c0e2739ece8e9" alt="Connector Resource ID" width="1920" height="974" data-path="images/ursa-lakehouse/uc-delta-azure-05.webp" />

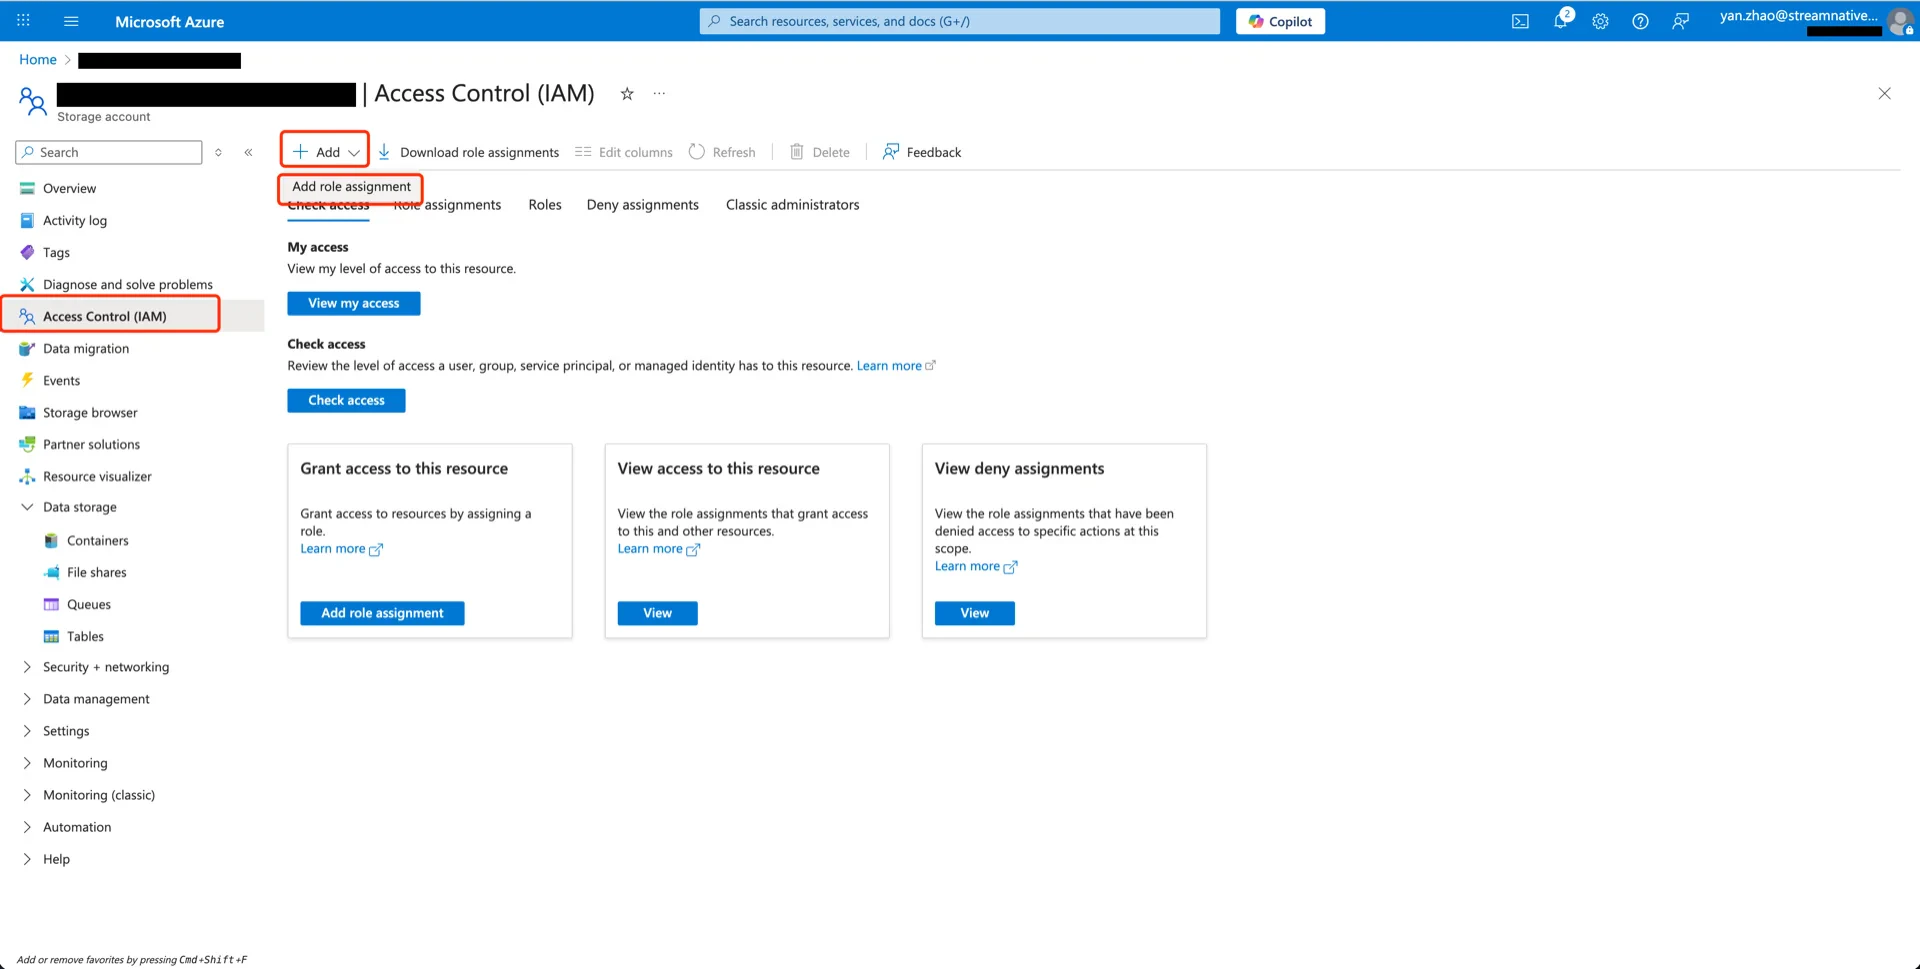
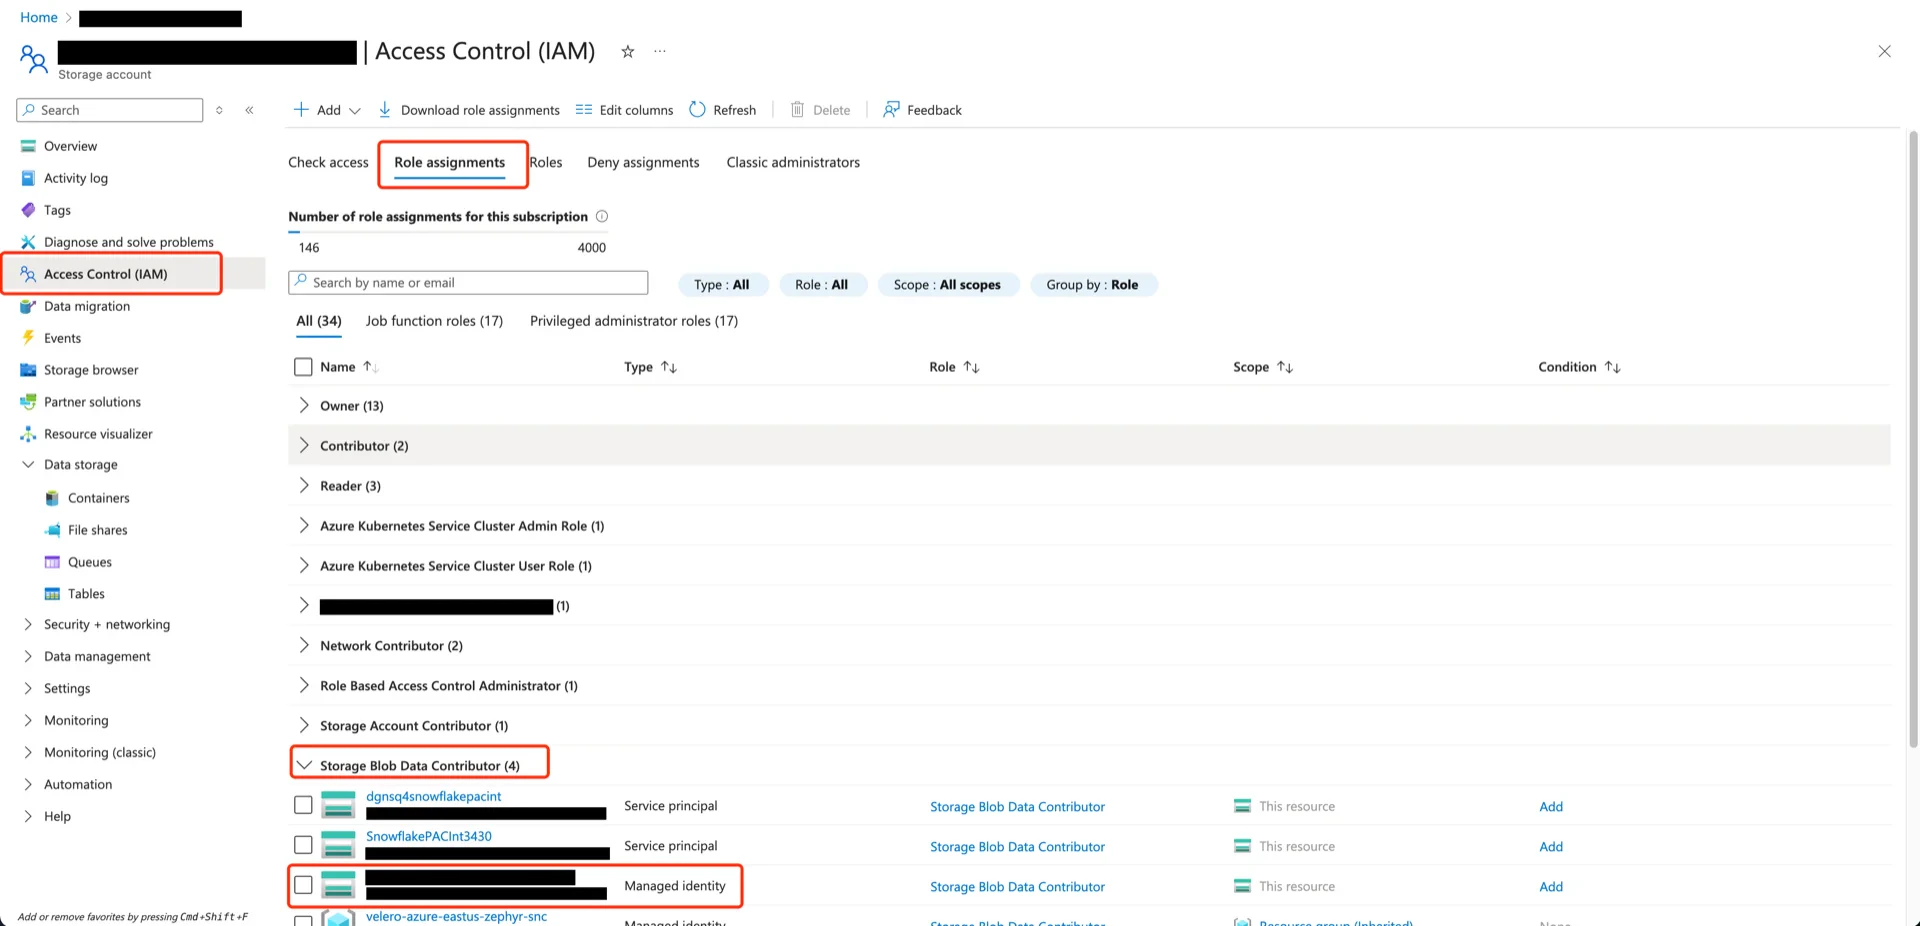
## 2. Grant `Storage Blob Data Contributor` to the Connector

Open the storage account that will hold the Delta tables, navigate to **Access Control (IAM) -> Add -> Add role assignment**.

<img src="https://mintcdn.com/streamnative/X17SyiKppfiqQD9i/images/ursa-lakehouse/uc-delta-azure-06.webp?fit=max&auto=format&n=X17SyiKppfiqQD9i&q=85&s=71f20913728fd6742edee11bbf2e1175" alt="Access control" width="1920" height="969" data-path="images/ursa-lakehouse/uc-delta-azure-06.webp" />

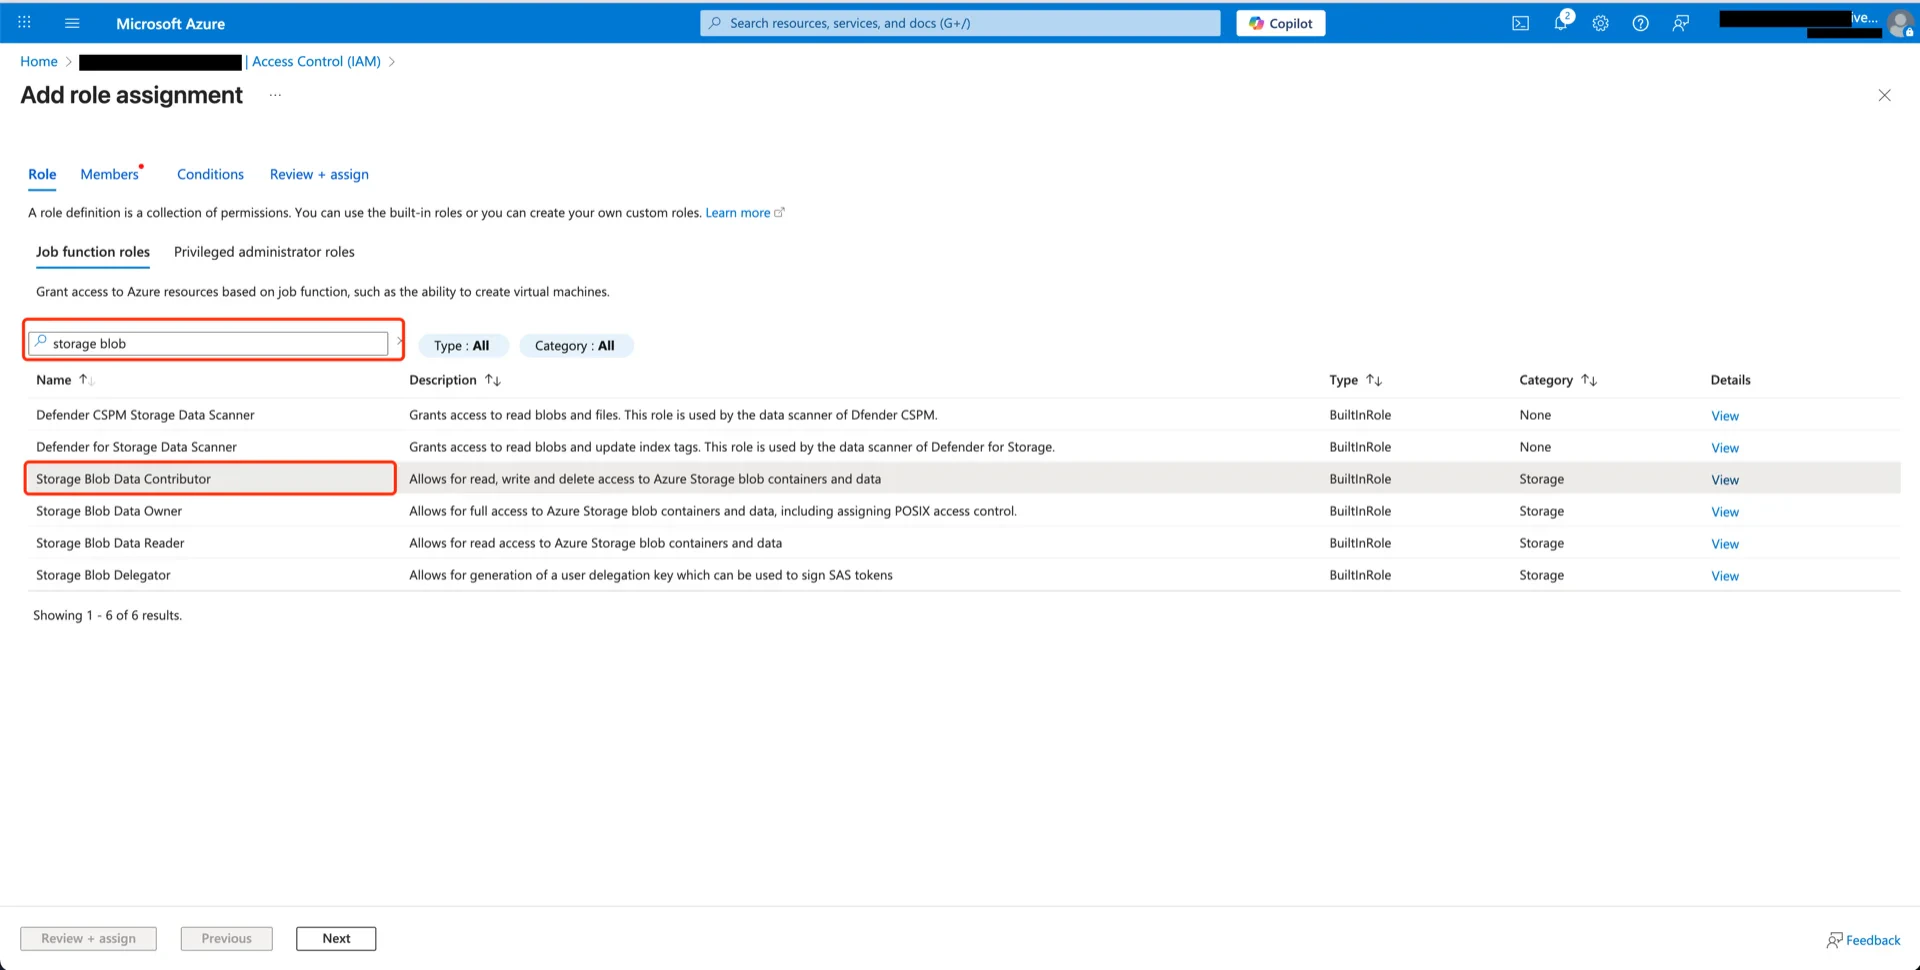
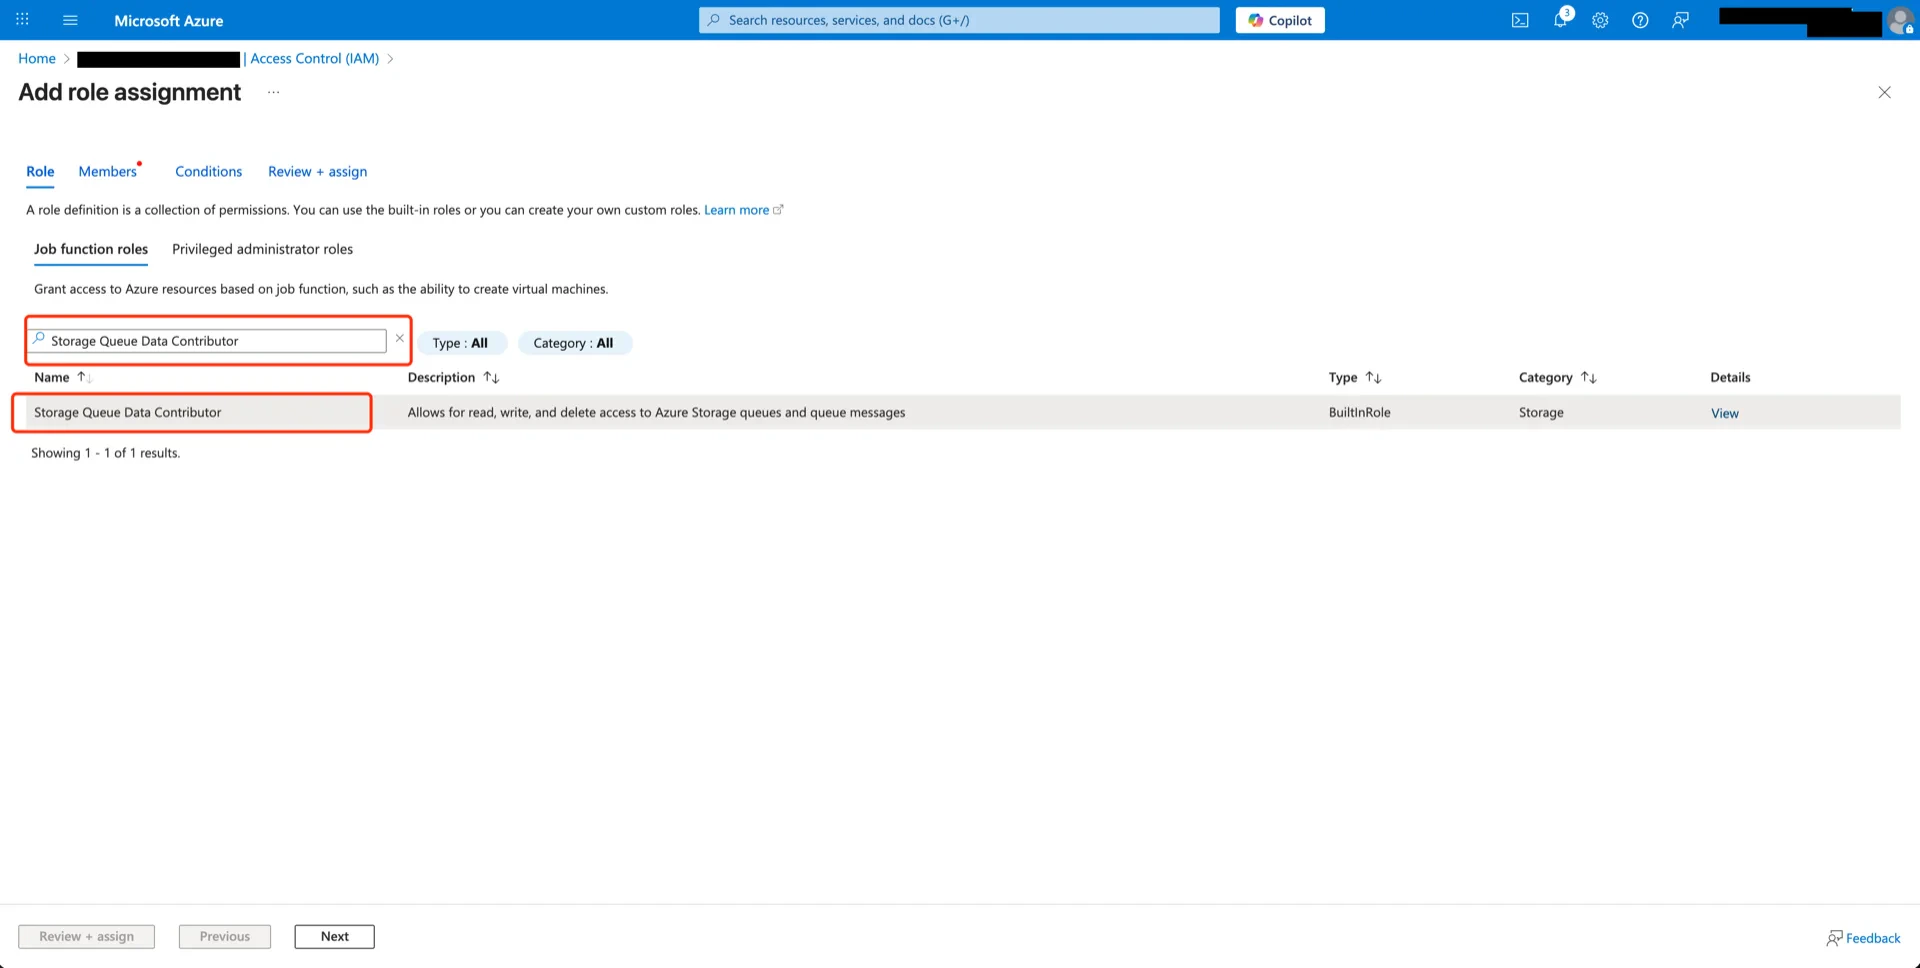
Search for and select **Storage Blob Data Contributor**, then click **Next**.

<img src="https://mintcdn.com/streamnative/X17SyiKppfiqQD9i/images/ursa-lakehouse/uc-delta-azure-07.webp?fit=max&auto=format&n=X17SyiKppfiqQD9i&q=85&s=7386768e1d014f01cf49c35ffd396114" alt="Select Blob Data Contributor" width="1920" height="970" data-path="images/ursa-lakehouse/uc-delta-azure-07.webp" />

Choose **Managed identity** and select the Access Connector created in step 1.

<img src="https://mintcdn.com/streamnative/X17SyiKppfiqQD9i/images/ursa-lakehouse/uc-delta-azure-08.webp?fit=max&auto=format&n=X17SyiKppfiqQD9i&q=85&s=ab2f50aff3f5b0113cb0b043ecacd30b" alt="Select members" width="1920" height="970" data-path="images/ursa-lakehouse/uc-delta-azure-08.webp" />

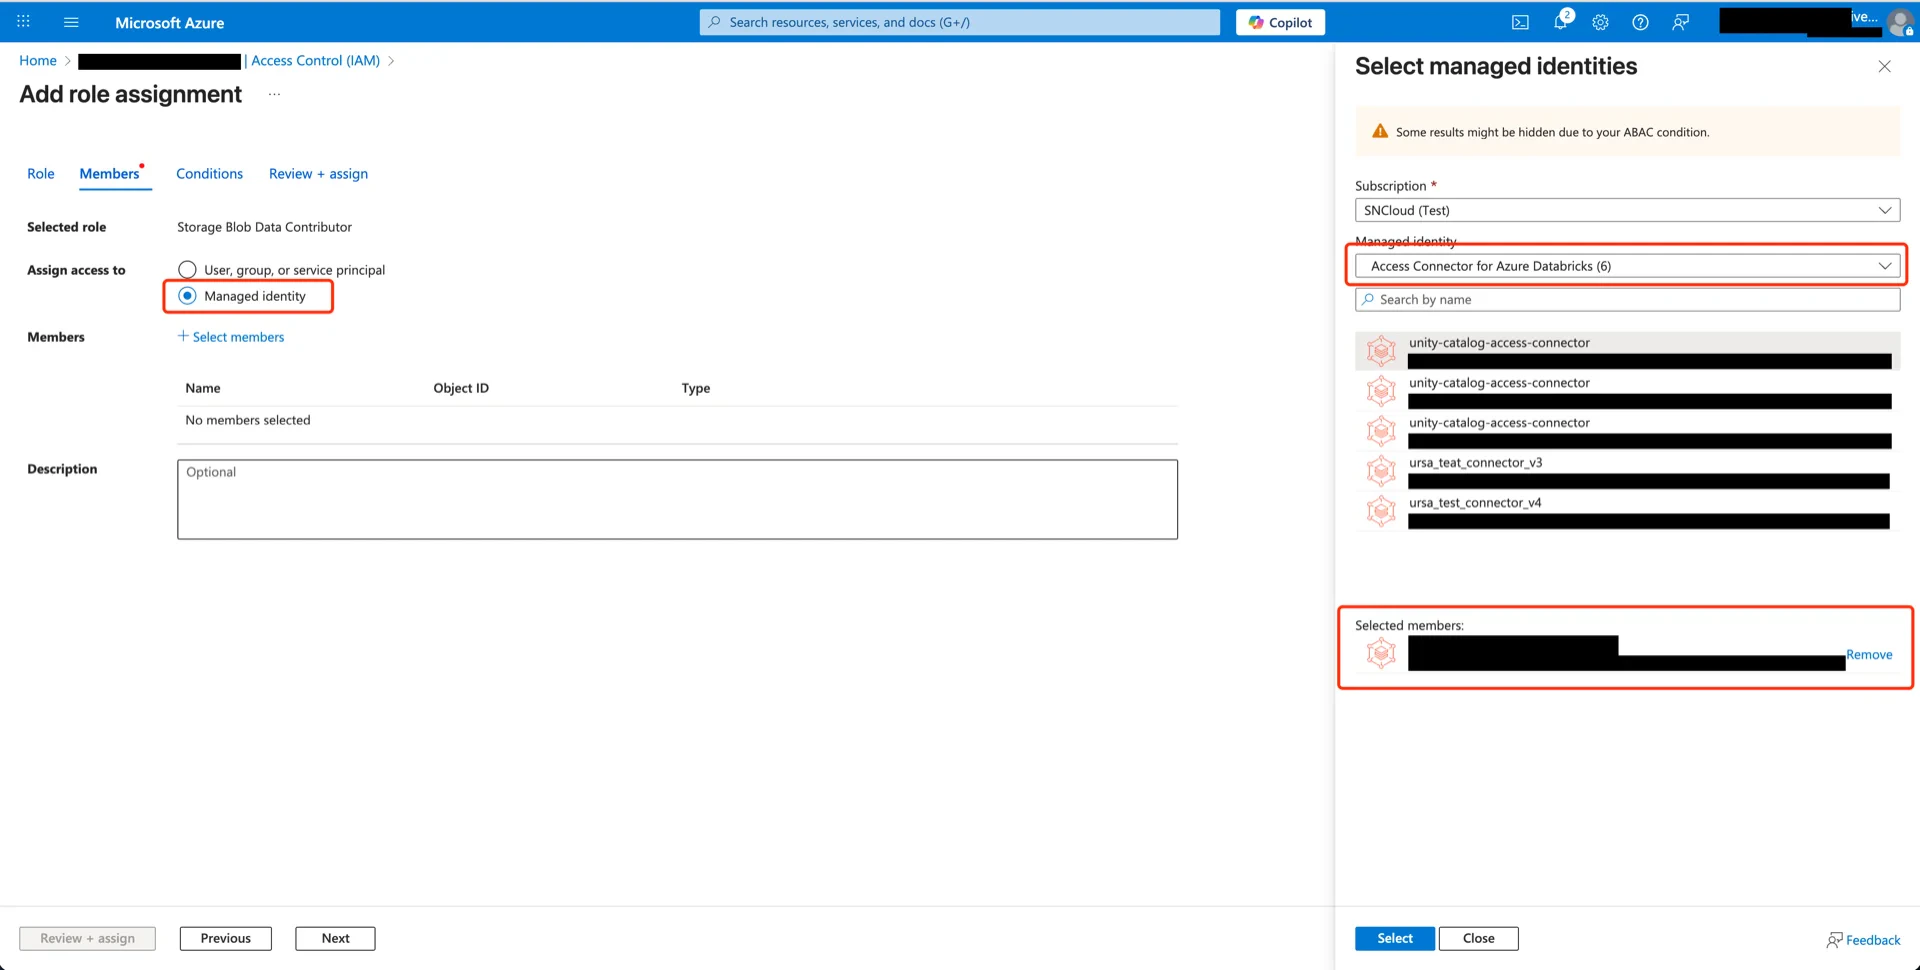
Click **Next -> Review + assign**.

<img src="https://mintcdn.com/streamnative/X17SyiKppfiqQD9i/images/ursa-lakehouse/uc-delta-azure-09.webp?fit=max&auto=format&n=X17SyiKppfiqQD9i&q=85&s=371f2b3bfae833ac2e936b88d9c523d4" alt="Role assigned" width="1920" height="926" data-path="images/ursa-lakehouse/uc-delta-azure-09.webp" />

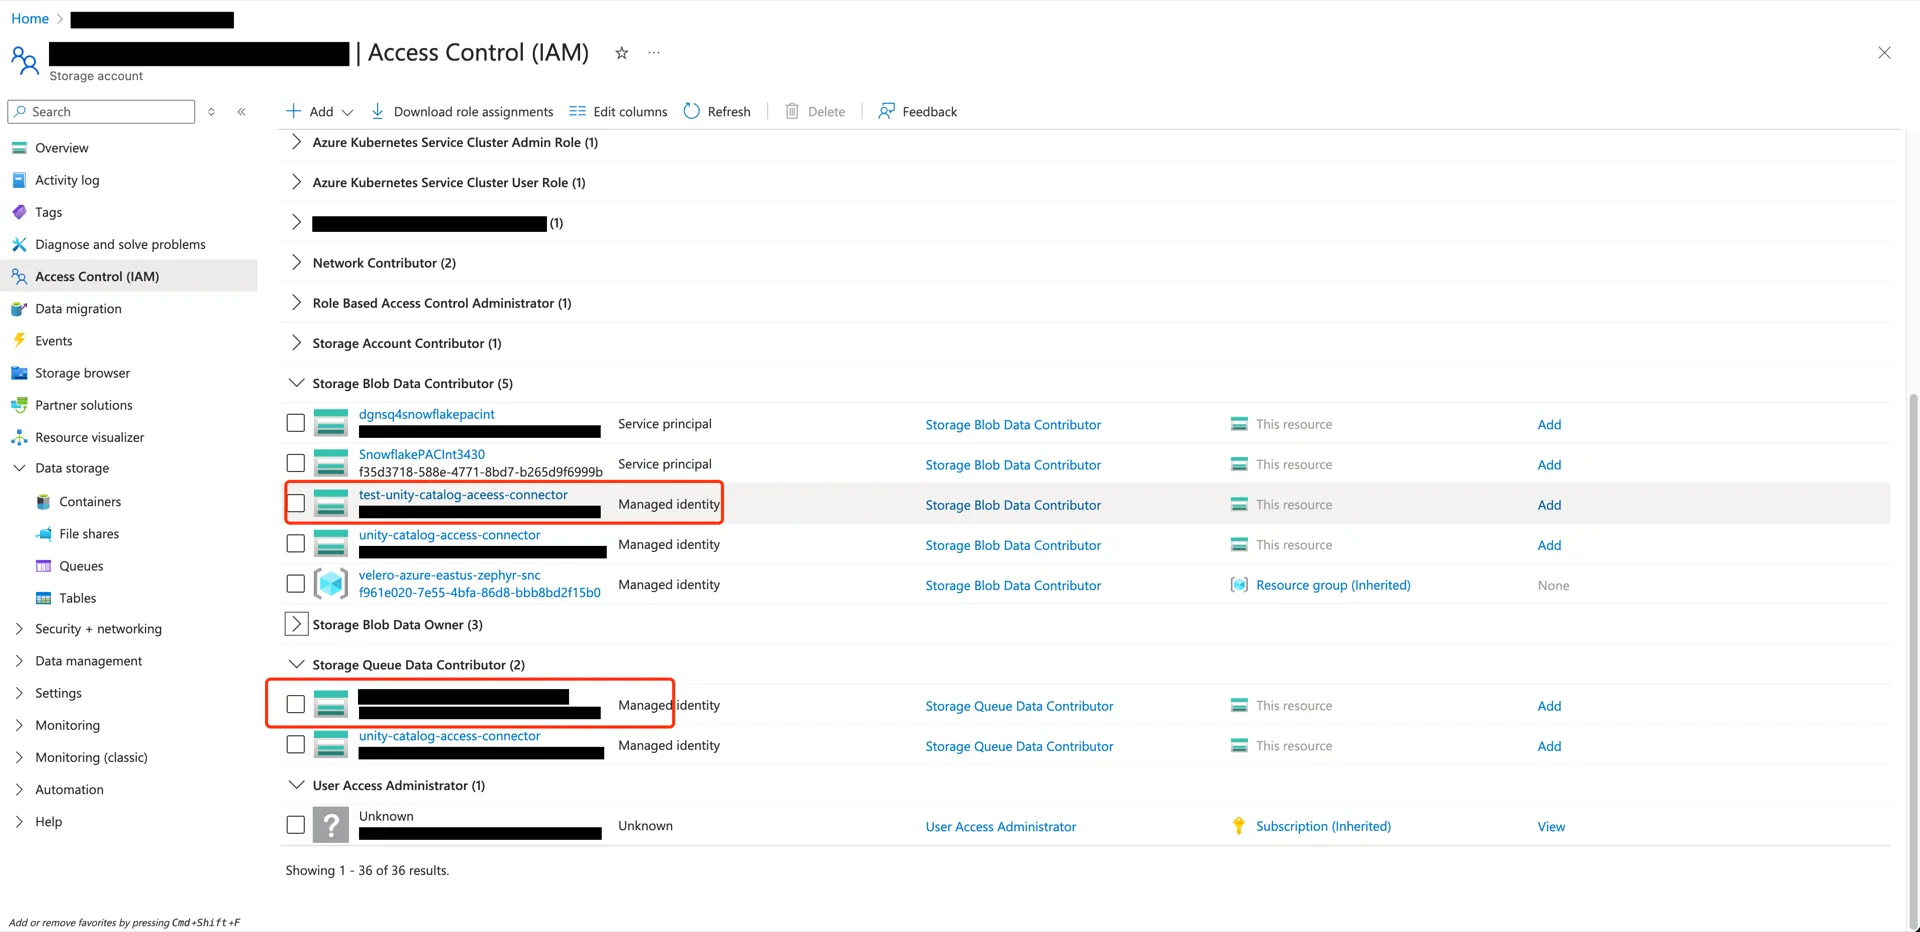
## 3. Grant `Storage Queue Data Contributor` to the Connector

Repeat the process from step 2 with the **Storage Queue Data Contributor** role.

<img src="https://mintcdn.com/streamnative/X17SyiKppfiqQD9i/images/ursa-lakehouse/uc-delta-azure-10.webp?fit=max&auto=format&n=X17SyiKppfiqQD9i&q=85&s=49cf7fe49b0bd37c3682085ca83d5c6e" alt="Queue Data Contributor" width="1920" height="968" data-path="images/ursa-lakehouse/uc-delta-azure-10.webp" />

Both roles are now assigned to the Access Connector.

<img src="https://mintcdn.com/streamnative/X17SyiKppfiqQD9i/images/ursa-lakehouse/uc-delta-azure-11.webp?fit=max&auto=format&n=X17SyiKppfiqQD9i&q=85&s=e9933f6ab862d4d694e1666e6b823fd6" alt="Both roles assigned" width="1920" height="932" data-path="images/ursa-lakehouse/uc-delta-azure-11.webp" />

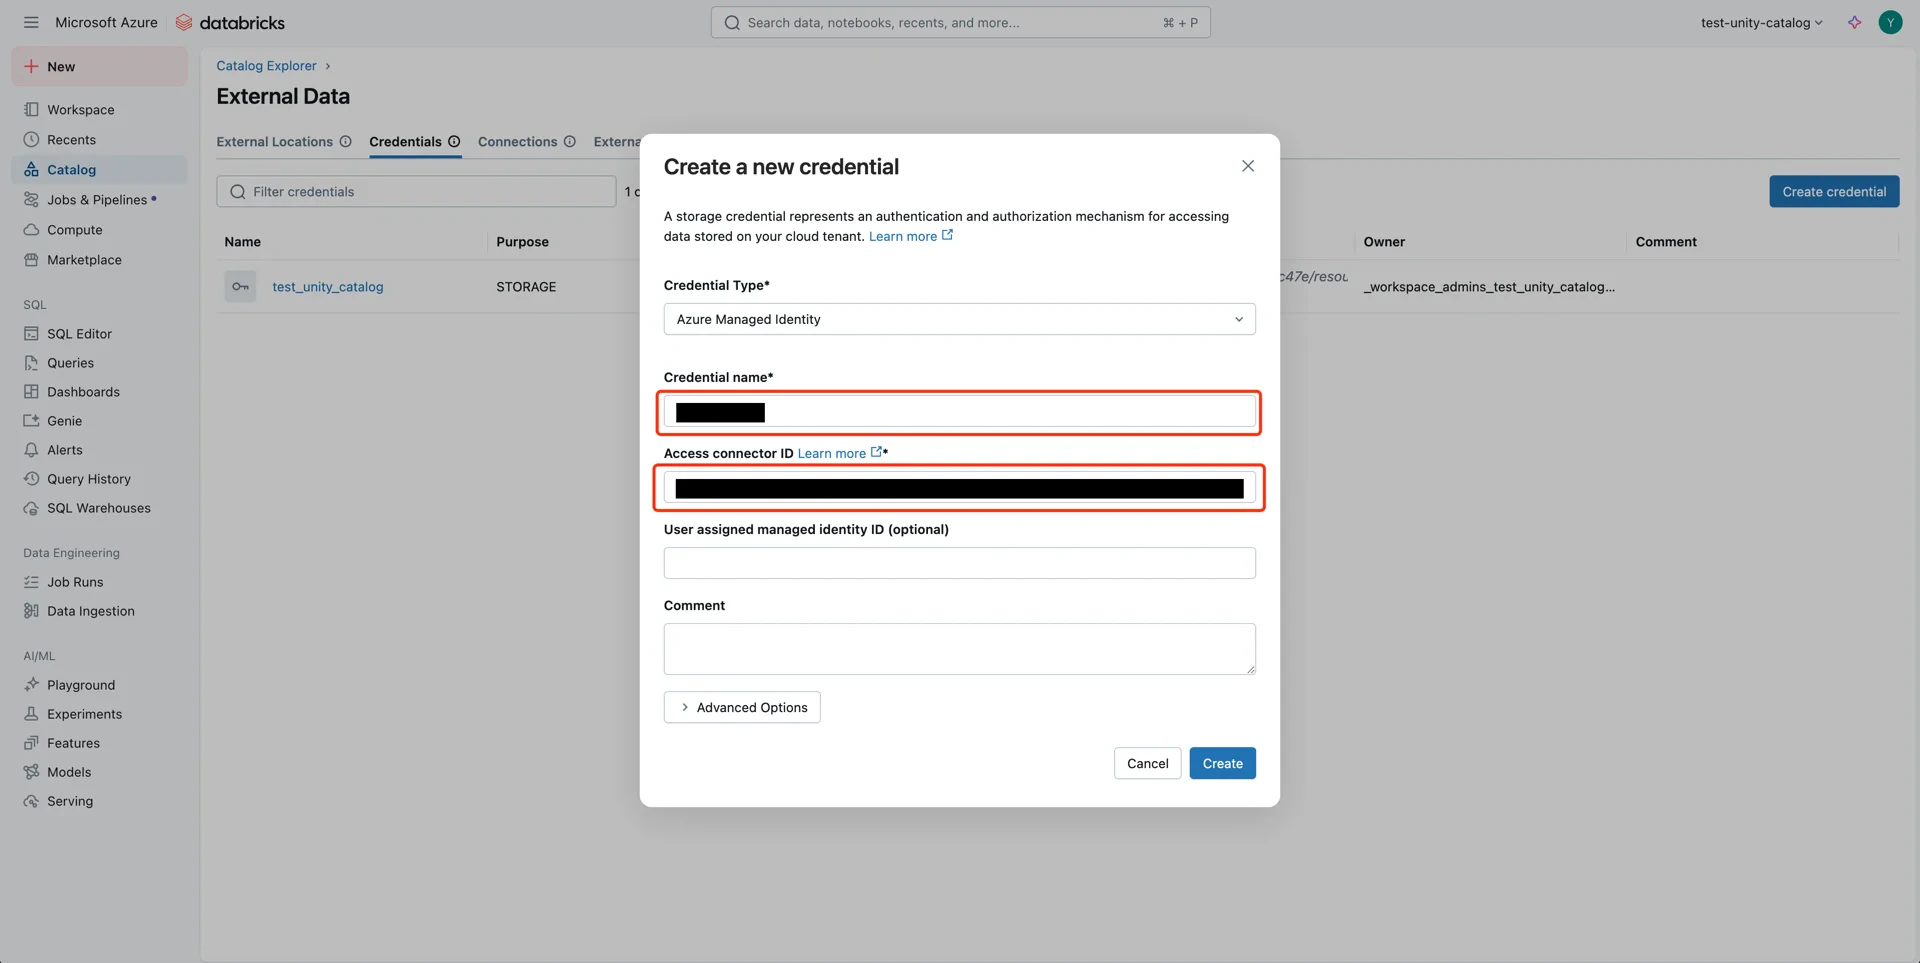
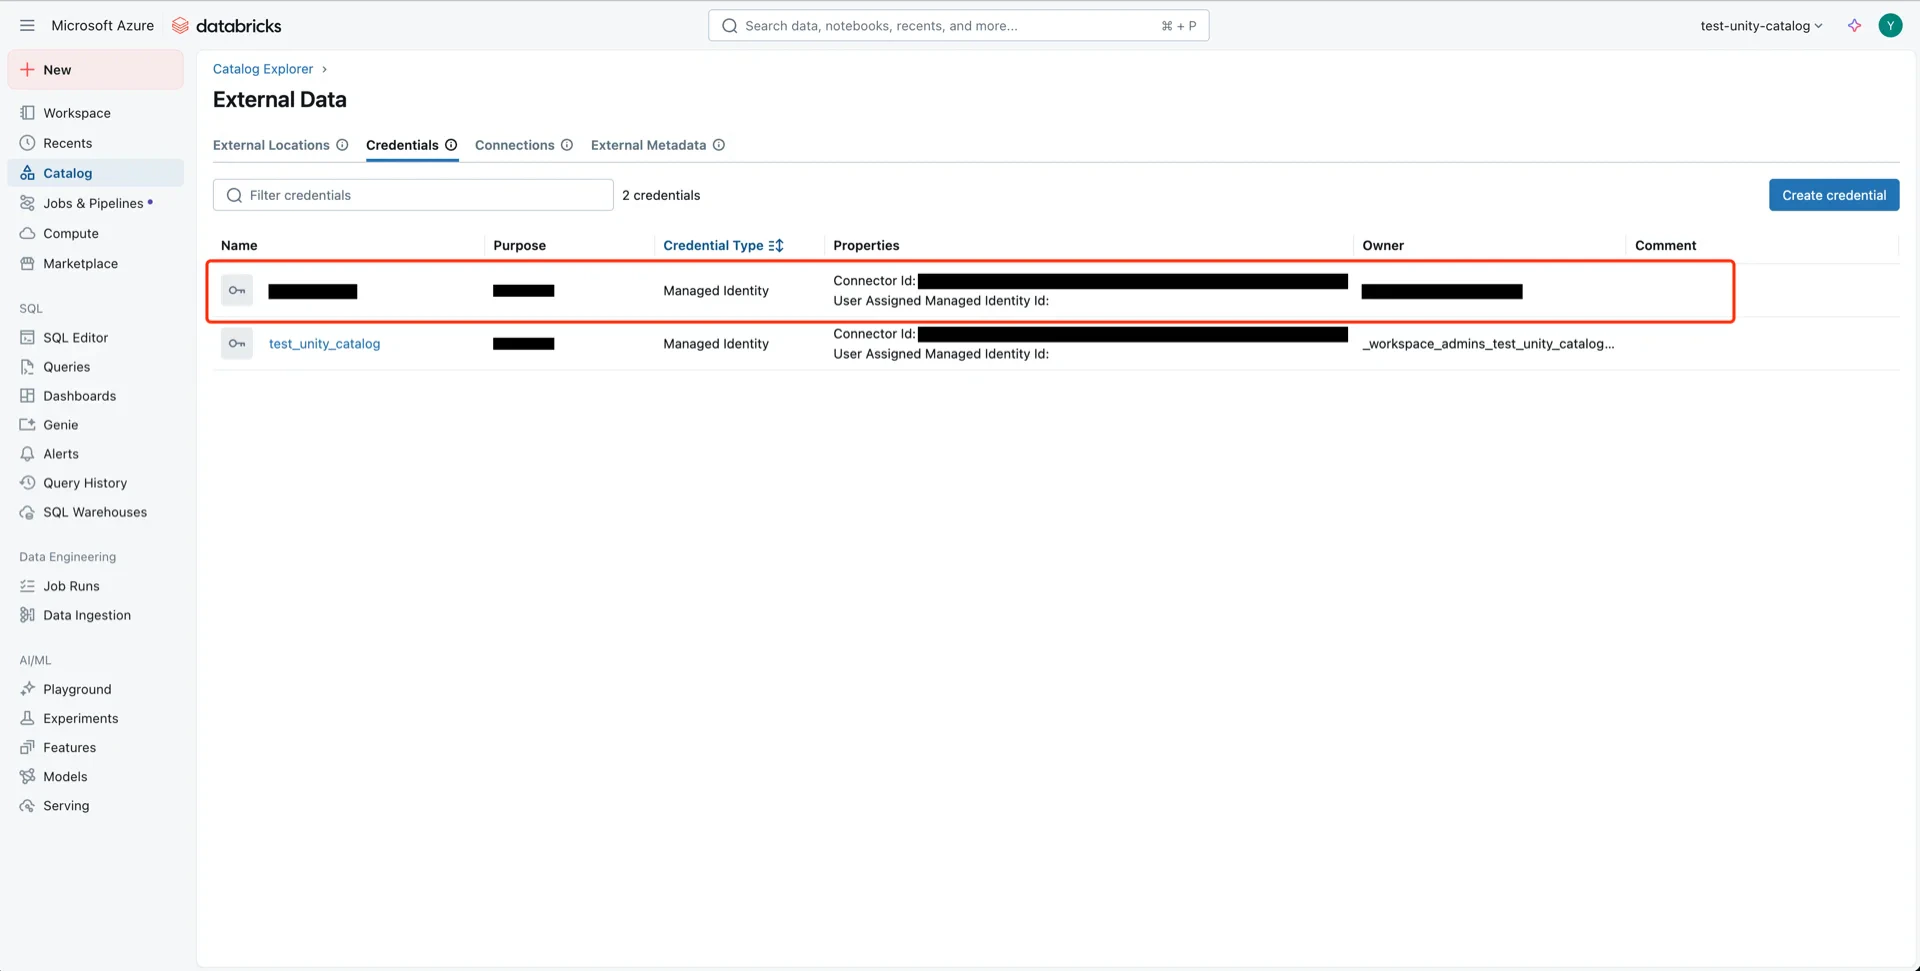
## 4. Create a Storage Credential in Unity Catalog

In the Databricks Catalog console, navigate to **Catalog -> Settings -> Credentials**.

<img src="https://mintcdn.com/streamnative/X17SyiKppfiqQD9i/images/ursa-lakehouse/uc-delta-azure-12.webp?fit=max&auto=format&n=X17SyiKppfiqQD9i&q=85&s=8063e10ac4684da838b5150e7740d185" alt="Credentials menu" width="1920" height="974" data-path="images/ursa-lakehouse/uc-delta-azure-12.webp" />

Click **Create Credential**, provide a name, and paste the Access Connector **Resource ID** from step 1.

<img src="https://mintcdn.com/streamnative/X17SyiKppfiqQD9i/images/ursa-lakehouse/uc-delta-azure-13.webp?fit=max&auto=format&n=X17SyiKppfiqQD9i&q=85&s=9b972dda5135f5a2c1c46850215e2ab0" alt="Create credential" width="1920" height="963" data-path="images/ursa-lakehouse/uc-delta-azure-13.webp" />

<img src="https://mintcdn.com/streamnative/X17SyiKppfiqQD9i/images/ursa-lakehouse/uc-delta-azure-14.webp?fit=max&auto=format&n=X17SyiKppfiqQD9i&q=85&s=1eb89c56e4c0c43f0c43dccd9d419166" alt="Credential created" width="1920" height="971" data-path="images/ursa-lakehouse/uc-delta-azure-14.webp" />

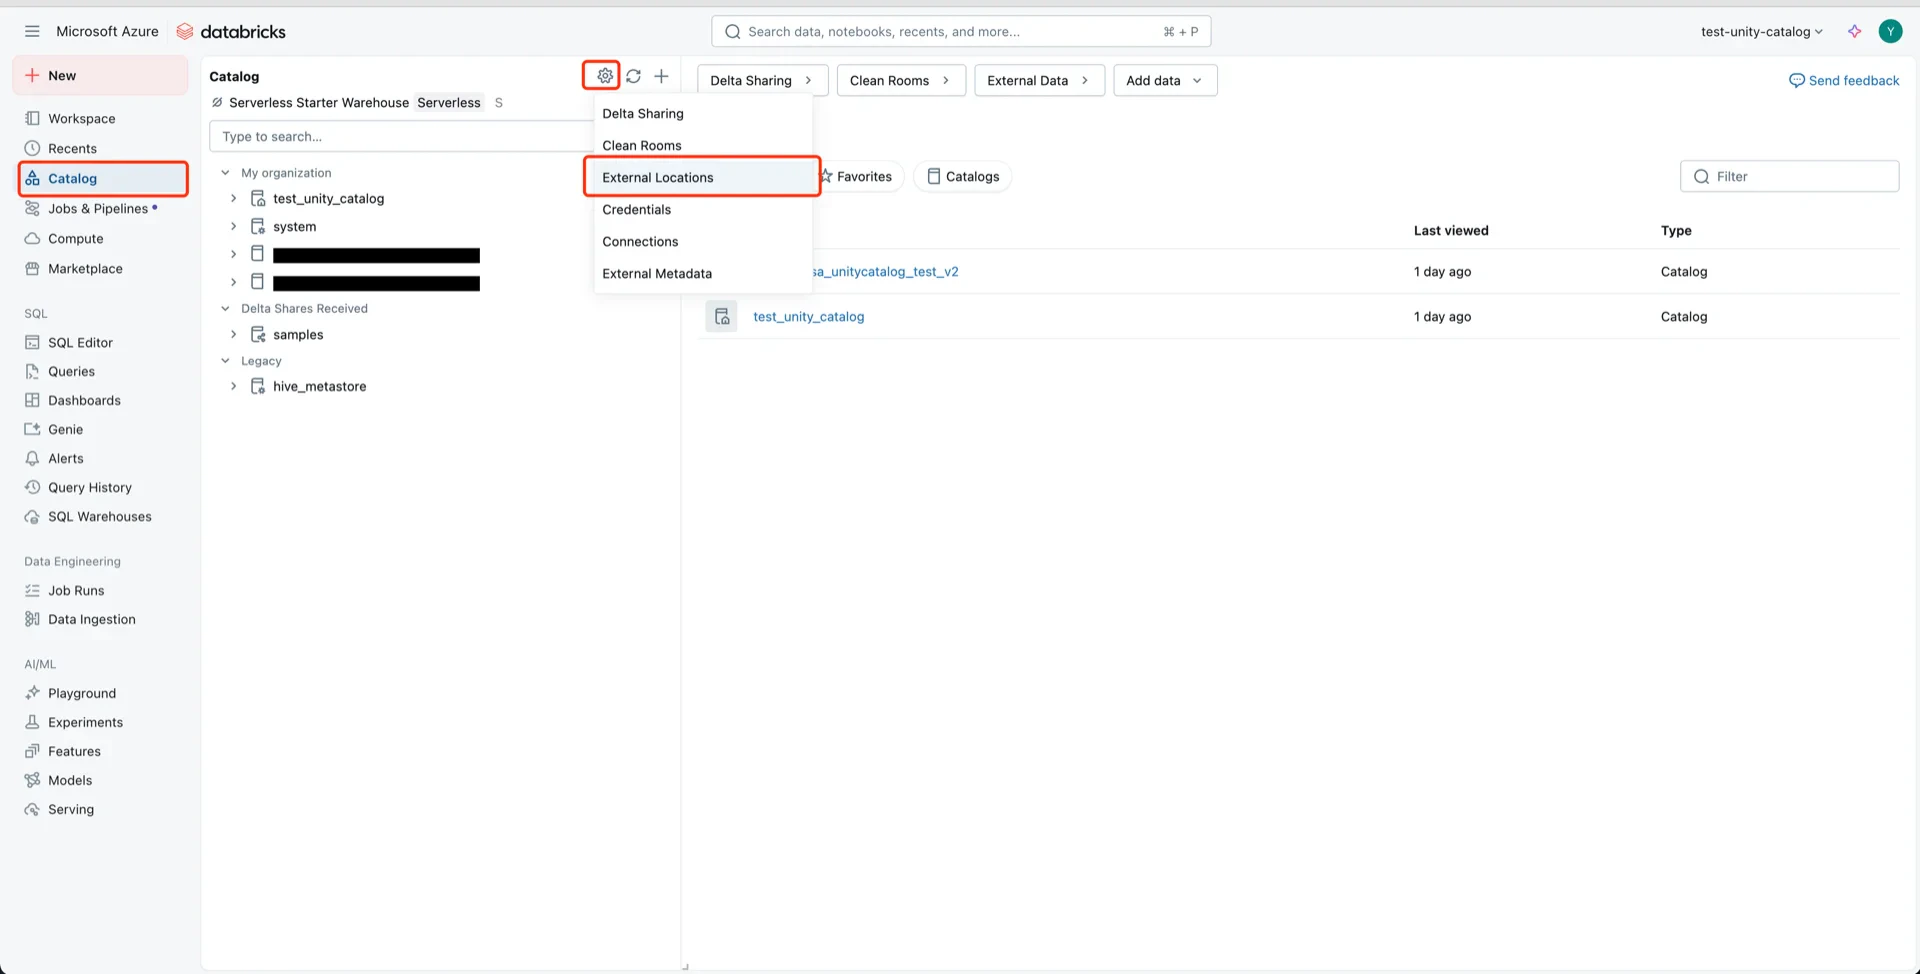
## 5. Create an External Location

In the Databricks Catalog console, create a new external location.
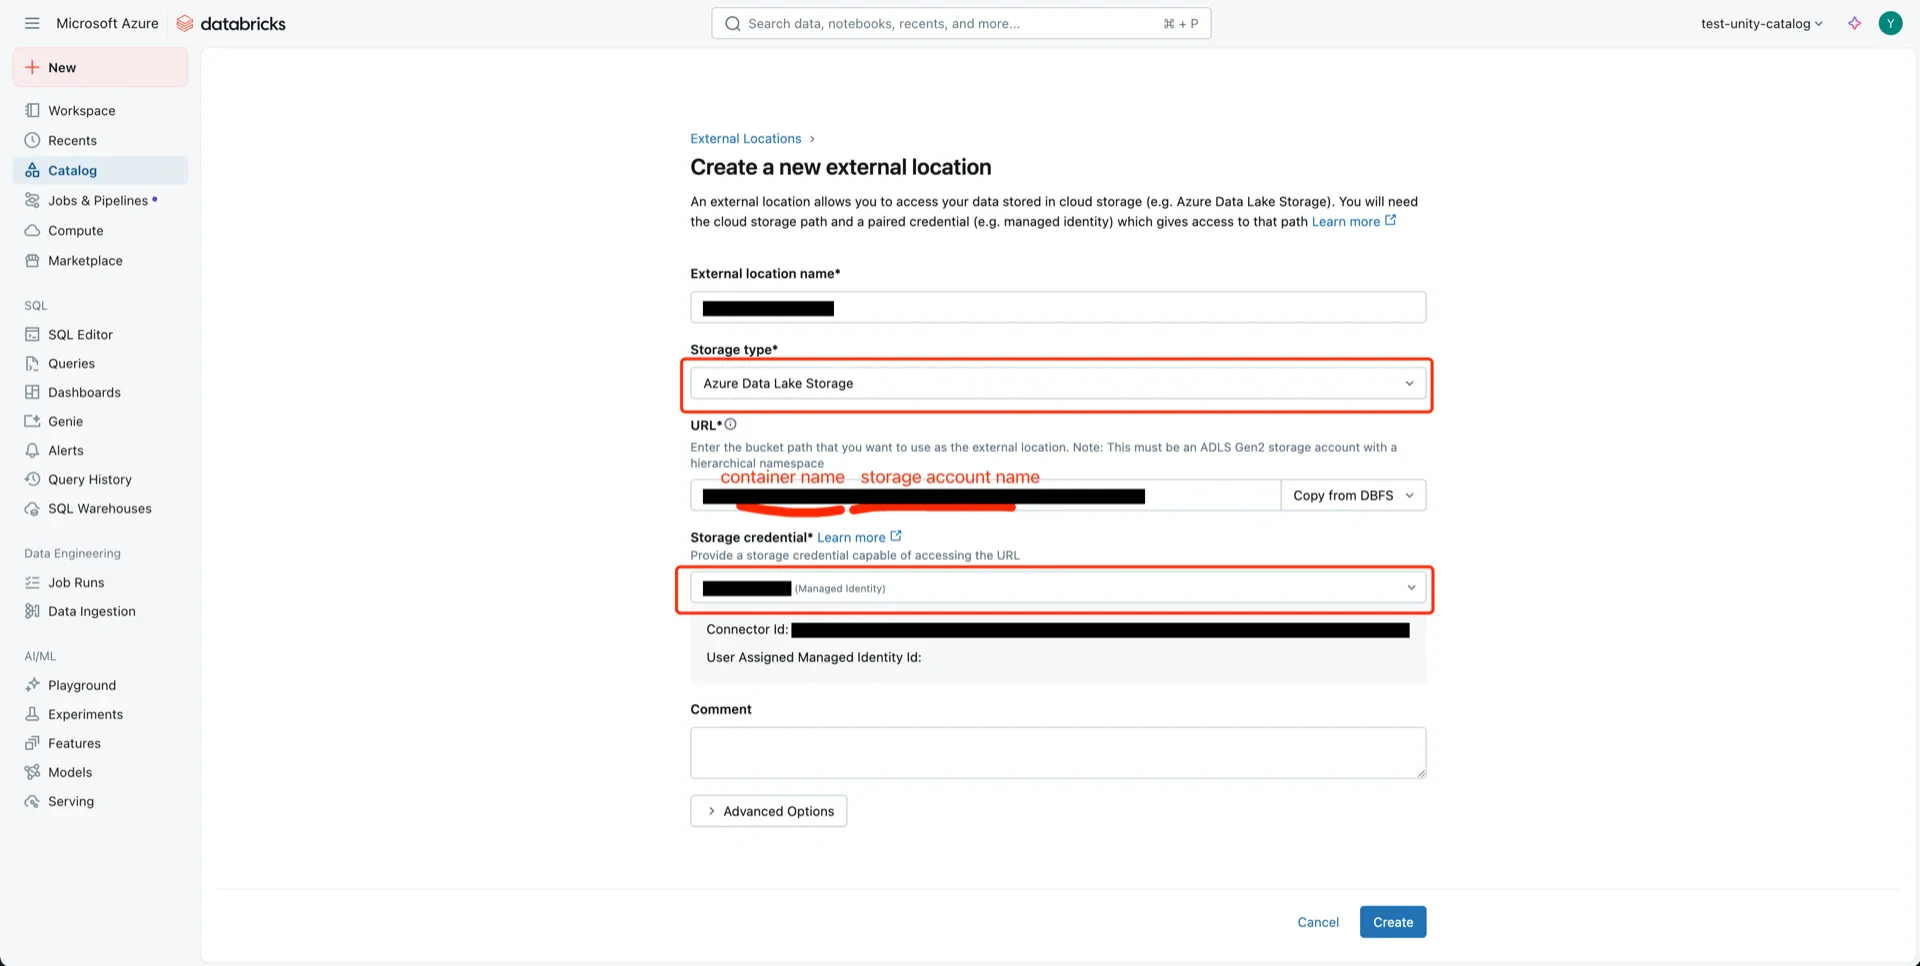
<img src="https://mintcdn.com/streamnative/X17SyiKppfiqQD9i/images/ursa-lakehouse/uc-delta-azure-15.webp?fit=max&auto=format&n=X17SyiKppfiqQD9i&q=85&s=152fa6d3501e6ce3de813421794edce4" alt="External locations" width="1920" height="974" data-path="images/ursa-lakehouse/uc-delta-azure-15.webp" />

Configure with:

* **Storage type:** Azure Data Lake Storage
* **URL:** `abfss://<container>@<storage-account>.dfs.core.windows.net`
* **Storage credential:** the credential created in step 4

<img src="https://mintcdn.com/streamnative/X17SyiKppfiqQD9i/images/ursa-lakehouse/uc-delta-azure-16.webp?fit=max&auto=format&n=X17SyiKppfiqQD9i&q=85&s=5957d0650b21d38bc4fd986271782c84" alt="External location form" width="1920" height="966" data-path="images/ursa-lakehouse/uc-delta-azure-16.webp" />

<img src="https://mintcdn.com/streamnative/X17SyiKppfiqQD9i/images/ursa-lakehouse/uc-delta-azure-17.webp?fit=max&auto=format&n=X17SyiKppfiqQD9i&q=85&s=f128b465e2c49dd1c66baacf4f3c9b63" alt="External location created" width="1920" height="969" data-path="images/ursa-lakehouse/uc-delta-azure-17.webp" />

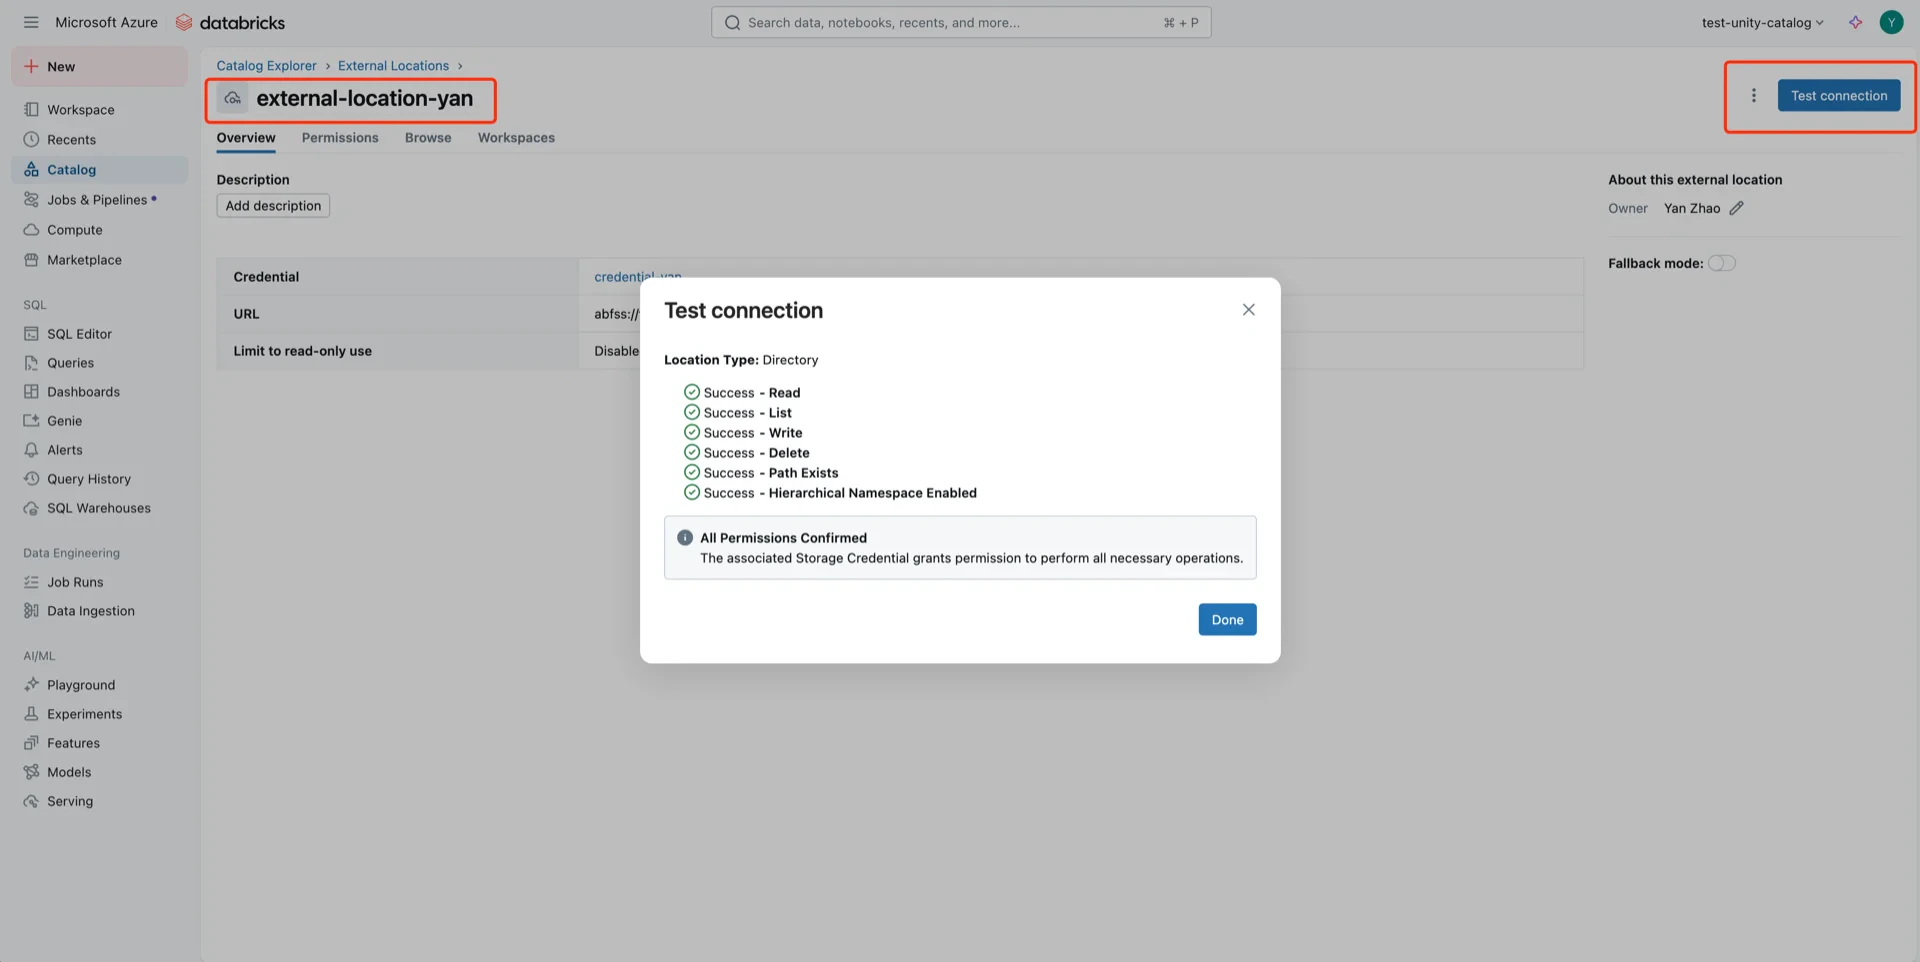
Click **Test Connection** to verify the credential.

<img src="https://mintcdn.com/streamnative/X17SyiKppfiqQD9i/images/ursa-lakehouse/uc-delta-azure-18.webp?fit=max&auto=format&n=X17SyiKppfiqQD9i&q=85&s=10622d02aca8192e340fa9c1442fc4ba" alt="Test connection" width="1920" height="962" data-path="images/ursa-lakehouse/uc-delta-azure-18.webp" />

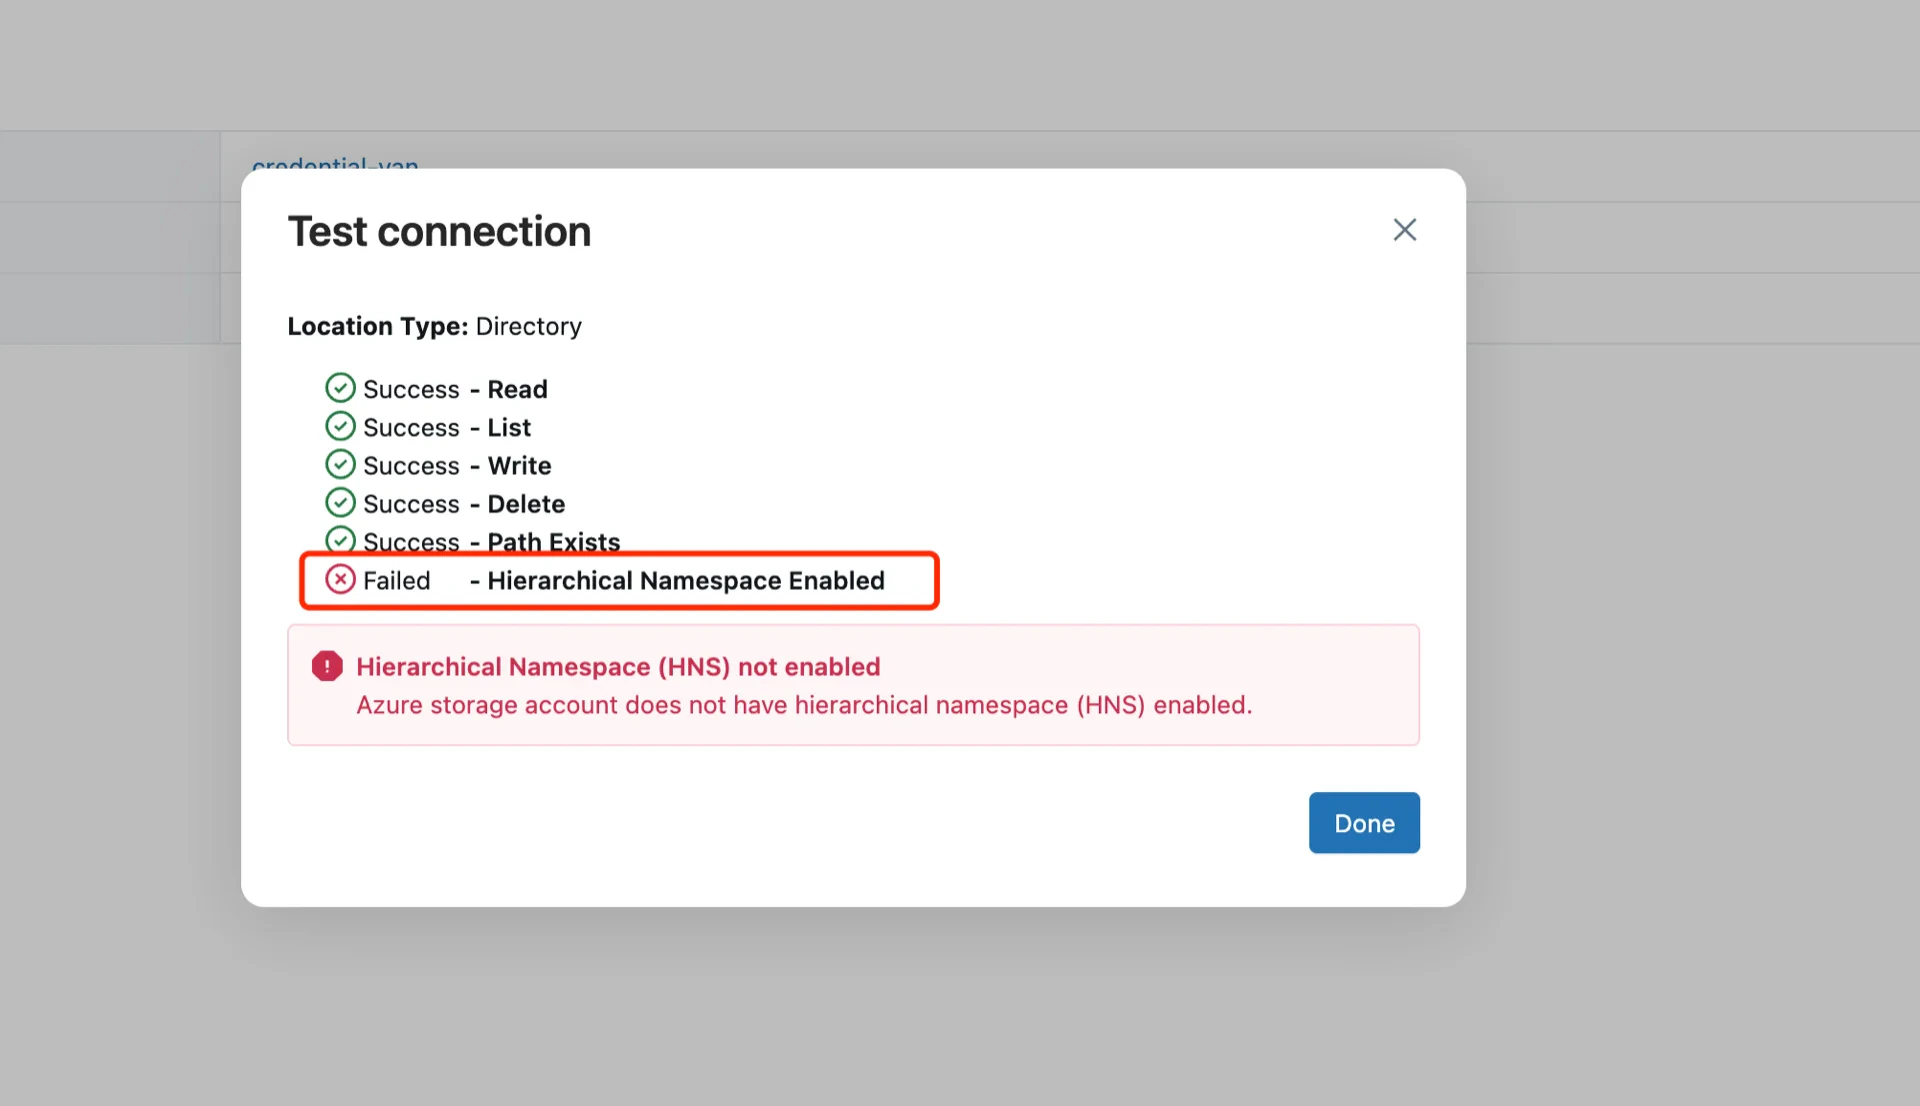
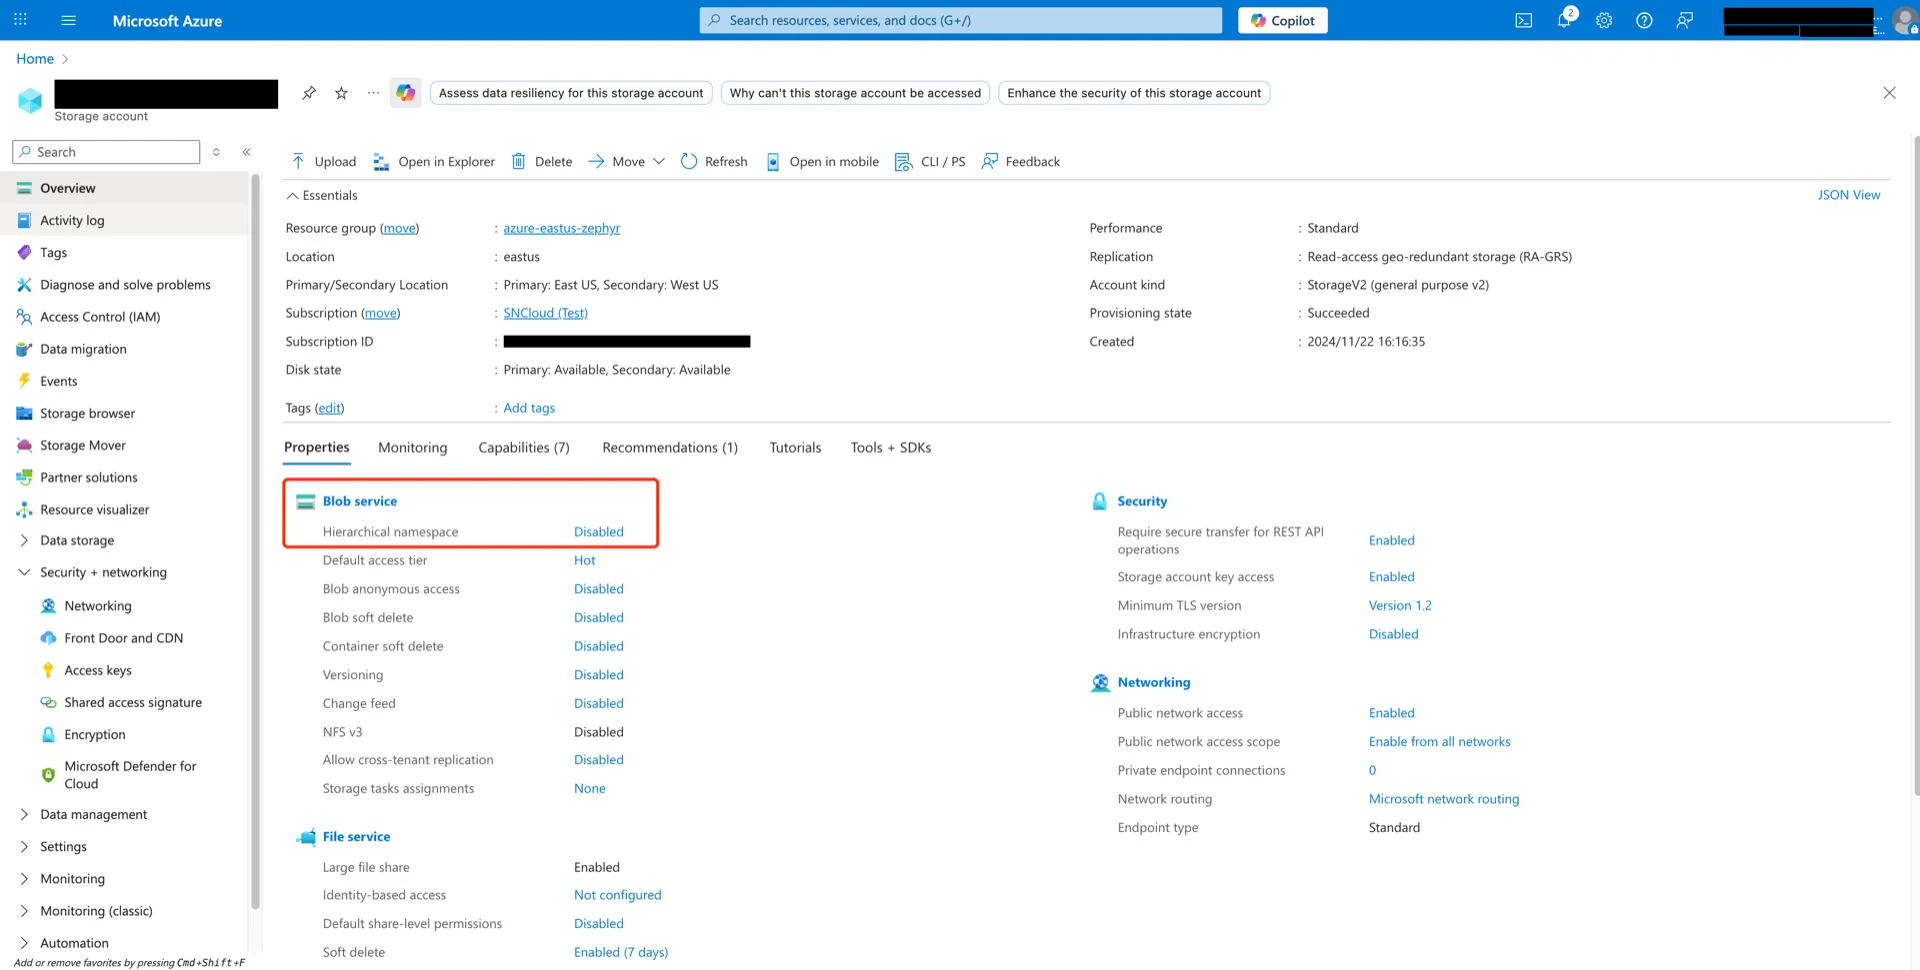
> **Troubleshooting:** If the test fails with a `Hierarchical Namespace Enabled` error, ensure that **Hierarchical namespace** is enabled on the storage account.

<img src="https://mintcdn.com/streamnative/X17SyiKppfiqQD9i/images/ursa-lakehouse/uc-delta-azure-19.webp?fit=max&auto=format&n=X17SyiKppfiqQD9i&q=85&s=074cefa91bc8aca56ca2ba8b3722eec9" alt="Hierarchical namespace" width="1920" height="1106" data-path="images/ursa-lakehouse/uc-delta-azure-19.webp" />

<img src="https://mintcdn.com/streamnative/X17SyiKppfiqQD9i/images/ursa-lakehouse/uc-delta-azure-20.webp?fit=max&auto=format&n=X17SyiKppfiqQD9i&q=85&s=71d5df296a73511c38facdd83321678d" alt="Hierarchical namespace" width="1920" height="970" data-path="images/ursa-lakehouse/uc-delta-azure-20.webp" />

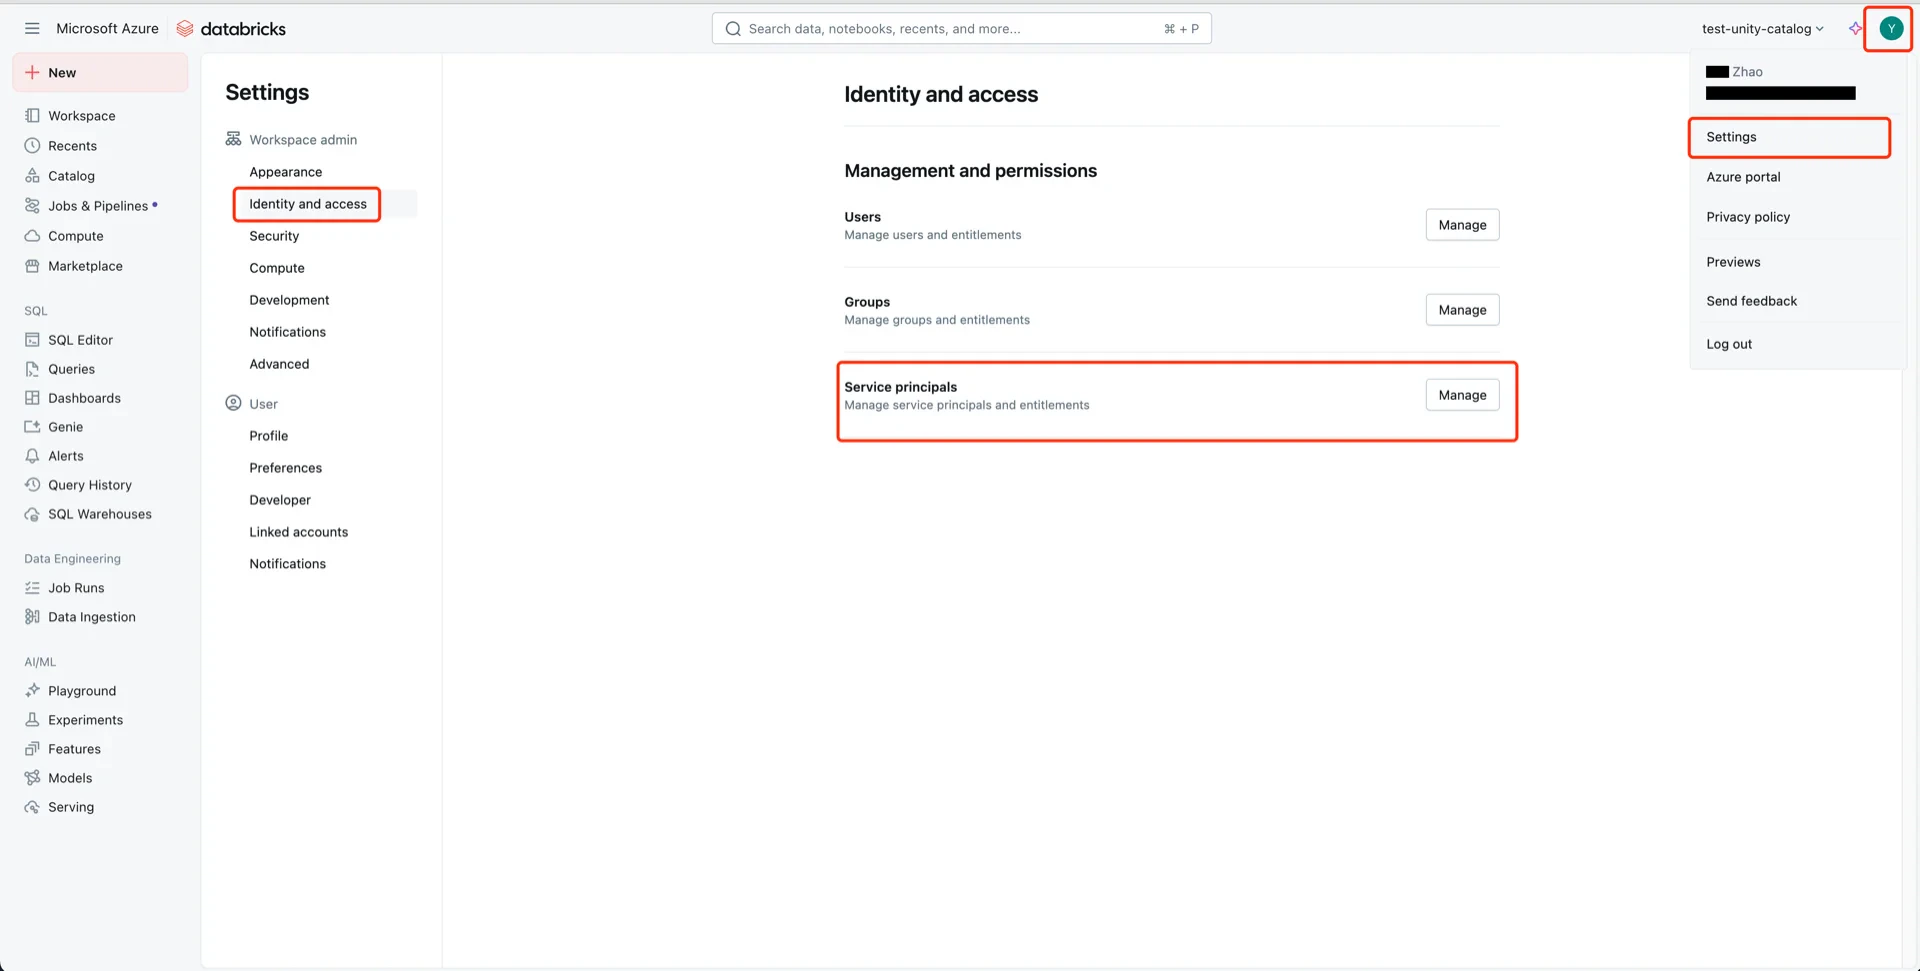
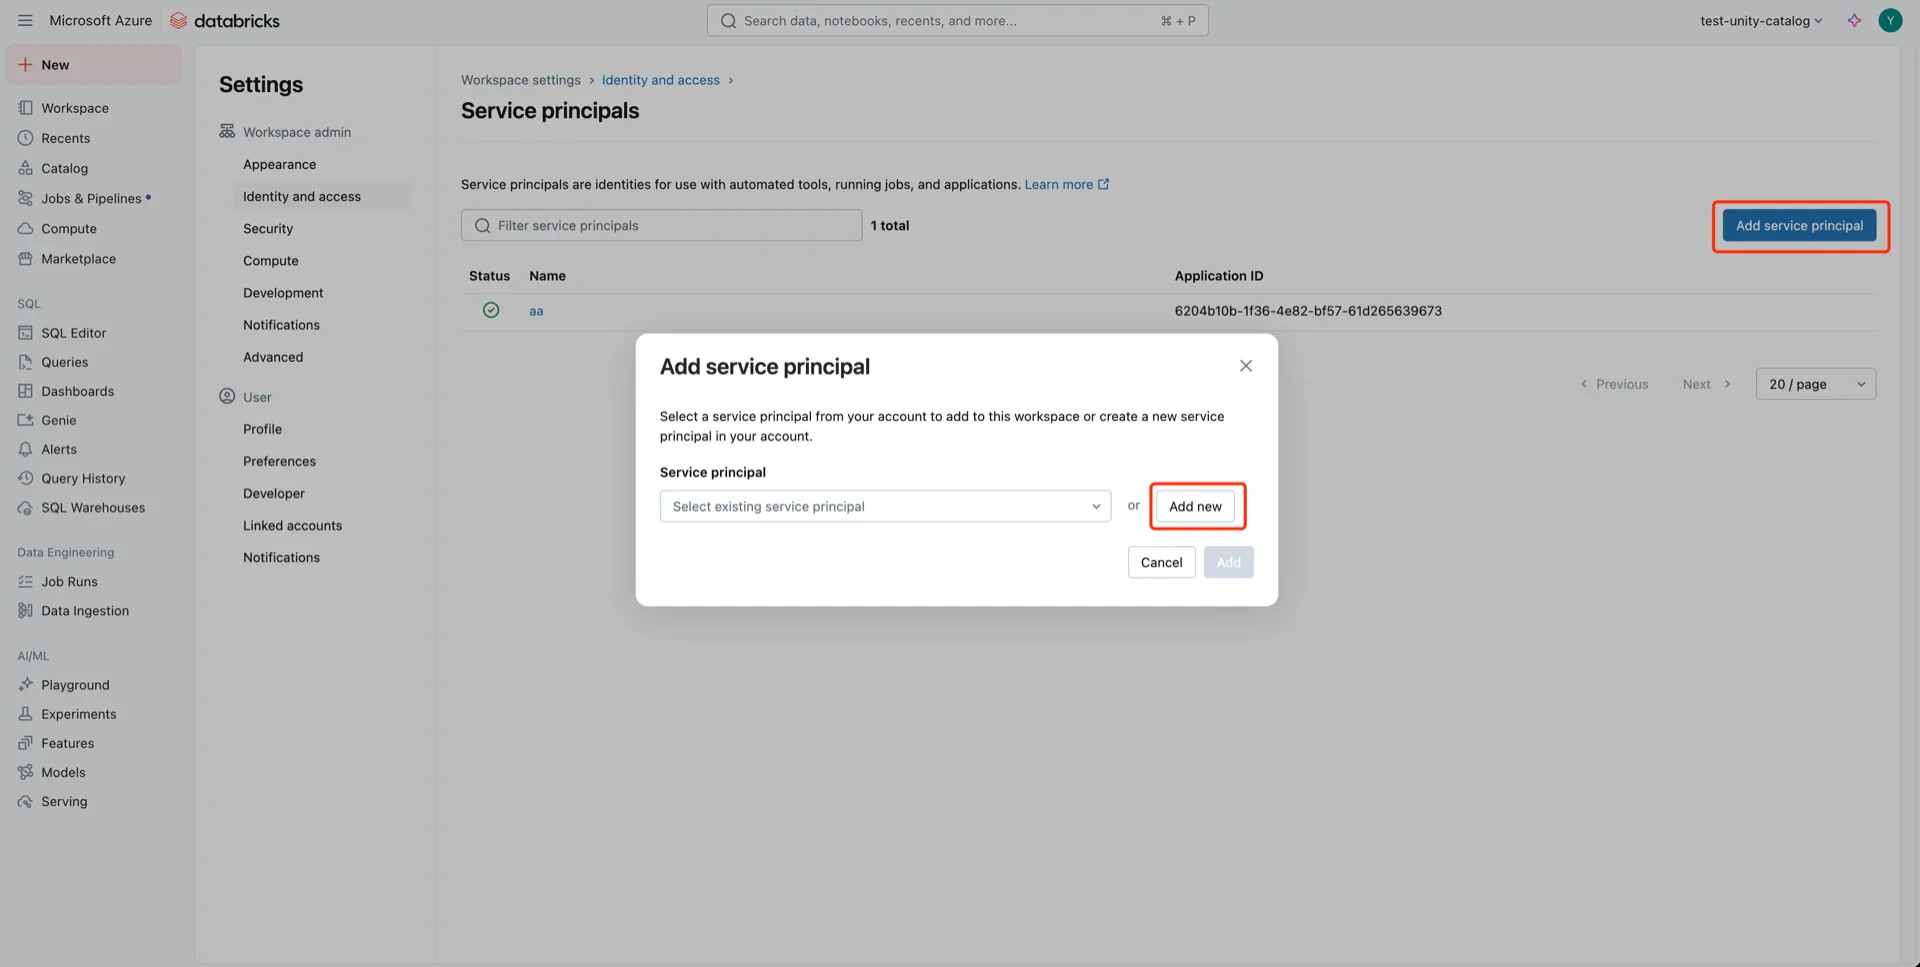
## 6. Create a Service Principal

Navigate to **User -> Settings -> Identity and access -> Service principals -> Manage**.

<img src="https://mintcdn.com/streamnative/X17SyiKppfiqQD9i/images/ursa-lakehouse/uc-delta-azure-21.webp?fit=max&auto=format&n=X17SyiKppfiqQD9i&q=85&s=25515c91c78f6575982b0fcbfcd945f1" alt="Service principals" width="1920" height="971" data-path="images/ursa-lakehouse/uc-delta-azure-21.webp" />

Click **Add service principal -> Add new**.

<img src="https://mintcdn.com/streamnative/X17SyiKppfiqQD9i/images/ursa-lakehouse/uc-delta-azure-22.webp?fit=max&auto=format&n=X17SyiKppfiqQD9i&q=85&s=848eacf29a6bdd7e48058ab827ff451f" alt="Add service principal" width="1920" height="967" data-path="images/ursa-lakehouse/uc-delta-azure-22.webp" />

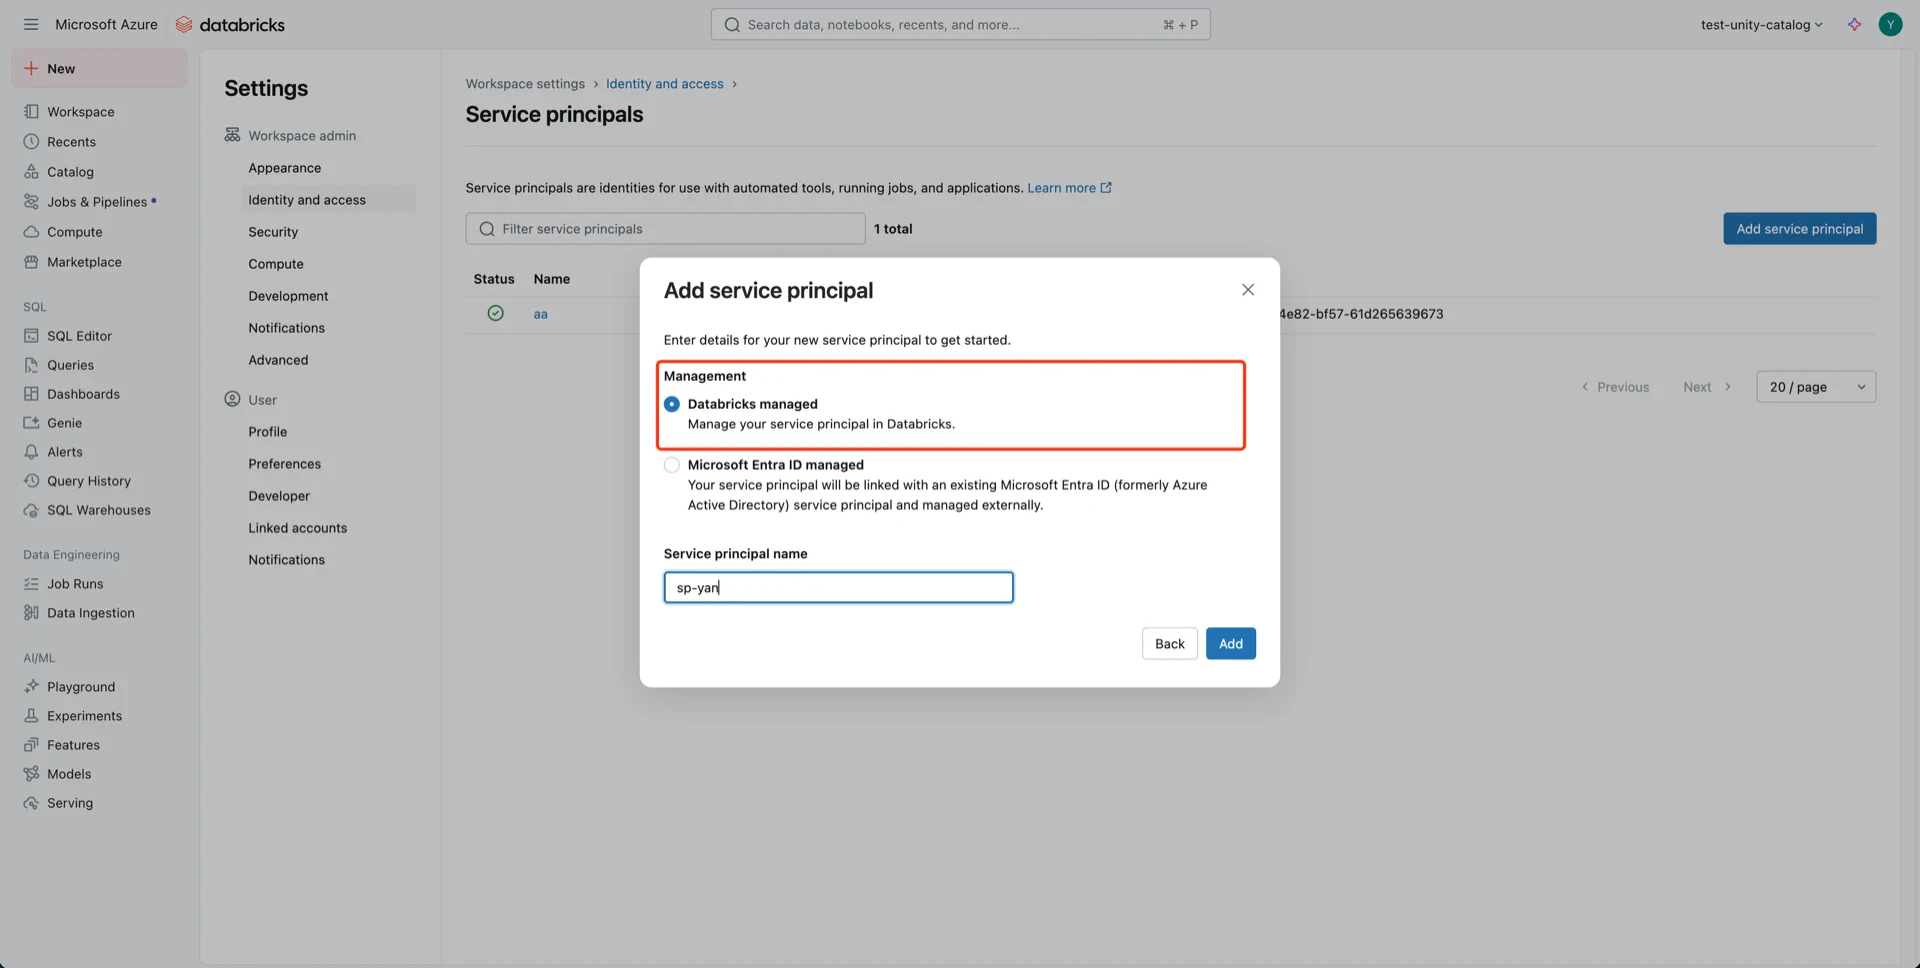
Choose **Databricks managed** and provide a name.

<img src="https://mintcdn.com/streamnative/X17SyiKppfiqQD9i/images/ursa-lakehouse/uc-delta-azure-23.webp?fit=max&auto=format&n=X17SyiKppfiqQD9i&q=85&s=f77bce70f1e3fc4882cabbf279874cda" alt="Name service principal" width="1920" height="968" data-path="images/ursa-lakehouse/uc-delta-azure-23.webp" />

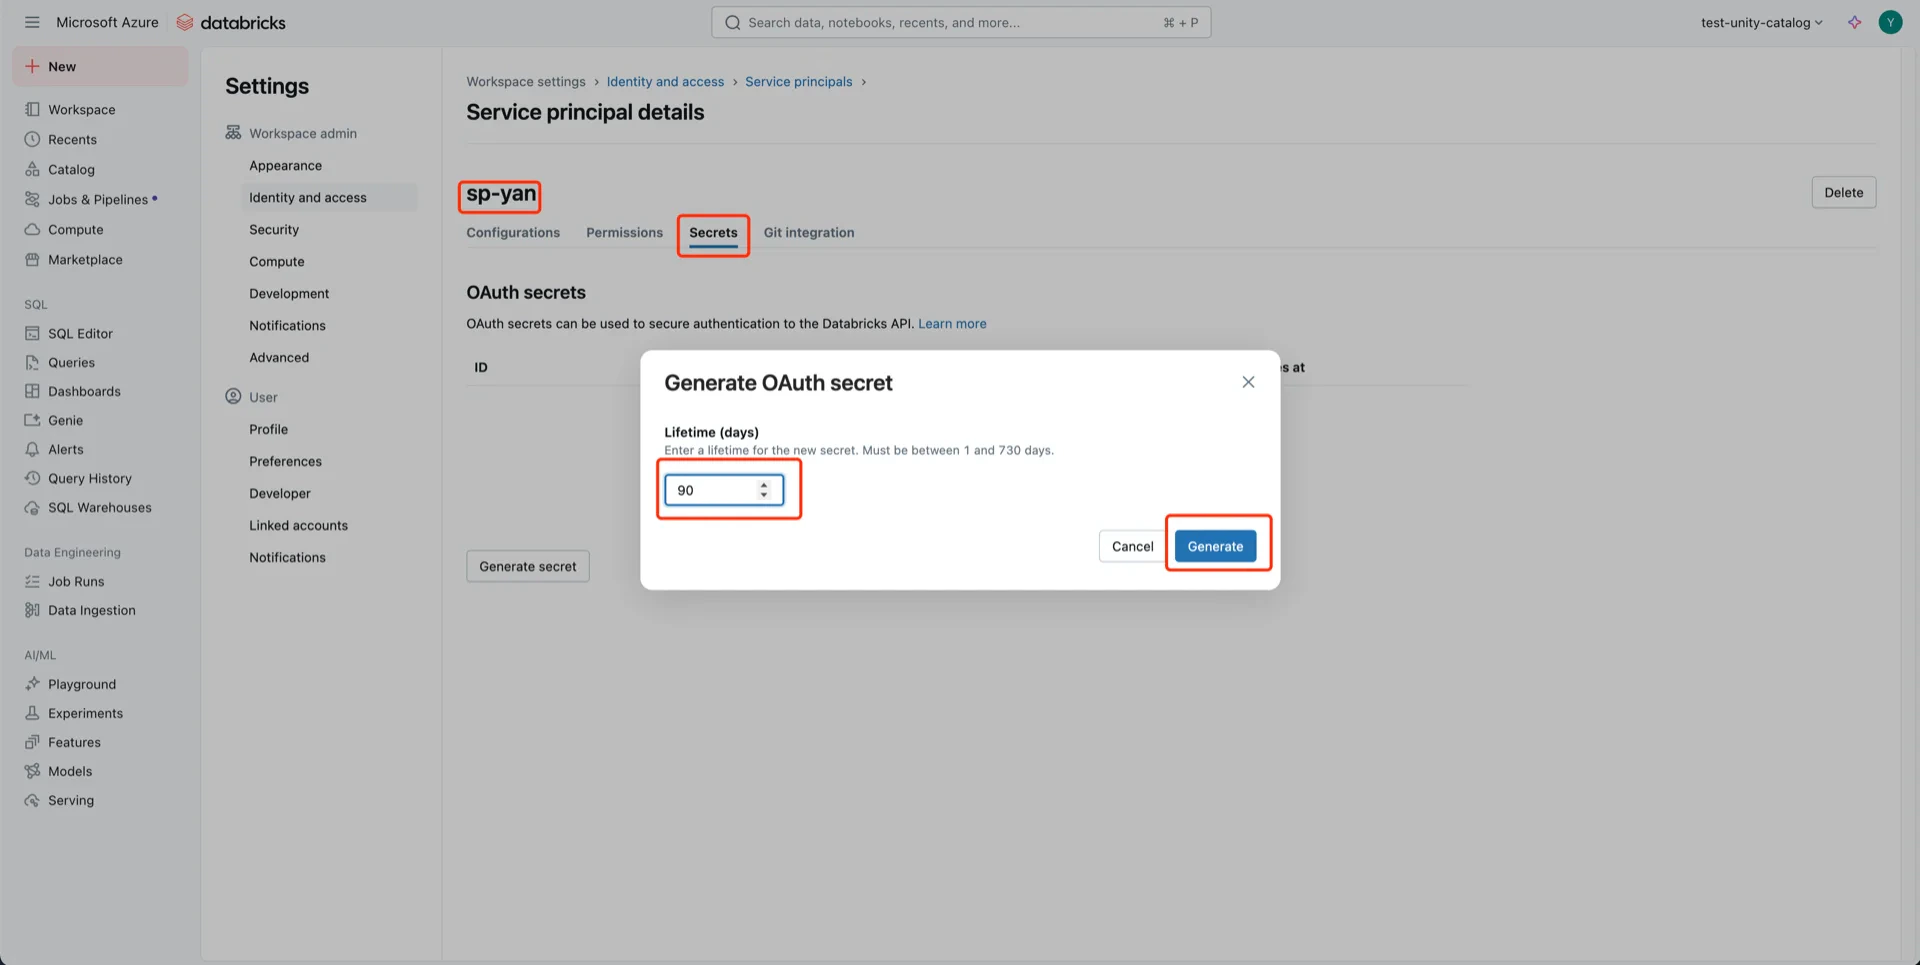
Open the service principal, click **Secrets**, choose an expiration period, and **Generate**.

<img src="https://mintcdn.com/streamnative/X17SyiKppfiqQD9i/images/ursa-lakehouse/uc-delta-azure-24.webp?fit=max&auto=format&n=X17SyiKppfiqQD9i&q=85&s=ac970413c4edc9c81181be3002c00d5d" alt="Generate secret" width="1920" height="965" data-path="images/ursa-lakehouse/uc-delta-azure-24.webp" />

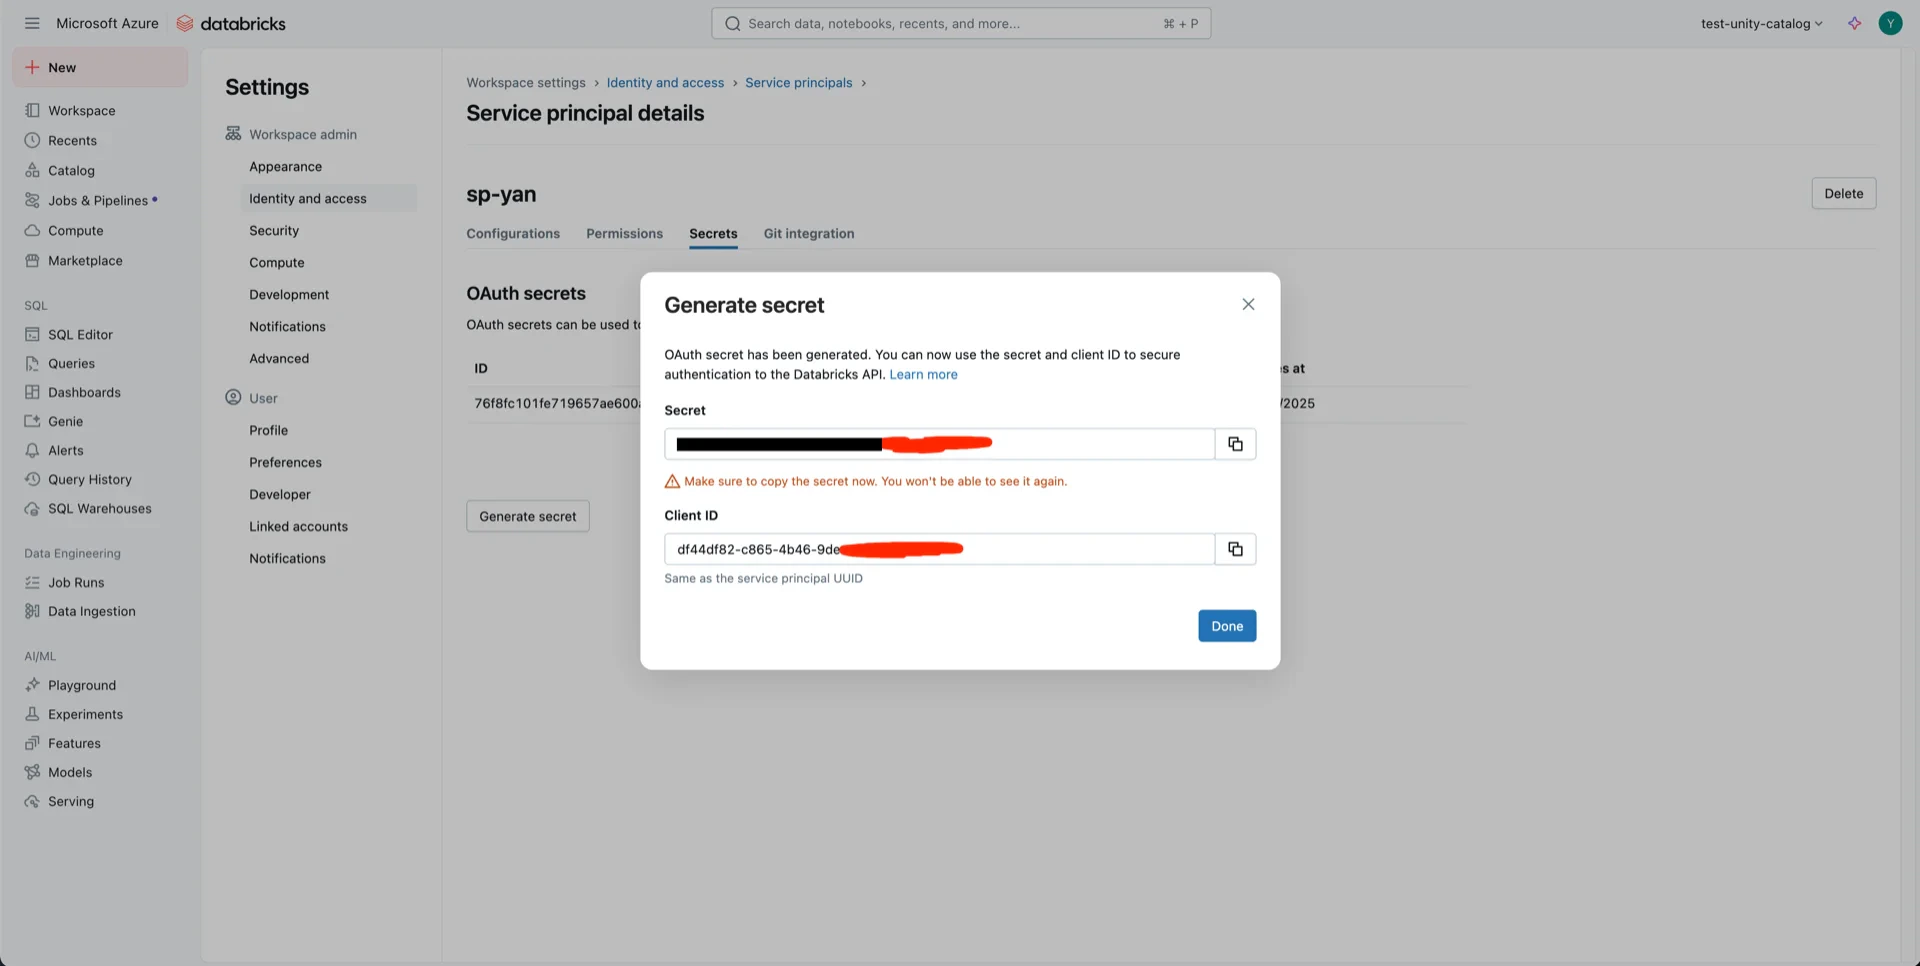
Record both the **Client ID** and **Client Secret** -- the secret cannot be retrieved later.

<img src="https://mintcdn.com/streamnative/X17SyiKppfiqQD9i/images/ursa-lakehouse/uc-delta-azure-25.webp?fit=max&auto=format&n=X17SyiKppfiqQD9i&q=85&s=62a8ad605da020da6aef5ec21aaa8f94" alt="Secret and Client ID" width="1920" height="966" data-path="images/ursa-lakehouse/uc-delta-azure-25.webp" />

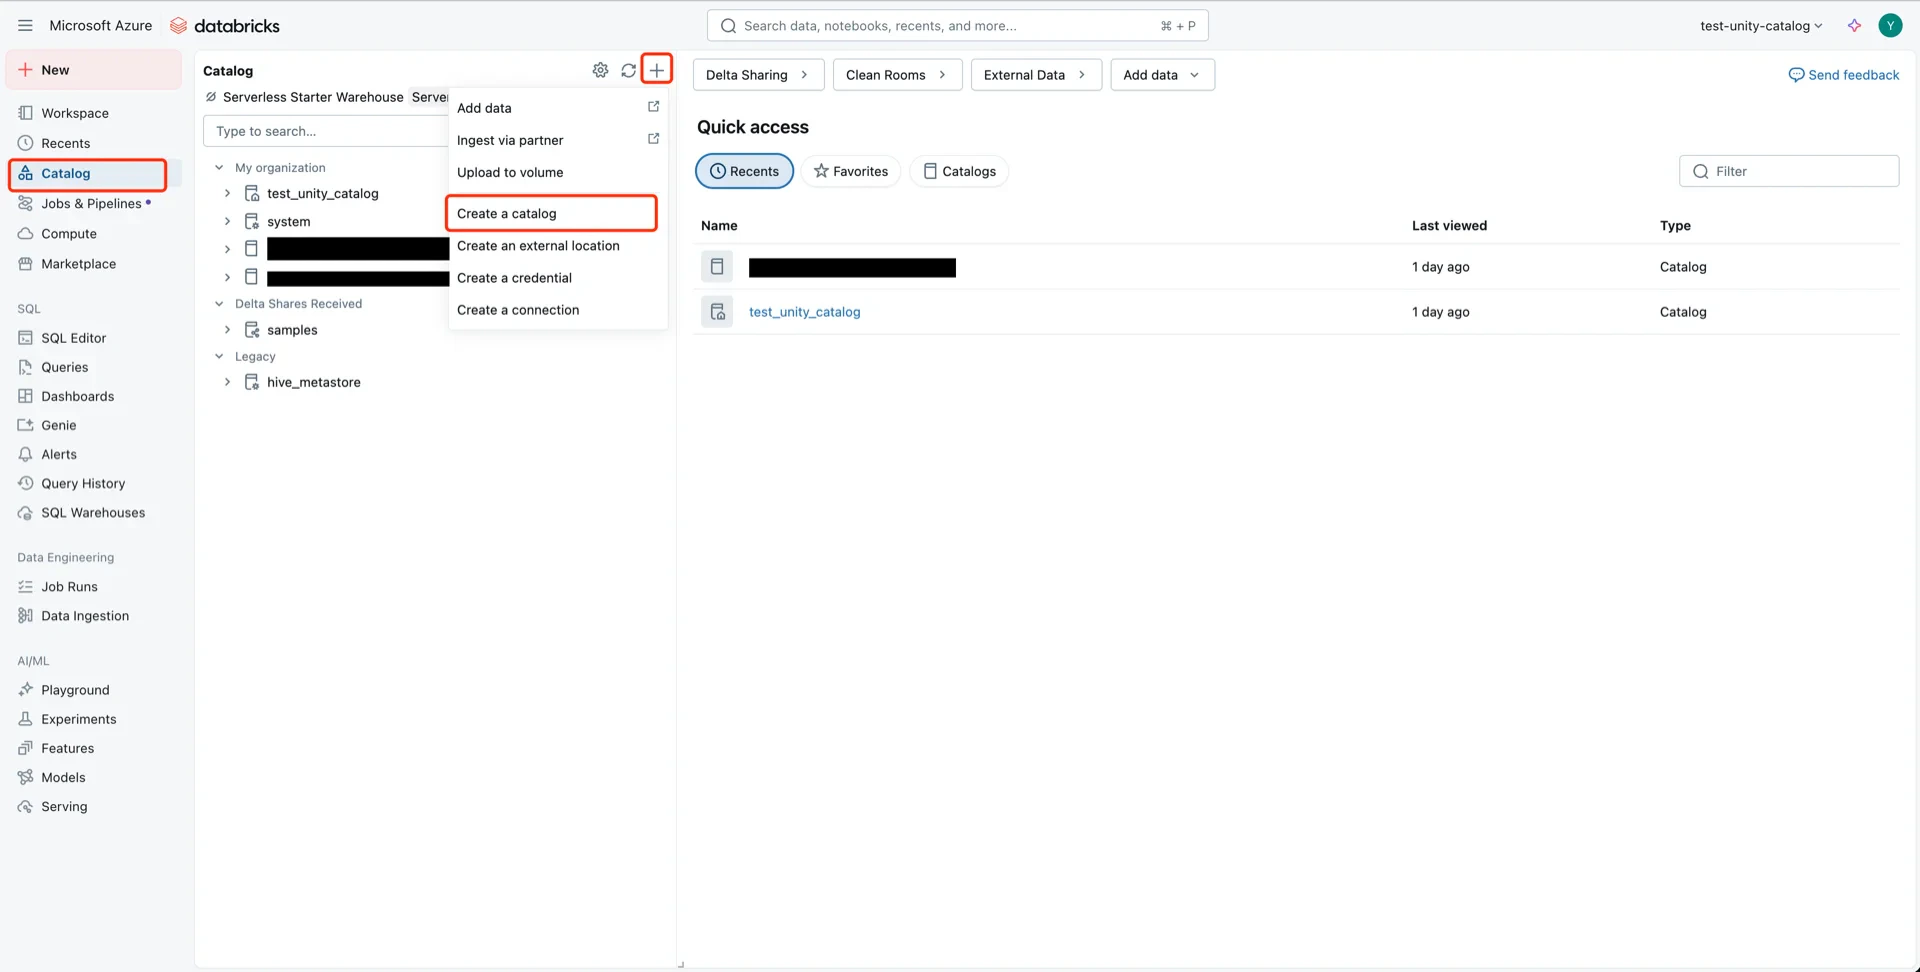
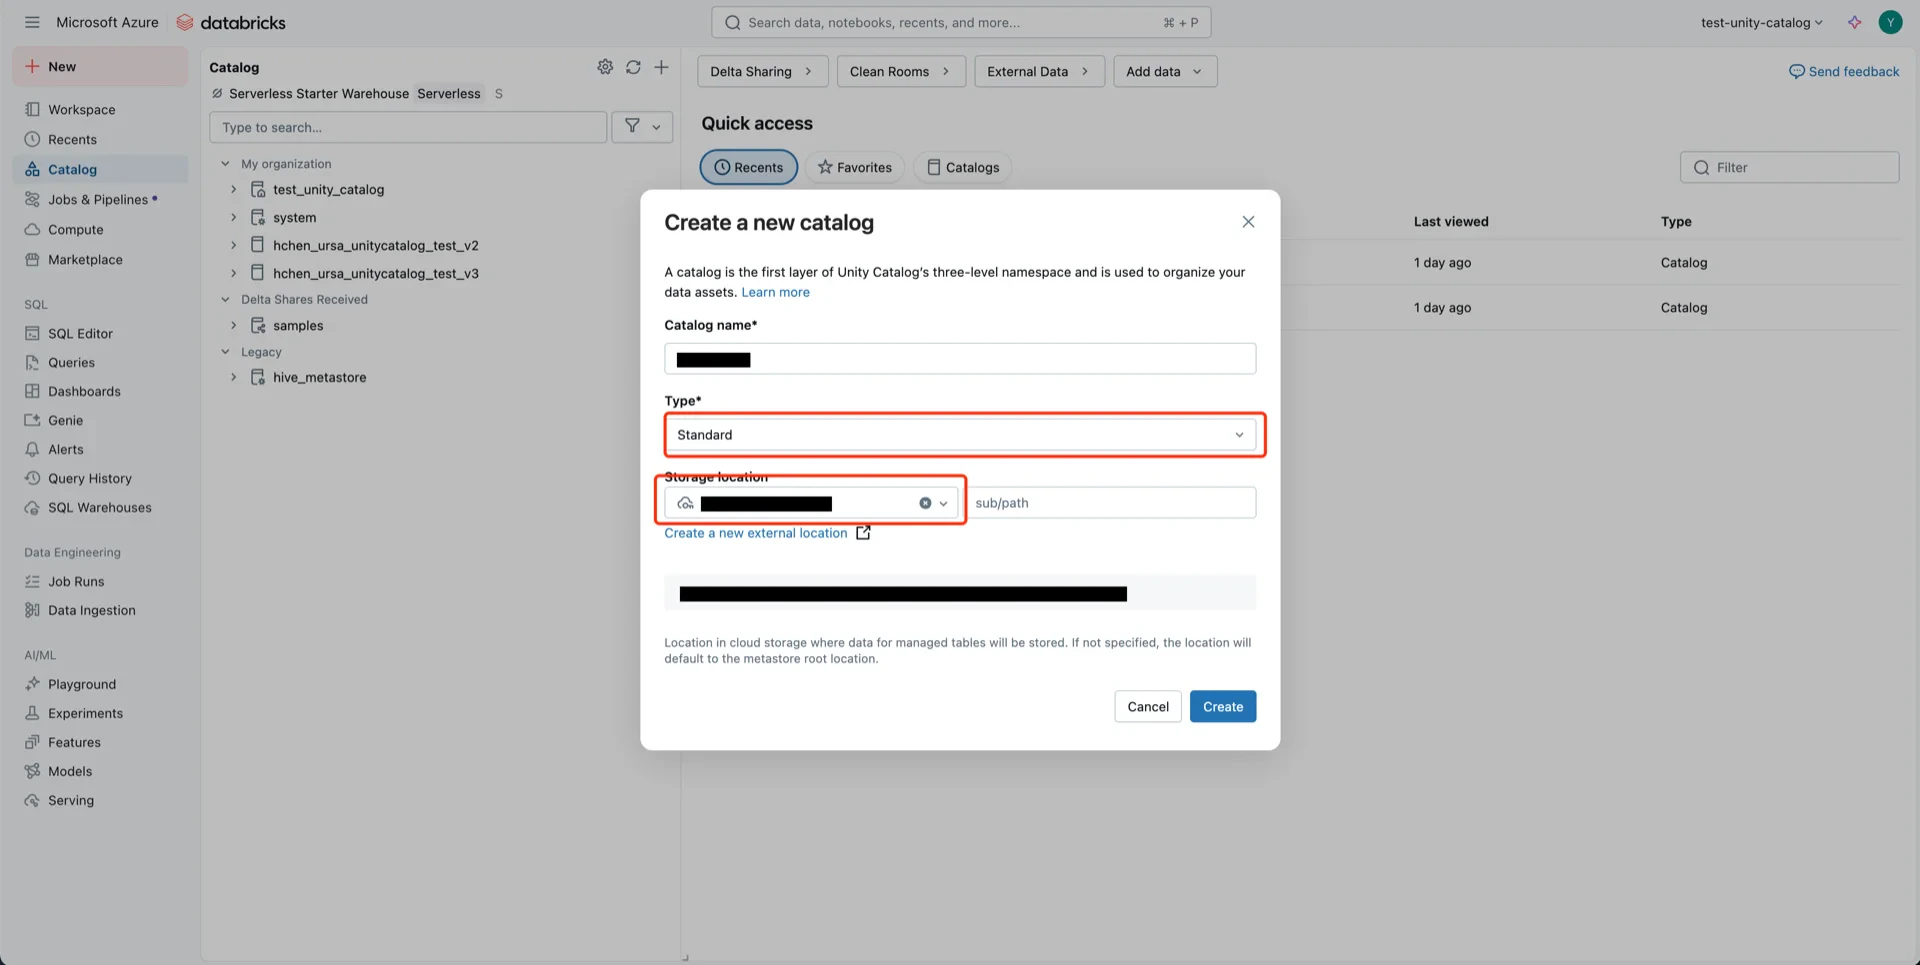
## 7. Create the Catalog

Create a new Catalog with **Type: Standard** and select the **storage location** created in step 5.

<img src="https://mintcdn.com/streamnative/X17SyiKppfiqQD9i/images/ursa-lakehouse/uc-delta-azure-26.webp?fit=max&auto=format&n=X17SyiKppfiqQD9i&q=85&s=a3146654cd34dbf64c6b04217aaa0ccd" alt="Create catalog" width="1920" height="972" data-path="images/ursa-lakehouse/uc-delta-azure-26.webp" />

<img src="https://mintcdn.com/streamnative/X17SyiKppfiqQD9i/images/ursa-lakehouse/uc-delta-azure-27.webp?fit=max&auto=format&n=X17SyiKppfiqQD9i&q=85&s=8cf296c5a73c8f974f9393a4a58adae8" alt="Catalog form" width="1920" height="965" data-path="images/ursa-lakehouse/uc-delta-azure-27.webp" />

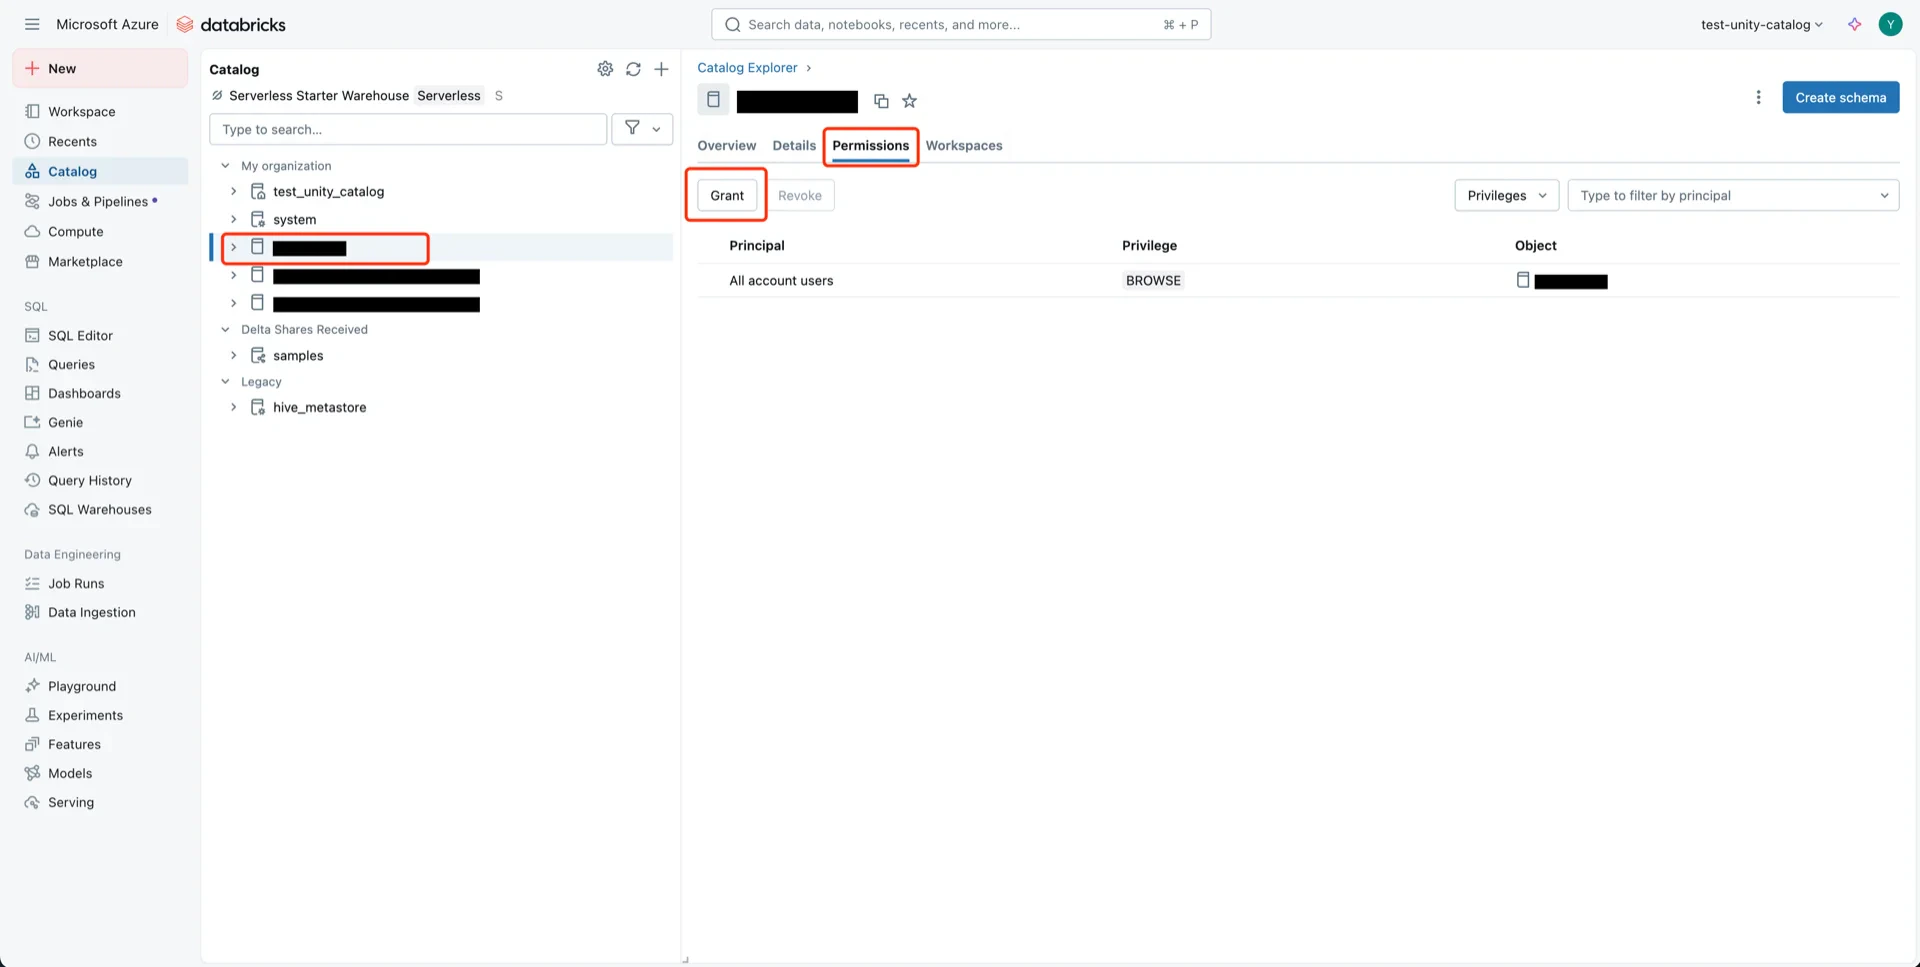
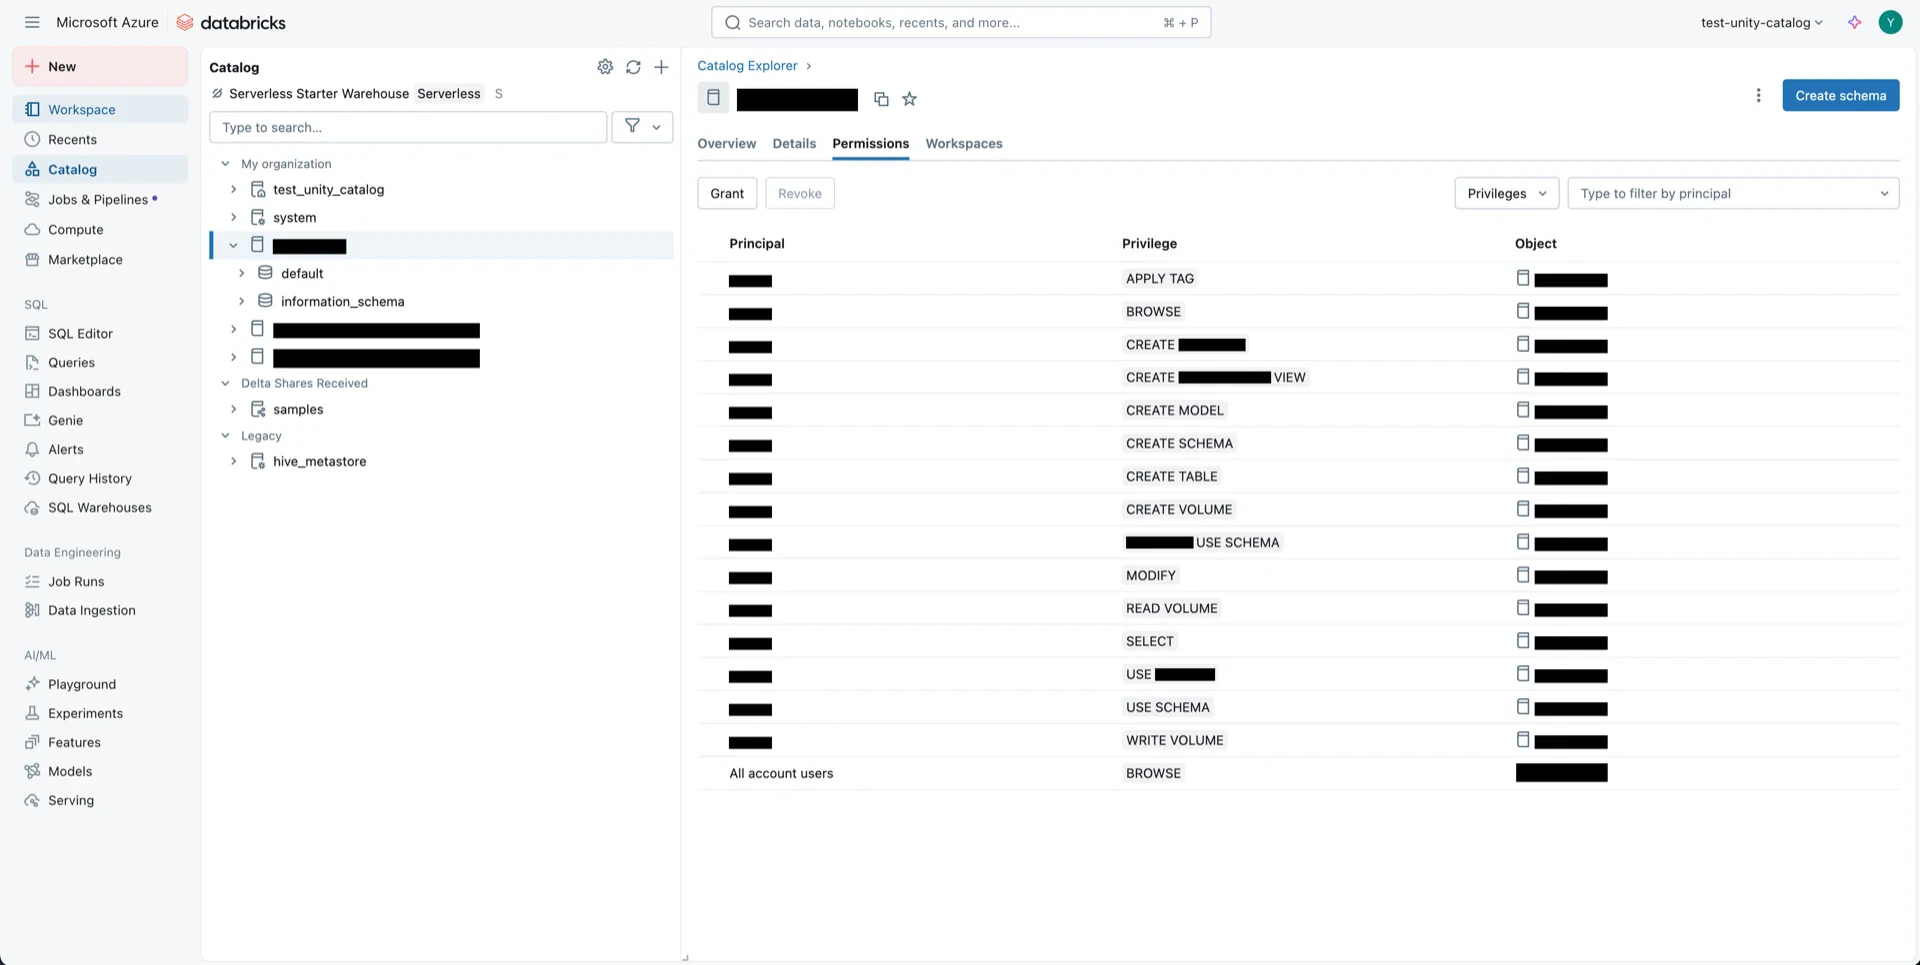
## 8. Grant Permissions to the Service Principal

### 8.1 Catalog Permissions

Navigate to the new catalog and click **Permissions -> Grant**.
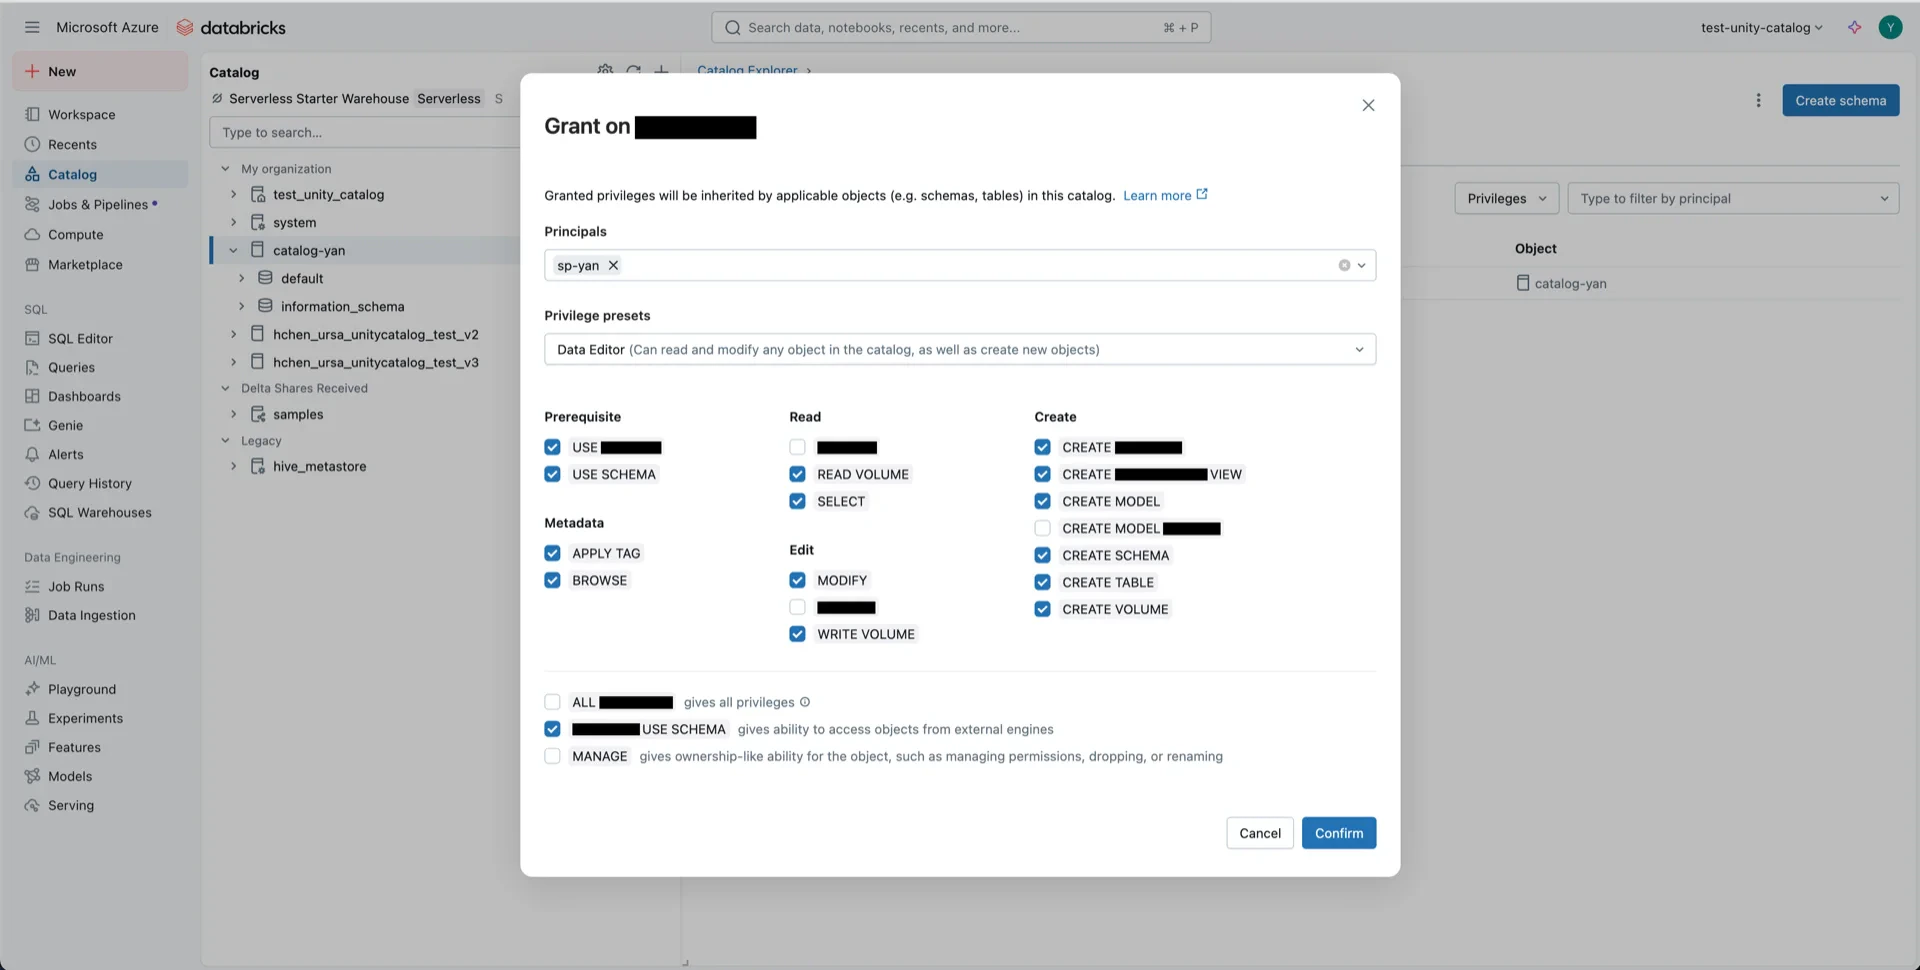
<img src="https://mintcdn.com/streamnative/X17SyiKppfiqQD9i/images/ursa-lakehouse/uc-delta-azure-28.webp?fit=max&auto=format&n=X17SyiKppfiqQD9i&q=85&s=95cc13fc2b60141e8dca898c075166bd" alt="Catalog permissions" width="1920" height="967" data-path="images/ursa-lakehouse/uc-delta-azure-28.webp" />

Configure:

* **Principals:** the service principal from step 6
* **Privilege presets:** Data Editor
* **EXTERNAL USE SCHEMA:** Enabled

<img src="https://mintcdn.com/streamnative/X17SyiKppfiqQD9i/images/ursa-lakehouse/uc-delta-azure-29.webp?fit=max&auto=format&n=X17SyiKppfiqQD9i&q=85&s=30eea1b07823e8450c676e1ef43a20d4" alt="Grant catalog permissions" width="1920" height="970" data-path="images/ursa-lakehouse/uc-delta-azure-29.webp" />

<img src="https://mintcdn.com/streamnative/X17SyiKppfiqQD9i/images/ursa-lakehouse/uc-delta-azure-30.webp?fit=max&auto=format&n=X17SyiKppfiqQD9i&q=85&s=34fa800e28a47d724a879d55e22d61b4" alt="Permissions granted" width="1920" height="965" data-path="images/ursa-lakehouse/uc-delta-azure-30.webp" />

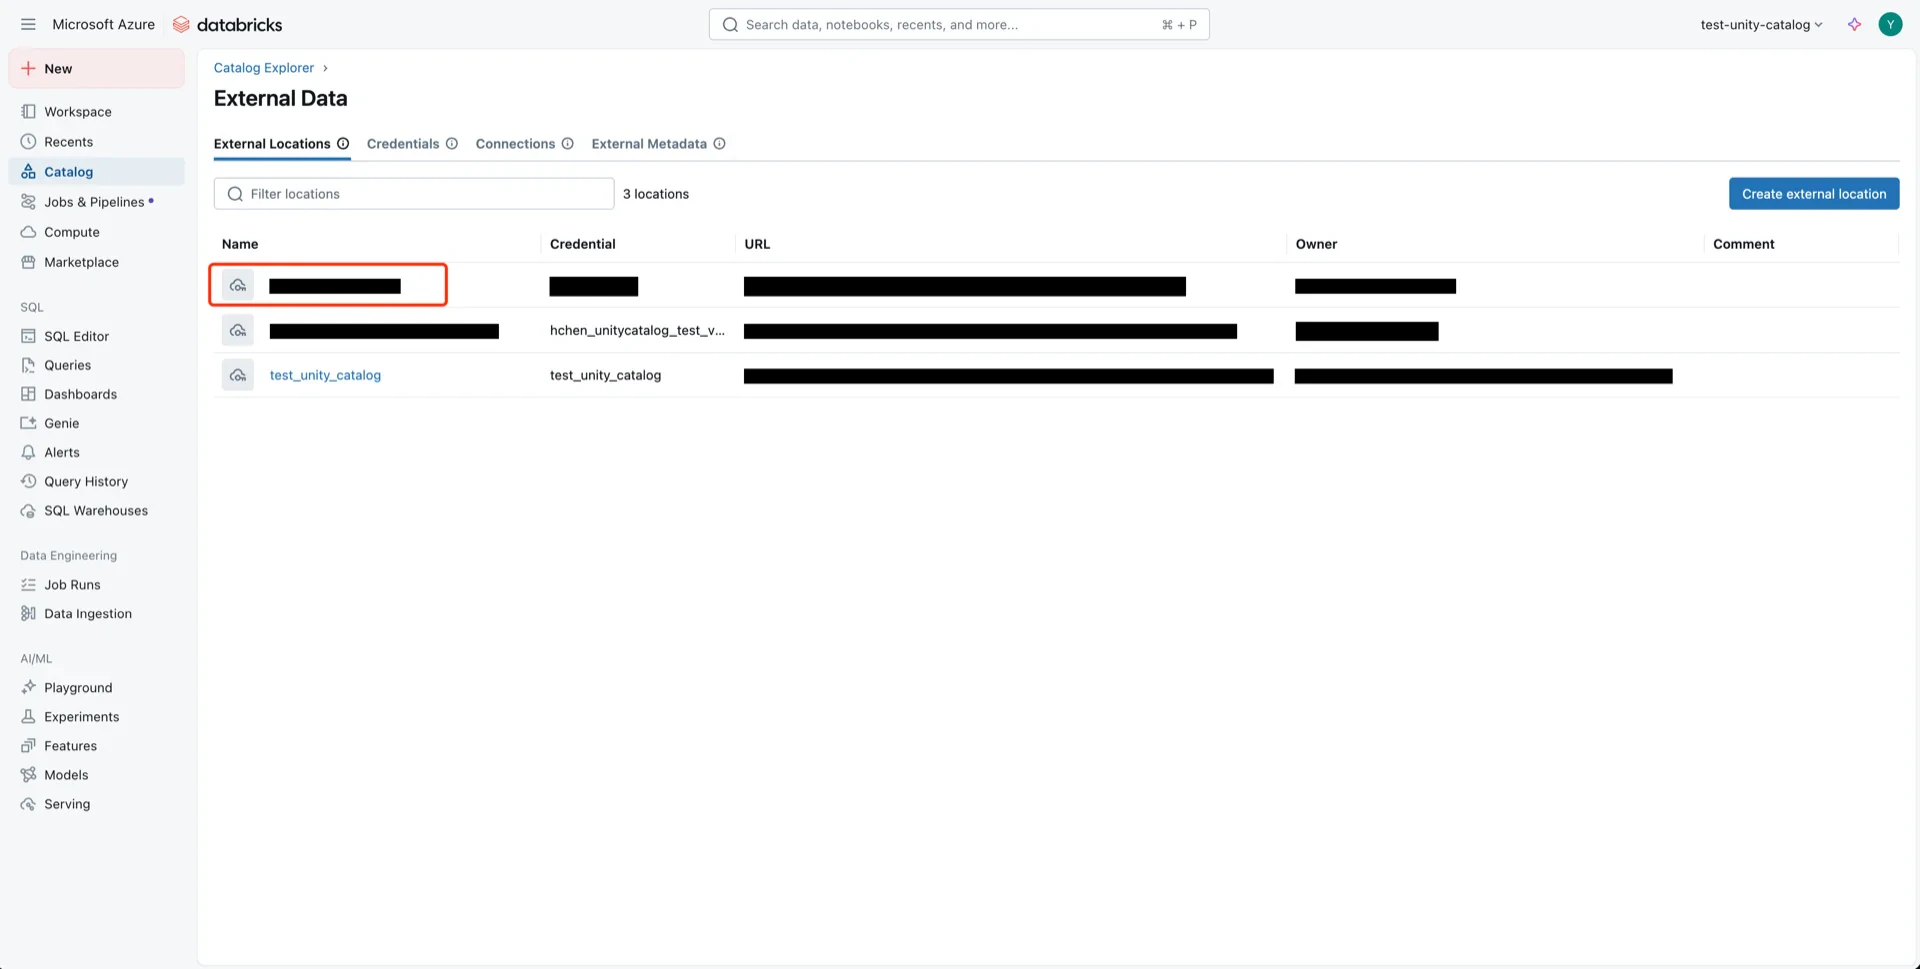
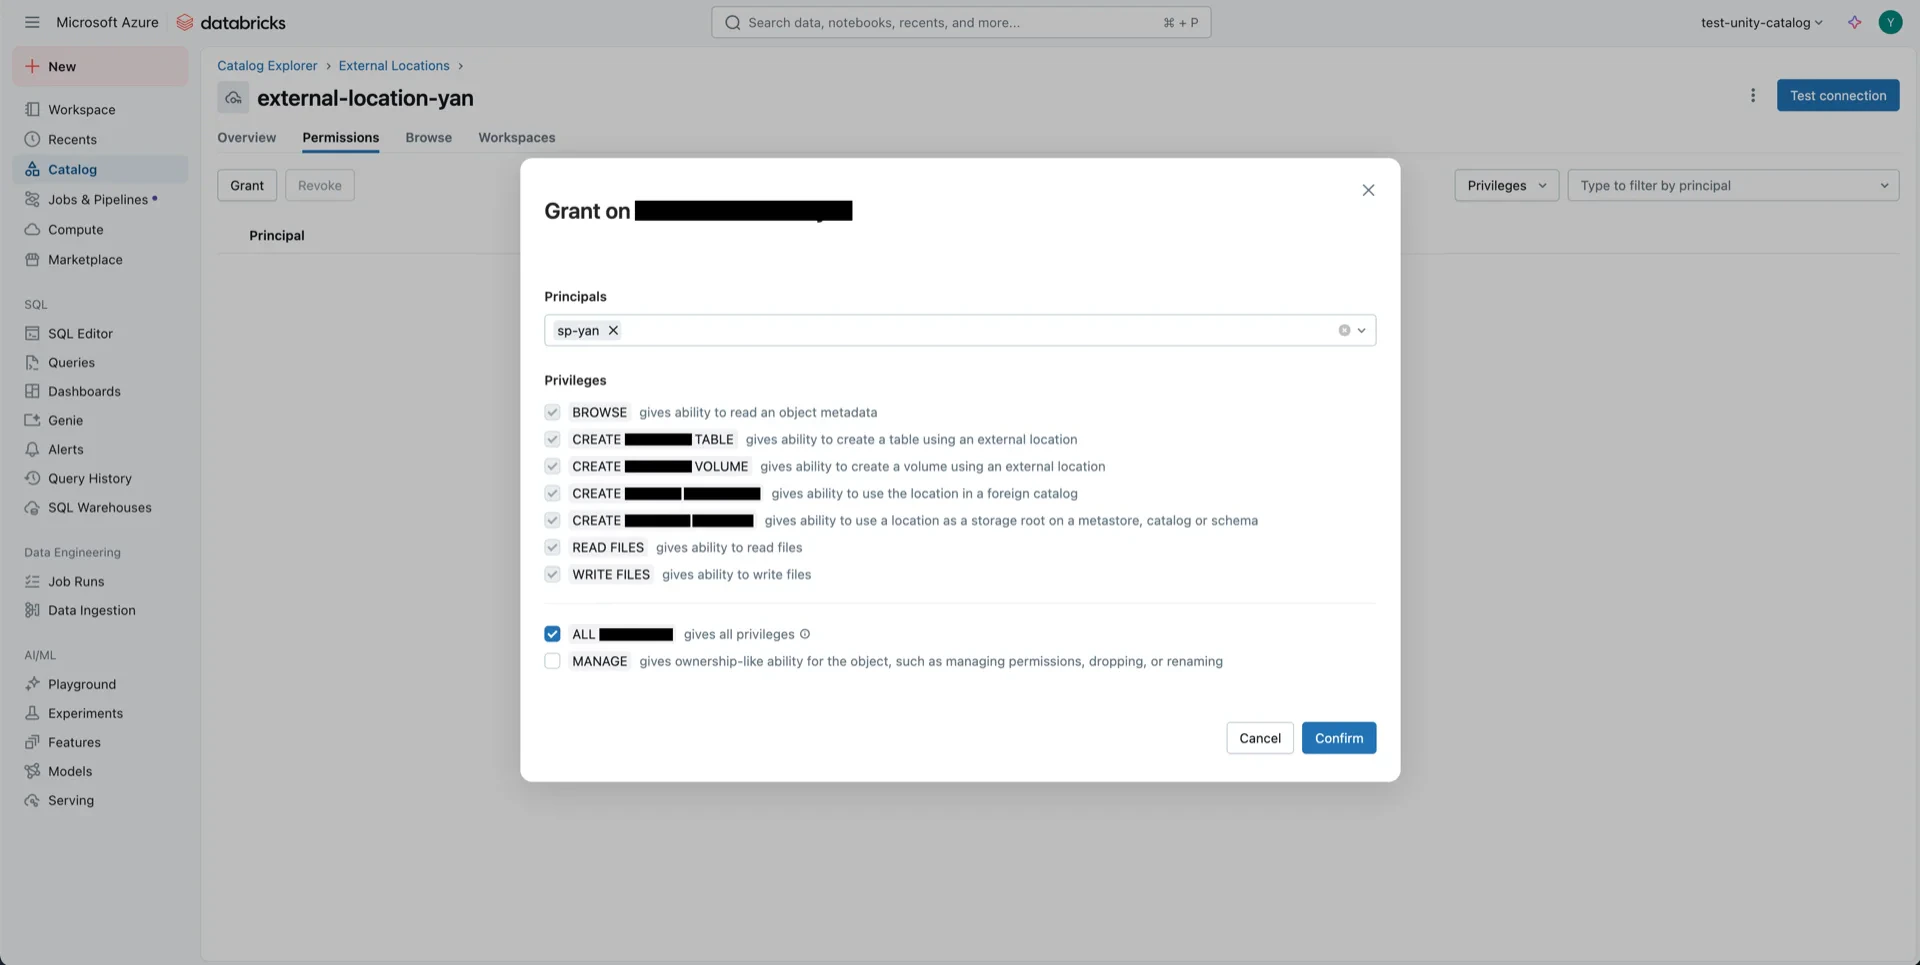
### 8.2 External Location Permissions

Open the external location from step 5.

<img src="https://mintcdn.com/streamnative/X17SyiKppfiqQD9i/images/ursa-lakehouse/uc-delta-azure-31.webp?fit=max&auto=format&n=X17SyiKppfiqQD9i&q=85&s=955bde4ec5ae13f586dec3a06c812bba" alt="External location details" width="1920" height="974" data-path="images/ursa-lakehouse/uc-delta-azure-31.webp" />

<img src="https://mintcdn.com/streamnative/X17SyiKppfiqQD9i/images/ursa-lakehouse/uc-delta-azure-32.webp?fit=max&auto=format&n=X17SyiKppfiqQD9i&q=85&s=ae21b797b34f26e59ffb16fa8b412706" alt="External location details" width="1920" height="967" data-path="images/ursa-lakehouse/uc-delta-azure-32.webp" />

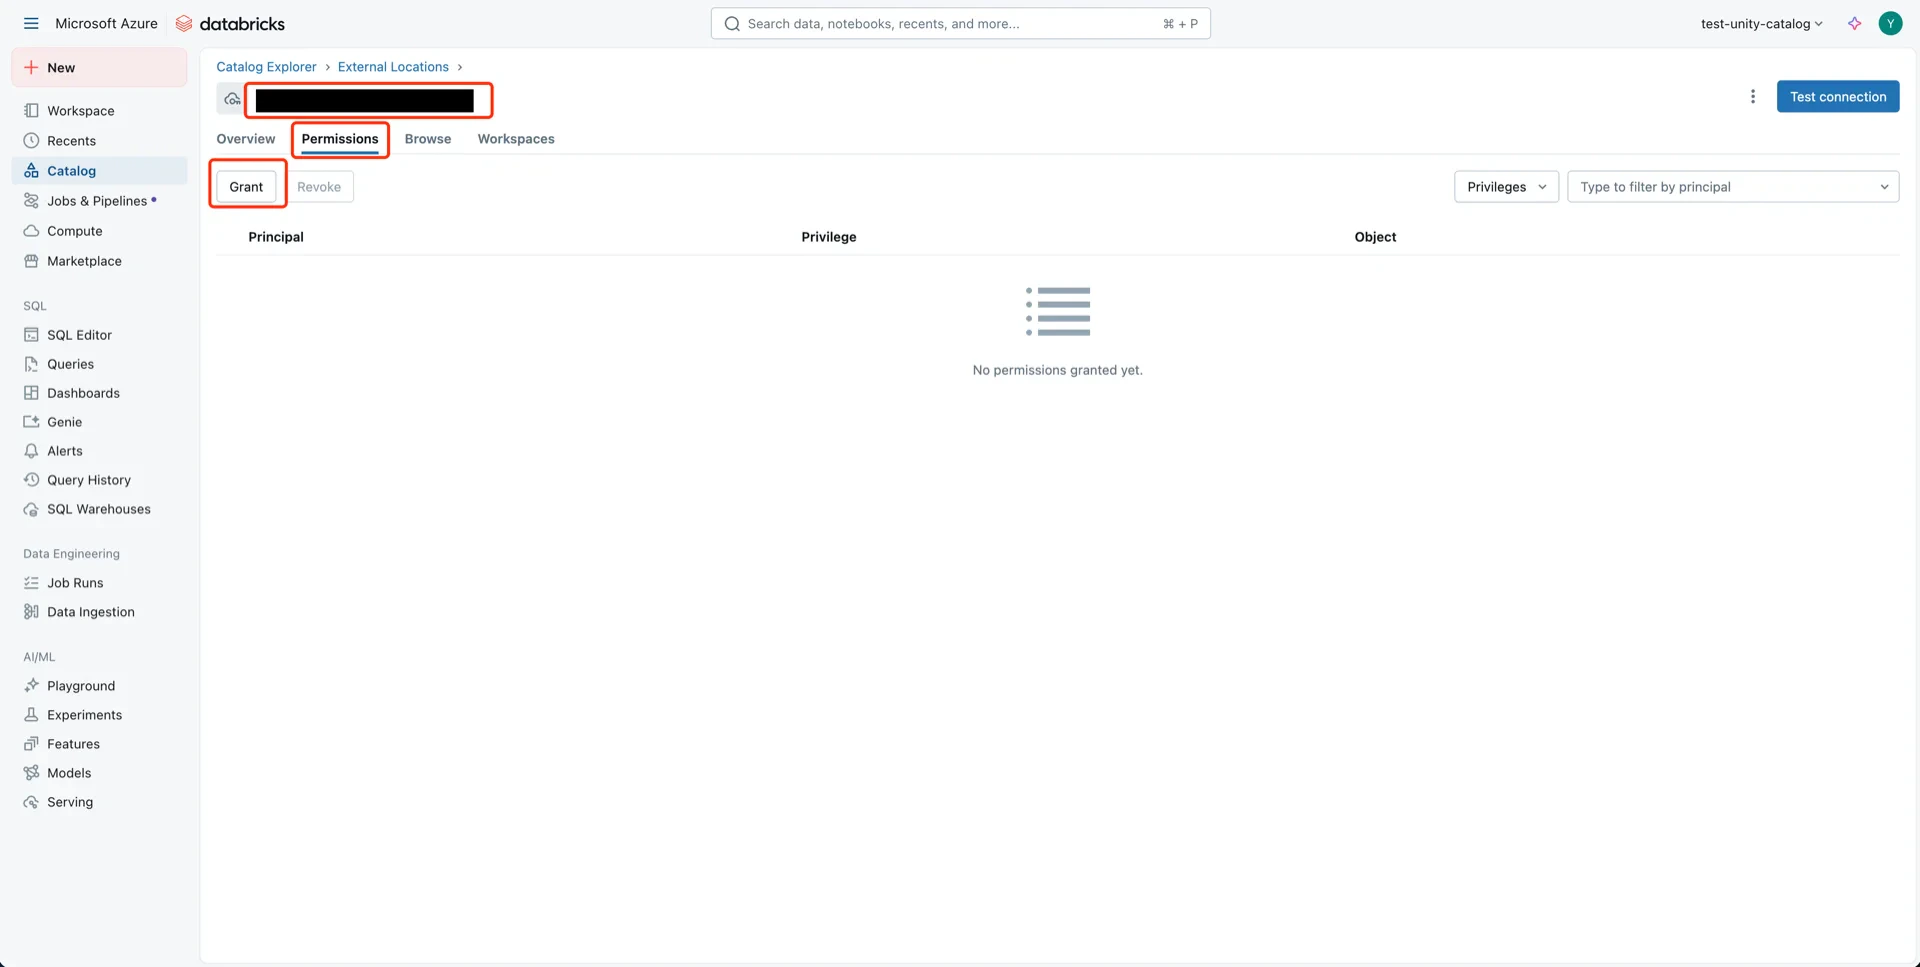
Click **Grant**, choose the service principal, select **ALL PRIVILEGES**, and click **Confirm**.

<img src="https://mintcdn.com/streamnative/X17SyiKppfiqQD9i/images/ursa-lakehouse/uc-delta-azure-33.webp?fit=max&auto=format&n=X17SyiKppfiqQD9i&q=85&s=de497723cc4205fe59582a58a9b84375" alt="Grant external location permission" width="1920" height="965" data-path="images/ursa-lakehouse/uc-delta-azure-33.webp" />

<img src="https://mintcdn.com/streamnative/X17SyiKppfiqQD9i/images/ursa-lakehouse/uc-delta-azure-34.webp?fit=max&auto=format&n=X17SyiKppfiqQD9i&q=85&s=f4d60433b45a212e4fcd71fd58a4d115" alt="Permission granted" width="1920" height="960" data-path="images/ursa-lakehouse/uc-delta-azure-34.webp" />

## Catalog Information Summary

When the steps above are complete, collect the following values for the StreamNative Ursa compaction service:

| Value                                               | Description                                                                       |
| --------------------------------------------------- | --------------------------------------------------------------------------------- |
| `unityCatalogUri`                                   | Databricks workspace URL (e.g., `https://adb-<workspace-id>.azuredatabricks.net`) |
| `unityCatalogName`                                  | The Unity Catalog name created in step 7                                          |
| `unityCatalogClientId` / `unityCatalogClientSecret` | OAuth2 credentials from step 6                                                    |

For the next steps, see [Configure Lakehouse Catalogs](../../../configure-lakehouse-catalogs).
