> ## Documentation Index
> Fetch the complete documentation index at: https://docs.streamnative.io/llms.txt
> Use this file to discover all available pages before exploring further.
# Create Connectors
## Prerequisites
Before deploying a connector to StreamNative Cloud, make sure the following prerequisites have been met:
* A running external data system service.
* A running [Pulsar Cluster](/cloud/clusters/manage-clusters/cluster#create-a-cluster) on StreamNative Cloud and the [required environment](/cloud/connect/pulsar-io/deploy-connectors/connector-setup) has been set up.
* At least one of the required tools: [snctl](/tools/cli/snctl/snctl-overview), [pulsarctl](/tools/cli/pulsarctl/pulsarctl-overview), `pulsar-admin` , or the Terraform module. For a quickstart of setting up `pulsarctl` and `pulsar-admin`, see [set up client tools](/cloud/connect/pulsar-io/deploy-connectors/connector-setup#set-up-client-tools).
## Create a built-in connector
Before creating a connector, it's highly recommended to do the following:
1. [Check connector availability](/cloud/connect/pulsar-io/deploy-connectors/connector-check) to ensure the version number of the connector you want to create is supported on StreamNative Cloud.
2. Go to [StreamNative Hub](/connect/overview) and find the connector-specific docs of your version for configuration reference.
The following example shows how to create a data generator source connector named `test` on Streamnative Cloud using different tools.
The `builtin://` is followed by the name of the built-in connector, such as `builtin://data-generator`.
To create a data generator source connector named `test`, run the following command.
```bash theme={null}
snctl pulsar admin sources create --archive builtin://data-generator --destination-topic-name public/default/dg-test --source-config '{"sleepBetweenMessages": 60}' --name test --use-service-account
```
You should see the following output:
```bash theme={null}
Created test successfully
```
If you want to verify whether the data generator source connector has been created successfully, run the following command:
```bash theme={null}
snctl pulsar admin sources list
```
You should see the following output:
```bash theme={null}
+---------------------+
| PULSAR SOURCES NAME |
+---------------------+
| test |
+---------------------+
```
If you want to create a sink connector, use the `snctl pulsar admin sinks create` command.
To create a data generator source connector named `test`, run the following command.
```bash theme={null}
pulsarctl sources create --archive builtin://data-generator --destination-topic-name public/default/dg-test --source-config '{"sleepBetweenMessages": 60}' --name test
```
You should see the following output:
```bash theme={null}
Created test successfully
```
If you want to verify whether the data generator source connector has been created successfully, run the following command:
```bash theme={null}
pulsarctl sources list
```
You should see the following output:
```bash theme={null}
+---------------------+
| PULSAR SOURCES NAME |
+---------------------+
| test |
+---------------------+
```
If you want to create a sink connector, use the `pulsarctl sinks create` command.
To create a data generator source connector named `test`, run the following command.
```bash theme={null}
./bin/pulsar-admin \
--admin-url "${WEB_SERVICE_URL}" \
--auth-plugin org.apache.pulsar.client.impl.auth.oauth2.AuthenticationOAuth2 \
--auth-params '{"privateKey":"file:///YOUR-KEY-FILE-PATH",
"issuerUrl":"https://auth.streamnative.cloud/",
"audience":"urn:sn:pulsar:${orgName}:${instanceName}}'
sources create --archive builtin://data-generator --destination-topic-name public/default/dg-test --source-config '{"sleepBetweenMessages": 60}' --name test
```
Replace the placeholder variables with the actual values that you can get when [setting up client tools](/cloud/connect/pulsar-io/deploy-connectors/connector-setup#set-up-client-tools).
* `admin-url`: the HTTP service URL of your Pulsar cluster.
* `private_key`: the path to the downloaded OAuth2 key file.
* `audience`: the [Uniform Resource Name (URN)](/cloud/references/glossary#uniform-resource-name-urn), which is a combination of the `urn:sn:pulsar`, your organization name, and your Pulsar instance name.
* `${orgName}`: the name of your [organization](/cloud/references/glossary#organization).
* `${instanceName}`: the name of your [instance](/cloud/references/glossary#instance).
If you want to list the submitted connector for a double check, run the following command:
```bash theme={null}
./bin/pulsar-admin sources list
```
You should see the following output:
```bash theme={null}
[
"test"
]
```
To reduce the complexity of your command, you can add the above parameters with values into the `conf/client.conf` file under the downloaded Pulsar release. Once it's configured, you can run a simple command instead:
```bash theme={null}
./bin/pulsar-admin sources create --archive builtin://data-generator --destination-topic-name public/default/dg-test --source-config '{"sleepBetweenMessages": 60}' --name test
```
1. Add the following content to your Terraform file:
```bash theme={null}
terraform {
required_providers {
pulsar = {
version = "0.2.0"
source = "registry.terraform.io/streamnative/pulsar"
}
}
}
provider "pulsar" {
web_service_url = "${WEB_SERVICE_URL}"
audience = "urn:sn:pulsar:${orgName}:${instanceName}"
issuer_url = "https://auth.streamnative.cloud/"
key_file_path = "file:///YOUR-KEY-FILE-PATH"
api_version = 3
}
resource "pulsar_source" "test" {
provider = pulsar
name = "dg-test-tf"
tenant = "public"
namespace = "default"
archive = "builtin://data-generator"
destination_topic_name = "public/default/dg-test"
processing_guarantees = "ATMOST_ONCE"
configs = "{\"sleepBetweenMessages\":\"60\"}"
}
```
2. Call the following commands in your Terraform file directory:
```bash theme={null}
terraform init
# output
Terraform has been successfully initialized!
```
```bash theme={null}
terraform apply
# output
Terraform used the selected providers to generate the following execution plan. Resource actions are indicated with the following symbols:
+ create
Terraform will perform the following actions:
# pulsar_source.test will be created
+ resource "pulsar_source" "test" {
+ archive = "builtin://data-generator"
+ classname = (known after apply)
+ configs = jsonencode(
{
+ sleepBetweenMessages = "60"
}
)
+ cpu = 1
+ destination_topic_name = "public/default/dg-test"
+ disk_mb = 10240
+ id = (known after apply)
+ name = "dg-test-tf"
+ namespace = "default"
+ parallelism = 1
+ processing_guarantees = "ATMOST_ONCE"
+ ram_mb = 1024
+ tenant = "public"
}
Plan: 1 to add, 0 to change, 0 to destroy.
Do you want to perform these actions?
Terraform will perform the actions described above.
Only 'yes' will be accepted to approve.
Enter a value: yes
pulsar_source.test: Creating...
pulsar_source.test: Creation complete after 1s [id=public/default/dg-test-tf]
Apply complete! Resources: 1 added, 0 changed, 0 destroyed.
```
You can use `snctl`, `pulsarctl` or `pulsar-admin` to list the source connector submitted using Terraform.
To create a data generator source connector named `test`, run the following command.
```bash theme={null}
curl -X POST https://${WEB_SERVICE_URL}/admin/v3/sources/{tenant}/{namespace}/test \
-H 'Authorization: Bearer ' \
-H "Content-Type: multipart/form-data" \
-F 'sourceConfig={"name": "test", "tenant": "public", "namespace": "default", "archive": "builtin://data-generator", "topicName": "public/default/dg-test", "configs": {"sleepBetweenMessages": "60"}};type=application/json'
```
If you want to list the submitted connector for a double check, run the following command:
```bash theme={null}
curl -X GET https://pc-ae474868.aws-use2-dixie-snc.streamnative.test.aws.sn2.dev/admin/v3/sources/public/default \
--header 'Authorization: Bearer '
["test"]
```
For all the common configurations of built-in connectors, see [Configuration reference](/cloud/connect/pulsar-io/connector-config).
## Pass sensitive configs to connector
Some connectors require sensitive information, such as passwords, token, to be passed to the connector. And you may not want to expose these sensitive information in the connector configuration.
To solve this problem, you can use the following methods to pass sensitive information to the connector:
* **Create a secret**
For example, the AWS lambda sink connector requires the AWS access key and secret key to be passed to the connector.
You can create a secret in the console UI and pass the secret name to the connector configuration.
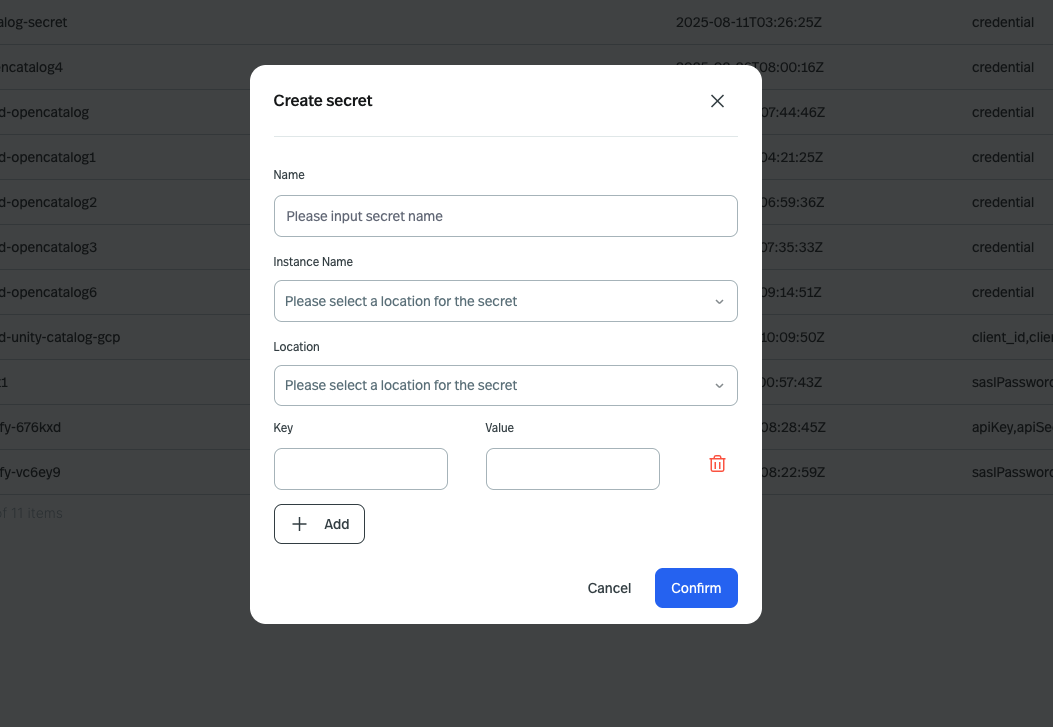 The `location` should be the same as the region of your Pulsar cluster.
The `awsAccessKey` and `awsSecretKey` is the field name, and the `lambda-sink-secret` can be any unique name you want to give to the secret.
Only "sensitive" fields are able to load from secrets. You can get the list of sensitive fields from the connector configuration reference.
E.g. [AWS lambda sink configurations](https://docs.streamnative.io/hub/connector-aws-lambda-sink-v3.1#configuration-properties)
* **Pass secrets to the connector configuration**
The following example shows how to create an AWS lambda sink connector named `test` on Streamnative Cloud using different tools.
The `builtin://` is followed by the name of the built-in connector, such as `builtin://data-generator`.
To create an AWS lambda sink connector named `test`, run the following command.
```bash theme={null}
snctl pulsar admin sinks create --archive builtin://aws-lambda --inputs public/default/lambda-sink-test --sink-config '{"awsRegion": "us-west-2","lambdaFunctionName": "test-hello","payloadFormat": "V2"}' --secrets '{"awsAccessKey":{"path":"lambda-sink-secret","key":"awsAccessKey"},"awsSecretKey":{"path":"lambda-sink-secret","key":"awsSecretKey"}}' --name test --use-service-account
```
You should see the following output:
```bash theme={null}
Created test successfully
```
The `awsAccessKey` and `awsSecretKey` is the field name, and the `lambda-sink-secret` is the secret name you created in UI.
If you want to verify whether the AWS lambda sink connector has been created successfully, run the following command:
```bash theme={null}
snctl pulsar admin sinks list
```
You should see the following output:
```bash theme={null}
+---------------------+
| PULSAR SINKS NAME |
+---------------------+
| test |
+---------------------+
```
To create an AWS lambda sink connector named `test`, run the following command.
```bash theme={null}
pulsarctl sinks create --archive builtin://aws-lambda --inputs public/default/lambda-sink-test --sink-config '{"awsRegion": "us-west-2","lambdaFunctionName": "test-hello","payloadFormat": "V2"}' --secrets '{"awsAccessKey":{"path":"lambda-sink-secret","key":"awsAccessKey"},"awsSecretKey":{"path":"lambda-sink-secret","key":"awsSecretKey"}}' --name test
```
You should see the following output:
```bash theme={null}
Created test successfully
```
The `awsAccessKey` and `awsSecretKey` is the field name, and the `lambda-sink-secret` is the secret name you created in UI.
If you want to verify whether the AWS lambda sink connector has been created successfully, run the following command:
```bash theme={null}
pulsarctl sinks list
```
You should see the following output:
```bash theme={null}
+---------------------+
| PULSAR SINKS NAME |
+---------------------+
| test |
+---------------------+
```
To create an AWS lambda sink connector named `test`, run the following command.
```bash theme={null}
./bin/pulsar-admin \
--admin-url "${WEB_SERVICE_URL}" \
--auth-plugin org.apache.pulsar.client.impl.auth.oauth2.AuthenticationOAuth2 \
--auth-params '{"privateKey":"file:///YOUR-KEY-FILE-PATH",
"issuerUrl":"https://auth.streamnative.cloud/",
"audience":"urn:sn:pulsar:${orgName}:${instanceName}}'
sinks create --archive builtin://aws-lambda --inputs public/default/lambda-sink-test --sink-config '{"awsRegion": "us-west-2","lambdaFunctionName": "test-hello","payloadFormat": "V2"}' --secrets '{"awsAccessKey":{"path":"lambda-sink-secret","key":"awsAccessKey"},"awsSecretKey":{"path":"lambda-sink-secret","key":"awsSecretKey"}}' --name test
```
Replace the placeholder variables with the actual values that you can get when [setting up client tools](/cloud/connect/pulsar-io/deploy-connectors/connector-setup#set-up-client-tools).
* `admin-url`: the HTTP service URL of your Pulsar cluster.
* `private_key`: the path to the downloaded OAuth2 key file.
* `audience`: the [Uniform Resource Name (URN)](/cloud/references/glossary#uniform-resource-name-urn), which is a combination of the `urn:sn:pulsar`, your organization name, and your Pulsar instance name.
* `${orgName}`: the name of your [organization](/cloud/references/glossary#organization).
* `${instanceName}`: the name of your [instance](/cloud/references/glossary#instance).
If you want to list the submitted connector for a double check, run the following command:
```bash theme={null}
./bin/pulsar-admin sinks list
```
You should see the following output:
```bash theme={null}
[
"test"
]
```
The `awsAccessKey` and `awsSecretKey` is the field name, and the `lambda-sink-secret` is the secret name you created in UI.
To reduce the complexity of your command, you can add the above parameters with values into the `conf/client.conf` file under the downloaded Pulsar release. Once it's configured, you can run a simple command instead:
```bash theme={null}
./bin/pulsar-admin sinks create --archive builtin://aws-lambda --inputs public/default/lambda-sink-test --sink-config '{"awsRegion": "us-west-2","lambdaFunctionName": "test-hello","payloadFormat": "V2"}' --secrets '{"awsAccessKey":{"path":"lambda-sink-secret","key":"awsAccessKey"},"awsSecretKey":{"path":"lambda-sink-secret","key":"awsSecretKey"}}' --name test
```
* **Add the following content to your Terraform file:**
```bash theme={null}
terraform {
required_providers {
pulsar = {
version = "0.2.0"
source = "registry.terraform.io/streamnative/pulsar"
}
}
}
provider "pulsar" {
web_service_url = "${WEB_SERVICE_URL}"
audience = "urn:sn:pulsar:${orgName}:${instanceName}"
issuer_url = "https://auth.streamnative.cloud/"
key_file_path = "file:///YOUR-KEY-FILE-PATH"
api_version = 3
}
resource "pulsar_sink" "test" {
provider = pulsar
name = "lambda-sink-test-tf"
tenant = "public"
namespace = "default"
archive = "builtin://aws-lambda"
auto_ack = true
cleanup_subscription = true
destination_topic_name = "public/default/lambda-sink-test"
processing_guarantees = "ATMOST_ONCE"
configs = "{\"awsRegion\":\"us-west-2\",\"lambdaFunctionName\":\"test-hello\",\"payloadFormat\":\"V2\"}"
secrets = "{\"awsAccessKey\":{\"path\":\"lambda-sink-secret\",\"key\":\"awsAccessKey\"},\"awsSecretKey\":{\"path\":\"lambda-sink-secret\",\"key\":\"awsSecretKey\"}}"
}
```
* **Call the following commands in your Terraform file directory:**
```bash theme={null}
terraform init
# output
Terraform has been successfully initialized!
```
```bash theme={null}
terraform apply
# output
Terraform used the selected providers to generate the following execution plan. Resource actions are indicated with the following symbols:
+ create
Terraform will perform the following actions:
# pulsar_sink.test will be created
+ resource "pulsar_sink" "test" {
+ archive = "builtin://aws-lambda"
+ auto_ack = true
+ classname = (known after apply)
+ cleanup_subscription = true
+ configs = jsonencode(
{
+ awsRegion = "us-west-2"
+ lambdaFunctionName = "test-hello"
+ payloadFormat = "V2"
}
)
+ cpu = 1
+ disk_mb = 10240
+ id = (known after apply)
+ inputs = [
+ "public/default/lambda-sink-test",
]
+ name = "lambda-sink-test-tf"
+ namespace = "default"
+ parallelism = 1
+ processing_guarantees = "ATMOST_ONCE"
+ ram_mb = 1024
+ retain_ordering = true
+ secrets = jsonencode(
{
+ awsAccessKey = {
+ key = "awsAccessKey"
+ path = "lambda-sink-secret"
}
+ awsSecretKey = {
+ key = "awsSecretKey"
+ path = "lambda-sink-secret"
}
}
)
+ subscription_position = "Earliest"
+ tenant = "public"
}
Plan: 1 to add, 0 to change, 0 to destroy.
Do you want to perform these actions?
Terraform will perform the actions described above.
Only 'yes' will be accepted to approve.
Enter a value: yes
pulsar_sink.test: Creating...
pulsar_sink.test: Creation complete after 5s [id=public/default/lambda-sink-test-tf]
Apply complete! Resources: 1 added, 0 changed, 0 destroyed.
```
The `awsAccessKey` and `awsSecretKey` is the field name, and the `lambda-sink-secret` is the secret name you created in UI.
You can use `snctl`, `pulsarctl` or `pulsar-admin` to list the source connector submitted using Terraform.
To create an AWS lambda sink connector named `test`, run the following command.
```bash theme={null}
curl -X POST https://${WEB_SERVICE_URL}/admin/v3/sinks/{tenant}/{namespace}/test \
-H 'Authorization: Bearer ' \
-H "Content-Type: multipart/form-data" \
-F 'sinkConfig={"name": "test", "tenant": "public", "namespace": "default", "archive": "builtin://aws-lambda", "inputs": ["public/default/lambda-sink-test"], "configs": {"awsRegion": "us-west-2","lambdaFunctionName": "test-hello", "payloadFormat": "V2"}, "secrets": {"awsAccessKey":{"path":"lambda-sink-secret","key":"awsAccessKey"},"awsSecretKey":{"path":"lambda-sink-secret","key":"awsSecretKey"}}};type=application/json'
```
If you want to list the submitted connector for a double check, run the following command:
```bash theme={null}
curl -X GET https://pc-ae474868.aws-use2-dixie-snc.streamnative.test.aws.sn2.dev/admin/v3/sinks/public/default \
--header 'Authorization: Bearer '
["test"]
```
The `awsAccessKey` and `awsSecretKey` is the field name, and the `lambda-sink-secret` is the secret name you created in UI.
For all the common configurations of built-in connectors, see [Configuration reference](/cloud/connect/pulsar-io/connector-config).
## Create a custom connector
Before creating a connector, it's highly recommended to do the following:
1. [Check connector availability](/cloud/connect/pulsar-io/deploy-connectors/connector-check) to ensure the version number of the connector you want to create is supported on StreamNative Cloud.
2. Go to [StreamNative Hub](/connect/overview) and find the connector-specific docs of your version for configuration reference.
To create a custom Pulsar Connector, you need to upload the connector jar/nar file to the StreamNative Cloud Package service first. Below are the steps:
### Upload your connector file to Pulsar
Upload packages
```bash theme={null}
snctl pulsar admin packages upload sink://public/default/custom-connect@v1 \
--path /tmp/your-connector.jar \
--description "custom connector" \
--properties fileName=your-connector.jar
```
You should see the following output:
```bash theme={null}
The package 'sink://public/default/custom-connect@v1' uploaded from path '/tmp/your-connector.jar' successfully
```
You can also upload your package to `source://${tenant}/${namespace}/${name}@{$version}`, currently Pulsar Package Service supports below protocols:
* `source://`
* `sink://`
* `function://`
You need to set the context for Pulsarctl first:
```bash theme={null}
# create a context
pulsarctl context set ${context-name} \
--admin-service-url ${admin-service-url} \
--issuer-endpoint ${issuerUrl} \
--audience urn:sn:pulsar:${orgName}:${instanceName} \
--key-file ${privateKey}
# activate oauth2
pulsarctl oauth2 activate
```
Replace the placeholder variables with the actual values that you can get when [setting up client tools](/cloud/process/pulsar-functions/function-setup#set-up-client-tools).
* `context-name`: any name you want
* `admin-service-url`: the HTTP service URL of your Pulsar cluster.
* `privateKey`: the path to the downloaded OAuth2 key file.
* `issuerUrl`: the URL of the OAuth2 issuer.
* `audience`: the [Uniform Resource Name (URN)](/cloud/references/glossary#uniform-resource-name-urn), which is a combination of the `urn:sn:pulsar`, your organization name, and your Pulsar instance name.
* `${orgName}`: the name of your [organization](/cloud/references/glossary#organization).
* `${instanceName}`: the name of your [instance](/cloud/references/glossary#instance).
Upload packages
```bash theme={null}
pulsarctl packages upload sink://public/default/custom-connect@v1 \
--path /tmp/your-connector.jar \
--description "custom connector" \
--properties fileName=your-connector.jar
```
You should see the following output:
```bash theme={null}
The package 'sink://public/default/custom-connect@v1' uploaded from path '/tmp/your-connector.jar' successfully
```
You can also upload your package to `source://${tenant}/${namespace}/${name}@{$version}`, currently Pulsar Package Service supports below protocols:
* `source://`
* `sink://`
* `function://`
```bash theme={null}
./bin/pulsar-admin \
--admin-url "${WEB_SERVICE_URL}" \
--auth-plugin org.apache.pulsar.client.impl.auth.oauth2.AuthenticationOAuth2 \
--auth-params '{"privateKey":"file://${privateKey}","issuerUrl":"${issuerUrl}","audience":"urn:sn:pulsar:${orgName}:${instanceName}}' \
packages upload sink://public/default/custom-connect@v1 \
--path /tmp/your-connector.jar \
--description "custom connector" \
--properties fileName=your-connector.jar
```
Replace the placeholder variables with the actual values that you can get when [setting up client tools](/cloud/process/pulsar-functions/function-setup#set-up-client-tools).
* `admin-url`: the HTTP service URL of your Pulsar cluster.
* `privateKey`: the path to the downloaded OAuth2 key file.
* `issuerUrl`: the URL of the OAuth2 issuer.
* `audience`: the [Uniform Resource Name (URN)](/cloud/references/glossary#uniform-resource-name-urn), which is a combination of the `urn:sn:pulsar`, your organization name, and your Pulsar instance name.
* `${orgName}`: the name of your [organization](/cloud/references/glossary#organization).
* `${instanceName}`: the name of your [instance](/cloud/references/glossary#instance).
You should see the following output:
```bash theme={null}
The package 'sink://public/default/custom-connect@v1' uploaded from path '/tmp/your-connector.jar' successfully
```
You can also upload your package to `source://${tenant}/${namespace}/${name}@{$version}`, currently Pulsar Package Service supports below protocols:
* `source://`
* `sink://`
* `function://`
To create a custom connector, just replace the `archive` argument to the package URL(like `sink://public/default/custom-connect@v1`) you uploaded.
The `location` should be the same as the region of your Pulsar cluster.
The `awsAccessKey` and `awsSecretKey` is the field name, and the `lambda-sink-secret` can be any unique name you want to give to the secret.
Only "sensitive" fields are able to load from secrets. You can get the list of sensitive fields from the connector configuration reference.
E.g. [AWS lambda sink configurations](https://docs.streamnative.io/hub/connector-aws-lambda-sink-v3.1#configuration-properties)
* **Pass secrets to the connector configuration**
The following example shows how to create an AWS lambda sink connector named `test` on Streamnative Cloud using different tools.
The `builtin://` is followed by the name of the built-in connector, such as `builtin://data-generator`.
To create an AWS lambda sink connector named `test`, run the following command.
```bash theme={null}
snctl pulsar admin sinks create --archive builtin://aws-lambda --inputs public/default/lambda-sink-test --sink-config '{"awsRegion": "us-west-2","lambdaFunctionName": "test-hello","payloadFormat": "V2"}' --secrets '{"awsAccessKey":{"path":"lambda-sink-secret","key":"awsAccessKey"},"awsSecretKey":{"path":"lambda-sink-secret","key":"awsSecretKey"}}' --name test --use-service-account
```
You should see the following output:
```bash theme={null}
Created test successfully
```
The `awsAccessKey` and `awsSecretKey` is the field name, and the `lambda-sink-secret` is the secret name you created in UI.
If you want to verify whether the AWS lambda sink connector has been created successfully, run the following command:
```bash theme={null}
snctl pulsar admin sinks list
```
You should see the following output:
```bash theme={null}
+---------------------+
| PULSAR SINKS NAME |
+---------------------+
| test |
+---------------------+
```
To create an AWS lambda sink connector named `test`, run the following command.
```bash theme={null}
pulsarctl sinks create --archive builtin://aws-lambda --inputs public/default/lambda-sink-test --sink-config '{"awsRegion": "us-west-2","lambdaFunctionName": "test-hello","payloadFormat": "V2"}' --secrets '{"awsAccessKey":{"path":"lambda-sink-secret","key":"awsAccessKey"},"awsSecretKey":{"path":"lambda-sink-secret","key":"awsSecretKey"}}' --name test
```
You should see the following output:
```bash theme={null}
Created test successfully
```
The `awsAccessKey` and `awsSecretKey` is the field name, and the `lambda-sink-secret` is the secret name you created in UI.
If you want to verify whether the AWS lambda sink connector has been created successfully, run the following command:
```bash theme={null}
pulsarctl sinks list
```
You should see the following output:
```bash theme={null}
+---------------------+
| PULSAR SINKS NAME |
+---------------------+
| test |
+---------------------+
```
To create an AWS lambda sink connector named `test`, run the following command.
```bash theme={null}
./bin/pulsar-admin \
--admin-url "${WEB_SERVICE_URL}" \
--auth-plugin org.apache.pulsar.client.impl.auth.oauth2.AuthenticationOAuth2 \
--auth-params '{"privateKey":"file:///YOUR-KEY-FILE-PATH",
"issuerUrl":"https://auth.streamnative.cloud/",
"audience":"urn:sn:pulsar:${orgName}:${instanceName}}'
sinks create --archive builtin://aws-lambda --inputs public/default/lambda-sink-test --sink-config '{"awsRegion": "us-west-2","lambdaFunctionName": "test-hello","payloadFormat": "V2"}' --secrets '{"awsAccessKey":{"path":"lambda-sink-secret","key":"awsAccessKey"},"awsSecretKey":{"path":"lambda-sink-secret","key":"awsSecretKey"}}' --name test
```
Replace the placeholder variables with the actual values that you can get when [setting up client tools](/cloud/connect/pulsar-io/deploy-connectors/connector-setup#set-up-client-tools).
* `admin-url`: the HTTP service URL of your Pulsar cluster.
* `private_key`: the path to the downloaded OAuth2 key file.
* `audience`: the [Uniform Resource Name (URN)](/cloud/references/glossary#uniform-resource-name-urn), which is a combination of the `urn:sn:pulsar`, your organization name, and your Pulsar instance name.
* `${orgName}`: the name of your [organization](/cloud/references/glossary#organization).
* `${instanceName}`: the name of your [instance](/cloud/references/glossary#instance).
If you want to list the submitted connector for a double check, run the following command:
```bash theme={null}
./bin/pulsar-admin sinks list
```
You should see the following output:
```bash theme={null}
[
"test"
]
```
The `awsAccessKey` and `awsSecretKey` is the field name, and the `lambda-sink-secret` is the secret name you created in UI.
To reduce the complexity of your command, you can add the above parameters with values into the `conf/client.conf` file under the downloaded Pulsar release. Once it's configured, you can run a simple command instead:
```bash theme={null}
./bin/pulsar-admin sinks create --archive builtin://aws-lambda --inputs public/default/lambda-sink-test --sink-config '{"awsRegion": "us-west-2","lambdaFunctionName": "test-hello","payloadFormat": "V2"}' --secrets '{"awsAccessKey":{"path":"lambda-sink-secret","key":"awsAccessKey"},"awsSecretKey":{"path":"lambda-sink-secret","key":"awsSecretKey"}}' --name test
```
* **Add the following content to your Terraform file:**
```bash theme={null}
terraform {
required_providers {
pulsar = {
version = "0.2.0"
source = "registry.terraform.io/streamnative/pulsar"
}
}
}
provider "pulsar" {
web_service_url = "${WEB_SERVICE_URL}"
audience = "urn:sn:pulsar:${orgName}:${instanceName}"
issuer_url = "https://auth.streamnative.cloud/"
key_file_path = "file:///YOUR-KEY-FILE-PATH"
api_version = 3
}
resource "pulsar_sink" "test" {
provider = pulsar
name = "lambda-sink-test-tf"
tenant = "public"
namespace = "default"
archive = "builtin://aws-lambda"
auto_ack = true
cleanup_subscription = true
destination_topic_name = "public/default/lambda-sink-test"
processing_guarantees = "ATMOST_ONCE"
configs = "{\"awsRegion\":\"us-west-2\",\"lambdaFunctionName\":\"test-hello\",\"payloadFormat\":\"V2\"}"
secrets = "{\"awsAccessKey\":{\"path\":\"lambda-sink-secret\",\"key\":\"awsAccessKey\"},\"awsSecretKey\":{\"path\":\"lambda-sink-secret\",\"key\":\"awsSecretKey\"}}"
}
```
* **Call the following commands in your Terraform file directory:**
```bash theme={null}
terraform init
# output
Terraform has been successfully initialized!
```
```bash theme={null}
terraform apply
# output
Terraform used the selected providers to generate the following execution plan. Resource actions are indicated with the following symbols:
+ create
Terraform will perform the following actions:
# pulsar_sink.test will be created
+ resource "pulsar_sink" "test" {
+ archive = "builtin://aws-lambda"
+ auto_ack = true
+ classname = (known after apply)
+ cleanup_subscription = true
+ configs = jsonencode(
{
+ awsRegion = "us-west-2"
+ lambdaFunctionName = "test-hello"
+ payloadFormat = "V2"
}
)
+ cpu = 1
+ disk_mb = 10240
+ id = (known after apply)
+ inputs = [
+ "public/default/lambda-sink-test",
]
+ name = "lambda-sink-test-tf"
+ namespace = "default"
+ parallelism = 1
+ processing_guarantees = "ATMOST_ONCE"
+ ram_mb = 1024
+ retain_ordering = true
+ secrets = jsonencode(
{
+ awsAccessKey = {
+ key = "awsAccessKey"
+ path = "lambda-sink-secret"
}
+ awsSecretKey = {
+ key = "awsSecretKey"
+ path = "lambda-sink-secret"
}
}
)
+ subscription_position = "Earliest"
+ tenant = "public"
}
Plan: 1 to add, 0 to change, 0 to destroy.
Do you want to perform these actions?
Terraform will perform the actions described above.
Only 'yes' will be accepted to approve.
Enter a value: yes
pulsar_sink.test: Creating...
pulsar_sink.test: Creation complete after 5s [id=public/default/lambda-sink-test-tf]
Apply complete! Resources: 1 added, 0 changed, 0 destroyed.
```
The `awsAccessKey` and `awsSecretKey` is the field name, and the `lambda-sink-secret` is the secret name you created in UI.
You can use `snctl`, `pulsarctl` or `pulsar-admin` to list the source connector submitted using Terraform.
To create an AWS lambda sink connector named `test`, run the following command.
```bash theme={null}
curl -X POST https://${WEB_SERVICE_URL}/admin/v3/sinks/{tenant}/{namespace}/test \
-H 'Authorization: Bearer ' \
-H "Content-Type: multipart/form-data" \
-F 'sinkConfig={"name": "test", "tenant": "public", "namespace": "default", "archive": "builtin://aws-lambda", "inputs": ["public/default/lambda-sink-test"], "configs": {"awsRegion": "us-west-2","lambdaFunctionName": "test-hello", "payloadFormat": "V2"}, "secrets": {"awsAccessKey":{"path":"lambda-sink-secret","key":"awsAccessKey"},"awsSecretKey":{"path":"lambda-sink-secret","key":"awsSecretKey"}}};type=application/json'
```
If you want to list the submitted connector for a double check, run the following command:
```bash theme={null}
curl -X GET https://pc-ae474868.aws-use2-dixie-snc.streamnative.test.aws.sn2.dev/admin/v3/sinks/public/default \
--header 'Authorization: Bearer '
["test"]
```
The `awsAccessKey` and `awsSecretKey` is the field name, and the `lambda-sink-secret` is the secret name you created in UI.
For all the common configurations of built-in connectors, see [Configuration reference](/cloud/connect/pulsar-io/connector-config).
## Create a custom connector
Before creating a connector, it's highly recommended to do the following:
1. [Check connector availability](/cloud/connect/pulsar-io/deploy-connectors/connector-check) to ensure the version number of the connector you want to create is supported on StreamNative Cloud.
2. Go to [StreamNative Hub](/connect/overview) and find the connector-specific docs of your version for configuration reference.
To create a custom Pulsar Connector, you need to upload the connector jar/nar file to the StreamNative Cloud Package service first. Below are the steps:
### Upload your connector file to Pulsar
Upload packages
```bash theme={null}
snctl pulsar admin packages upload sink://public/default/custom-connect@v1 \
--path /tmp/your-connector.jar \
--description "custom connector" \
--properties fileName=your-connector.jar
```
You should see the following output:
```bash theme={null}
The package 'sink://public/default/custom-connect@v1' uploaded from path '/tmp/your-connector.jar' successfully
```
You can also upload your package to `source://${tenant}/${namespace}/${name}@{$version}`, currently Pulsar Package Service supports below protocols:
* `source://`
* `sink://`
* `function://`
You need to set the context for Pulsarctl first:
```bash theme={null}
# create a context
pulsarctl context set ${context-name} \
--admin-service-url ${admin-service-url} \
--issuer-endpoint ${issuerUrl} \
--audience urn:sn:pulsar:${orgName}:${instanceName} \
--key-file ${privateKey}
# activate oauth2
pulsarctl oauth2 activate
```
Replace the placeholder variables with the actual values that you can get when [setting up client tools](/cloud/process/pulsar-functions/function-setup#set-up-client-tools).
* `context-name`: any name you want
* `admin-service-url`: the HTTP service URL of your Pulsar cluster.
* `privateKey`: the path to the downloaded OAuth2 key file.
* `issuerUrl`: the URL of the OAuth2 issuer.
* `audience`: the [Uniform Resource Name (URN)](/cloud/references/glossary#uniform-resource-name-urn), which is a combination of the `urn:sn:pulsar`, your organization name, and your Pulsar instance name.
* `${orgName}`: the name of your [organization](/cloud/references/glossary#organization).
* `${instanceName}`: the name of your [instance](/cloud/references/glossary#instance).
Upload packages
```bash theme={null}
pulsarctl packages upload sink://public/default/custom-connect@v1 \
--path /tmp/your-connector.jar \
--description "custom connector" \
--properties fileName=your-connector.jar
```
You should see the following output:
```bash theme={null}
The package 'sink://public/default/custom-connect@v1' uploaded from path '/tmp/your-connector.jar' successfully
```
You can also upload your package to `source://${tenant}/${namespace}/${name}@{$version}`, currently Pulsar Package Service supports below protocols:
* `source://`
* `sink://`
* `function://`
```bash theme={null}
./bin/pulsar-admin \
--admin-url "${WEB_SERVICE_URL}" \
--auth-plugin org.apache.pulsar.client.impl.auth.oauth2.AuthenticationOAuth2 \
--auth-params '{"privateKey":"file://${privateKey}","issuerUrl":"${issuerUrl}","audience":"urn:sn:pulsar:${orgName}:${instanceName}}' \
packages upload sink://public/default/custom-connect@v1 \
--path /tmp/your-connector.jar \
--description "custom connector" \
--properties fileName=your-connector.jar
```
Replace the placeholder variables with the actual values that you can get when [setting up client tools](/cloud/process/pulsar-functions/function-setup#set-up-client-tools).
* `admin-url`: the HTTP service URL of your Pulsar cluster.
* `privateKey`: the path to the downloaded OAuth2 key file.
* `issuerUrl`: the URL of the OAuth2 issuer.
* `audience`: the [Uniform Resource Name (URN)](/cloud/references/glossary#uniform-resource-name-urn), which is a combination of the `urn:sn:pulsar`, your organization name, and your Pulsar instance name.
* `${orgName}`: the name of your [organization](/cloud/references/glossary#organization).
* `${instanceName}`: the name of your [instance](/cloud/references/glossary#instance).
You should see the following output:
```bash theme={null}
The package 'sink://public/default/custom-connect@v1' uploaded from path '/tmp/your-connector.jar' successfully
```
You can also upload your package to `source://${tenant}/${namespace}/${name}@{$version}`, currently Pulsar Package Service supports below protocols:
* `source://`
* `sink://`
* `function://`
To create a custom connector, just replace the `archive` argument to the package URL(like `sink://public/default/custom-connect@v1`) you uploaded.