> ## Documentation Index
> Fetch the complete documentation index at: https://docs.streamnative.io/llms.txt
> Use this file to discover all available pages before exploring further.
# Create Kafka Connectors
## Prerequisites
Before deploying a kafka connect to StreamNative Cloud, make sure the following prerequisites have been met:
* A running external data system service.
* A running [Pulsar Cluster](/cloud/clusters/manage-clusters/cluster#create-a-cluster) with Kop feature enabled on StreamNative Cloud and the [required environment](/cloud/connect/kafka-connect/deploy-kafka-connectors/kafka-connect-setup) has been set up.
## Create a built-in kafka connect
Before creating a kafka connect, it’s highly recommended to do the following:
1. [Check kafka connect availability](/cloud/connect/kafka-connect/deploy-kafka-connectors/kafka-connect-check) to ensure the version number of the kafka connect you want to create is supported on StreamNative Cloud.
2. Go to [StreamNative Hub](/connect/overview) and find the connect-specific docs of your version for configuration reference.
You may see below error logs for the first time you create a connector:
```
org.apache.kafka.common.config.ConfigException: Topic '__kafka_connect_offset_storage' supplied via the 'offset.storage.topic' property is required to have 'cleanup.policy=compact' to guarantee consistency and durability of source connector offsets, but found the topic currently has 'cleanup.policy=delete'. Continuing would likely result in eventually losing source connector offsets and problems restarting this Connect cluster in the future. Change the 'offset.storage.topic' property in the Connect worker configurations to use a topic with 'cleanup.policy=compact'.
```
You should set the `cleanup.policy` of the `__kafka_connect_offset_storage` topic to `compact` to avoid the above error with below command:
```bash theme={null}
./bin/kafka-configs.sh --bootstrap-server xxxx:9093 --command-config ~/kafka/kafka-token.properties --alter --topic __kafka_connect_offset_storage --add-config cleanup.policy=compact
```
The following example shows how to create a data generator source connect named `test` on Streamnative Cloud using different tools.
To create a data generator source connect named `test`, run the following command.
```bash theme={null}
> cat datagen.json
{
"name": "test",
"config": {
"connector.class": "io.confluent.kafka.connect.datagen.DatagenConnector",
"kafka.topic": "testusers",
"quickstart": "users",
"key.converter": "org.apache.kafka.connect.storage.StringConverter",
"value.converter": "org.apache.kafka.connect.json.JsonConverter",
"value.converter.schemas.enable": "false",
"max.interval": 1000,
"iterations": 10000000,
"tasks.max": "1"
}
}
> snctl kafka admin connect apply -f datagen.json --use-service-account
```
You should see the following output:
```bash theme={null}
Created connector test
```
If you want to verify whether the data generator source connect has been created successfully, run the following command:
```bash theme={null}
snctl kafka admin connect get connectors
```
You should see the following output:
```bash theme={null}
NAME TYPE STATE TASKS
test source RUNNING 0: RUNNING
```
To create a data generator source connect named `test`, run the following command.
```bash theme={null}
> cat datagen.json
{
"name": "test",
"config": {
"connector.class": "io.confluent.kafka.connect.datagen.DatagenConnector",
"kafka.topic": "testusers",
"quickstart": "users",
"key.converter": "org.apache.kafka.connect.storage.StringConverter",
"value.converter": "org.apache.kafka.connect.json.JsonConverter",
"value.converter.schemas.enable": "false",
"max.interval": 1000,
"iterations": 10000000,
"tasks.max": "1"
}
}
> kcctl apply -f datagen.json
```
You should see the following output:
```bash theme={null}
Created connector test
```
If you want to verify whether the data generator source connect has been created successfully, run the following command:
```bash theme={null}
kcctl get connectors
```
You should see the following output:
```bash theme={null}
NAME TYPE STATE TASKS
test source RUNNING 0: RUNNING
```
To create a data generator source connect named `test`, run the following command.
```bash theme={null}
> cat datagen.json
{
"name": "test",
"config": {
"connector.class": "io.confluent.kafka.connect.datagen.DatagenConnector",
"kafka.topic": "testusers",
"quickstart": "users",
"key.converter": "org.apache.kafka.connect.storage.StringConverter",
"value.converter": "org.apache.kafka.connect.json.JsonConverter",
"value.converter.schemas.enable": "false",
"max.interval": 1000,
"iterations": 10000000,
"tasks.max": "1"
}
}
> curl -X POST --header "Content-Type: application/json" "https://public%2Fdefault:${APIKEY}@${KAFKA-SERVICE-URL}/admin/kafkaconnect/connectors/" --data @datagen.json
{"name":"test","config":{"connector.class":"io.confluent.kafka.connect.datagen.DatagenConnector","kafka.topic":"testusers","quickstart":"users","key.converter":"org.apache.kafka.connect.storage.StringConverter","value.converter":"org.apache.kafka.connect.json.JsonConverter","value.converter.schemas.enable":"false","max.interval":"1000","iterations":"10000000","tasks.max":"1","name":"test"},"tasks":[],"type":"source"}
```
If you want to list the submitted connect for a double check, run the following command:
```bash theme={null}
> curl "https://public%2Fdefault:${APIKEY}@${KAFKA-SERVICE-URL}/admin/kafkaconnect/connectors/"
["test"]
```
To create a data generator source connect named `test`, follow these steps:
1. Login to the [StreamNative Cloud Console](https://cloud.streamnative.io/).
2. In the left navigation pane, click **Connectors**, then click the **Kafka Sources** tab.
3. Click the **Create Kafka Source** button:
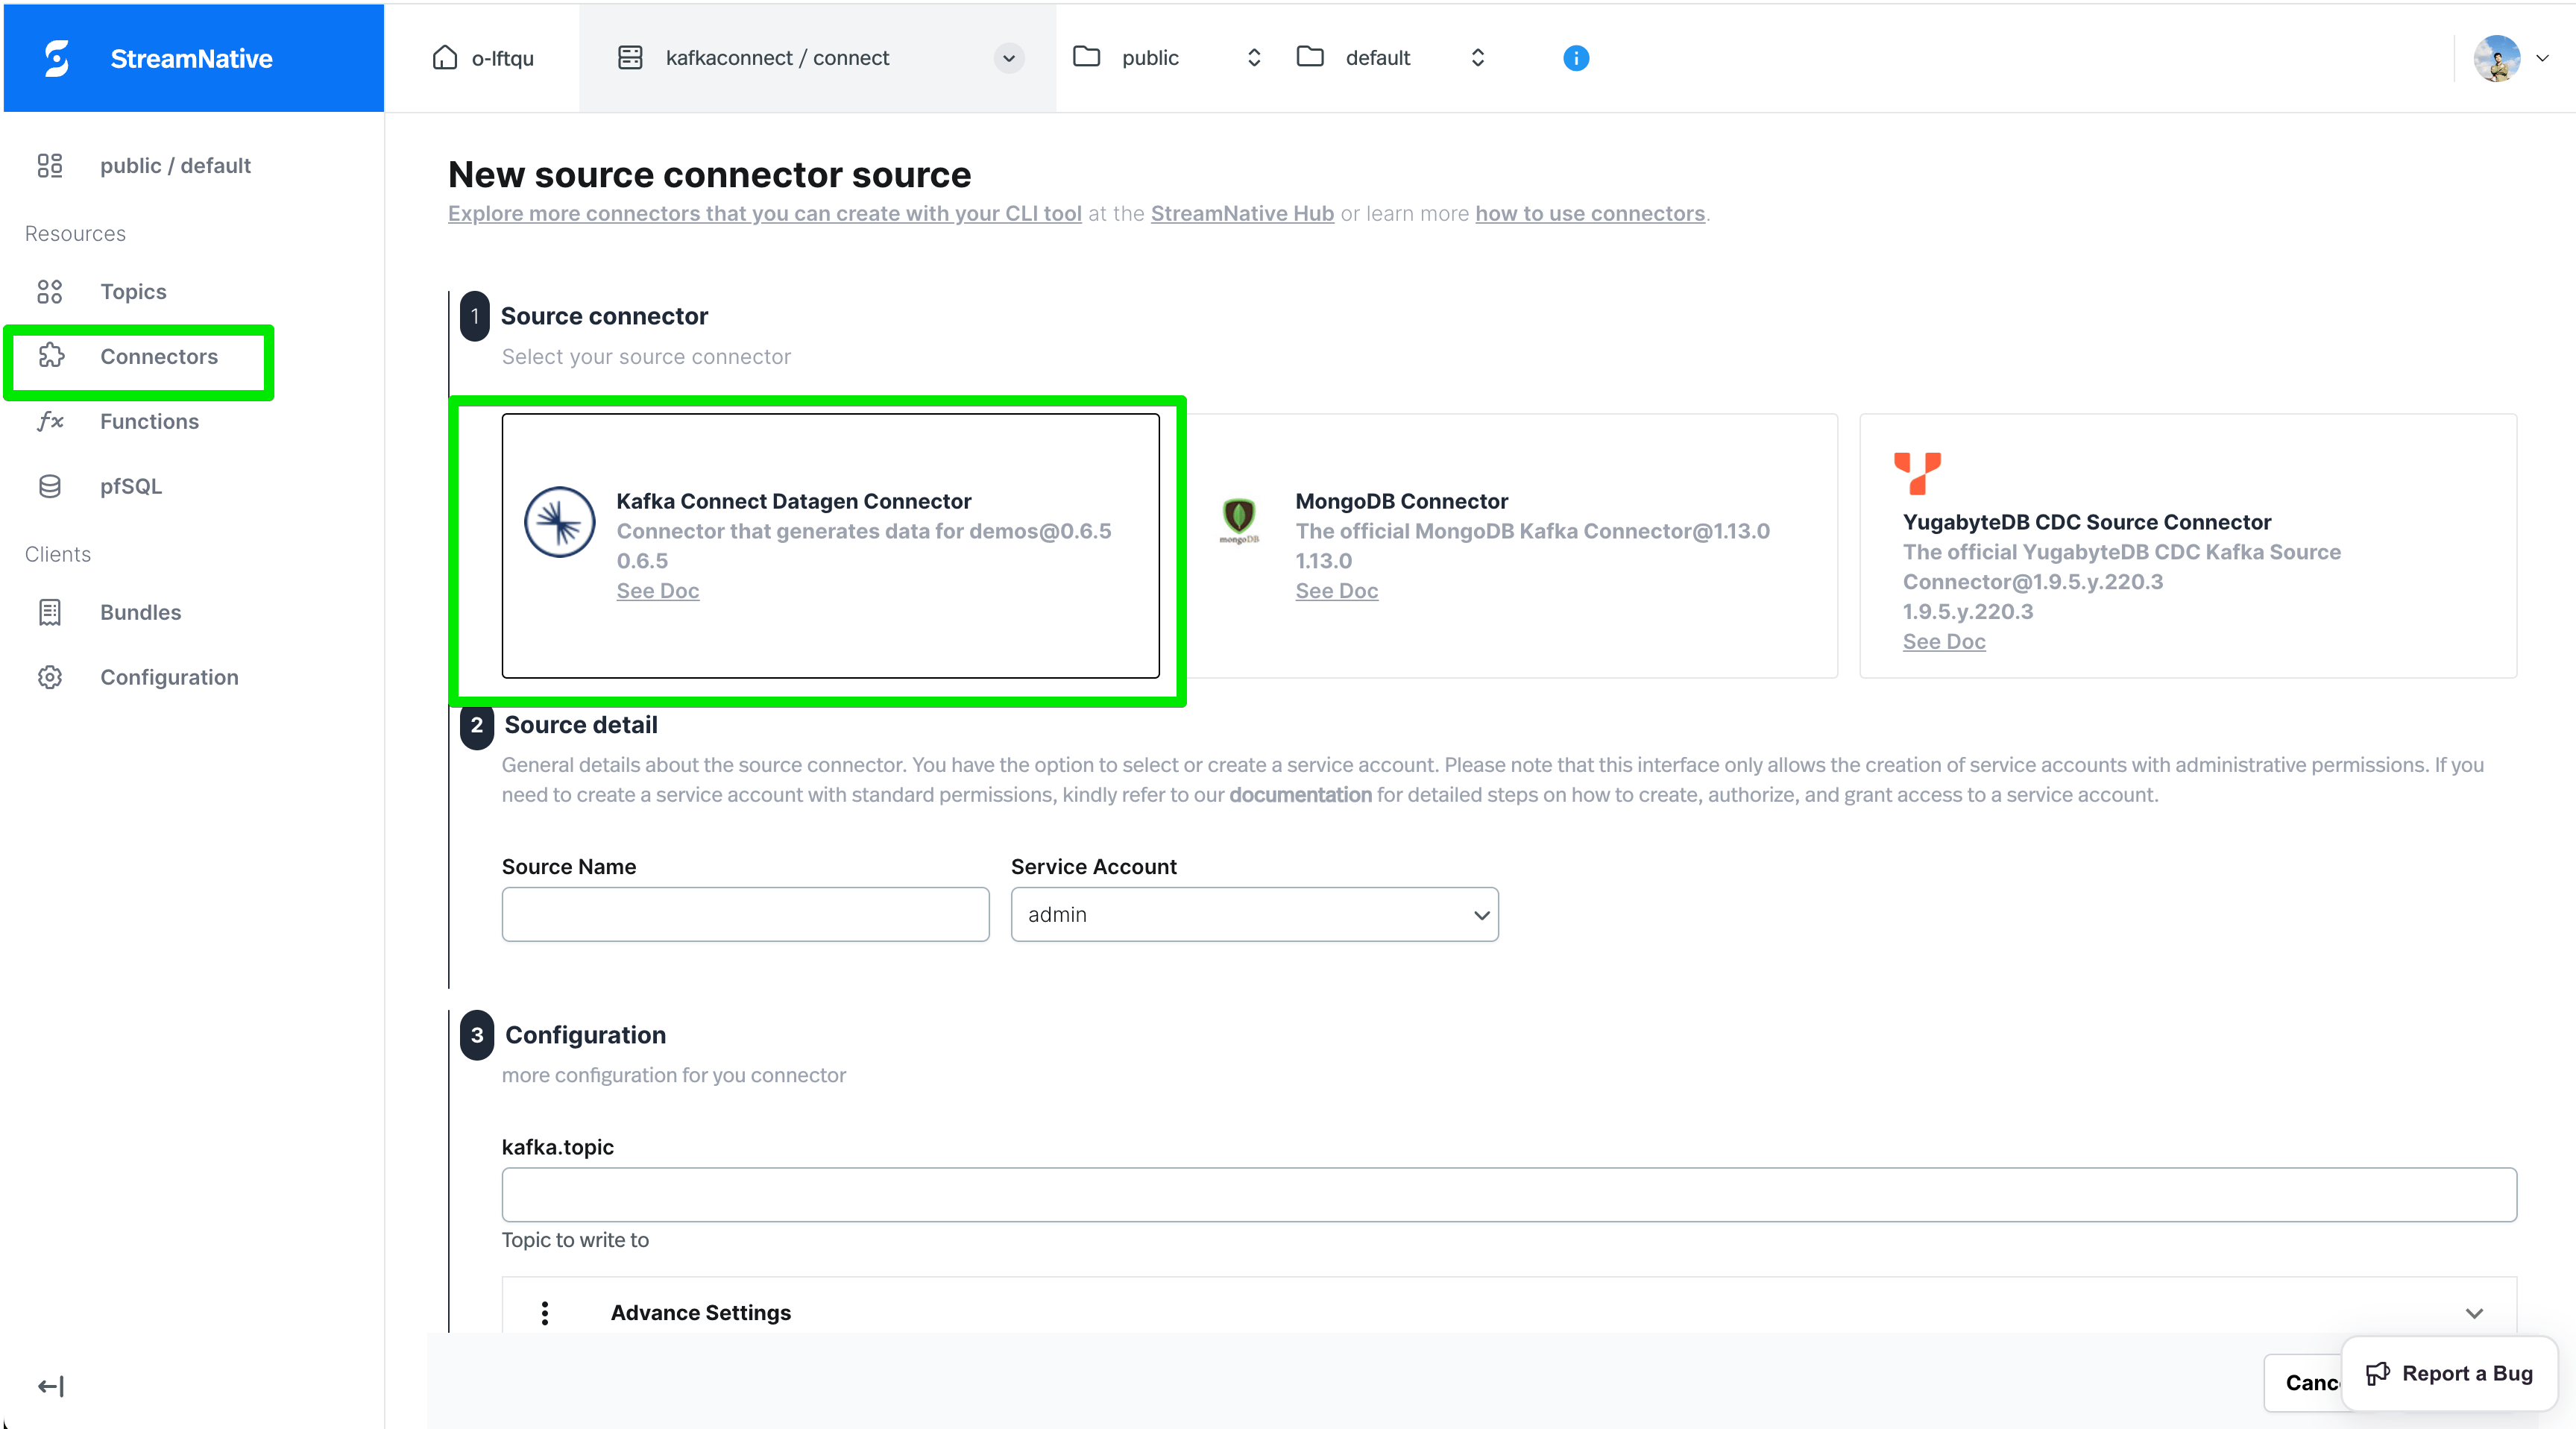 4. Fill in the required fields and optional fields as you wish, and then Click the **Submit** button.
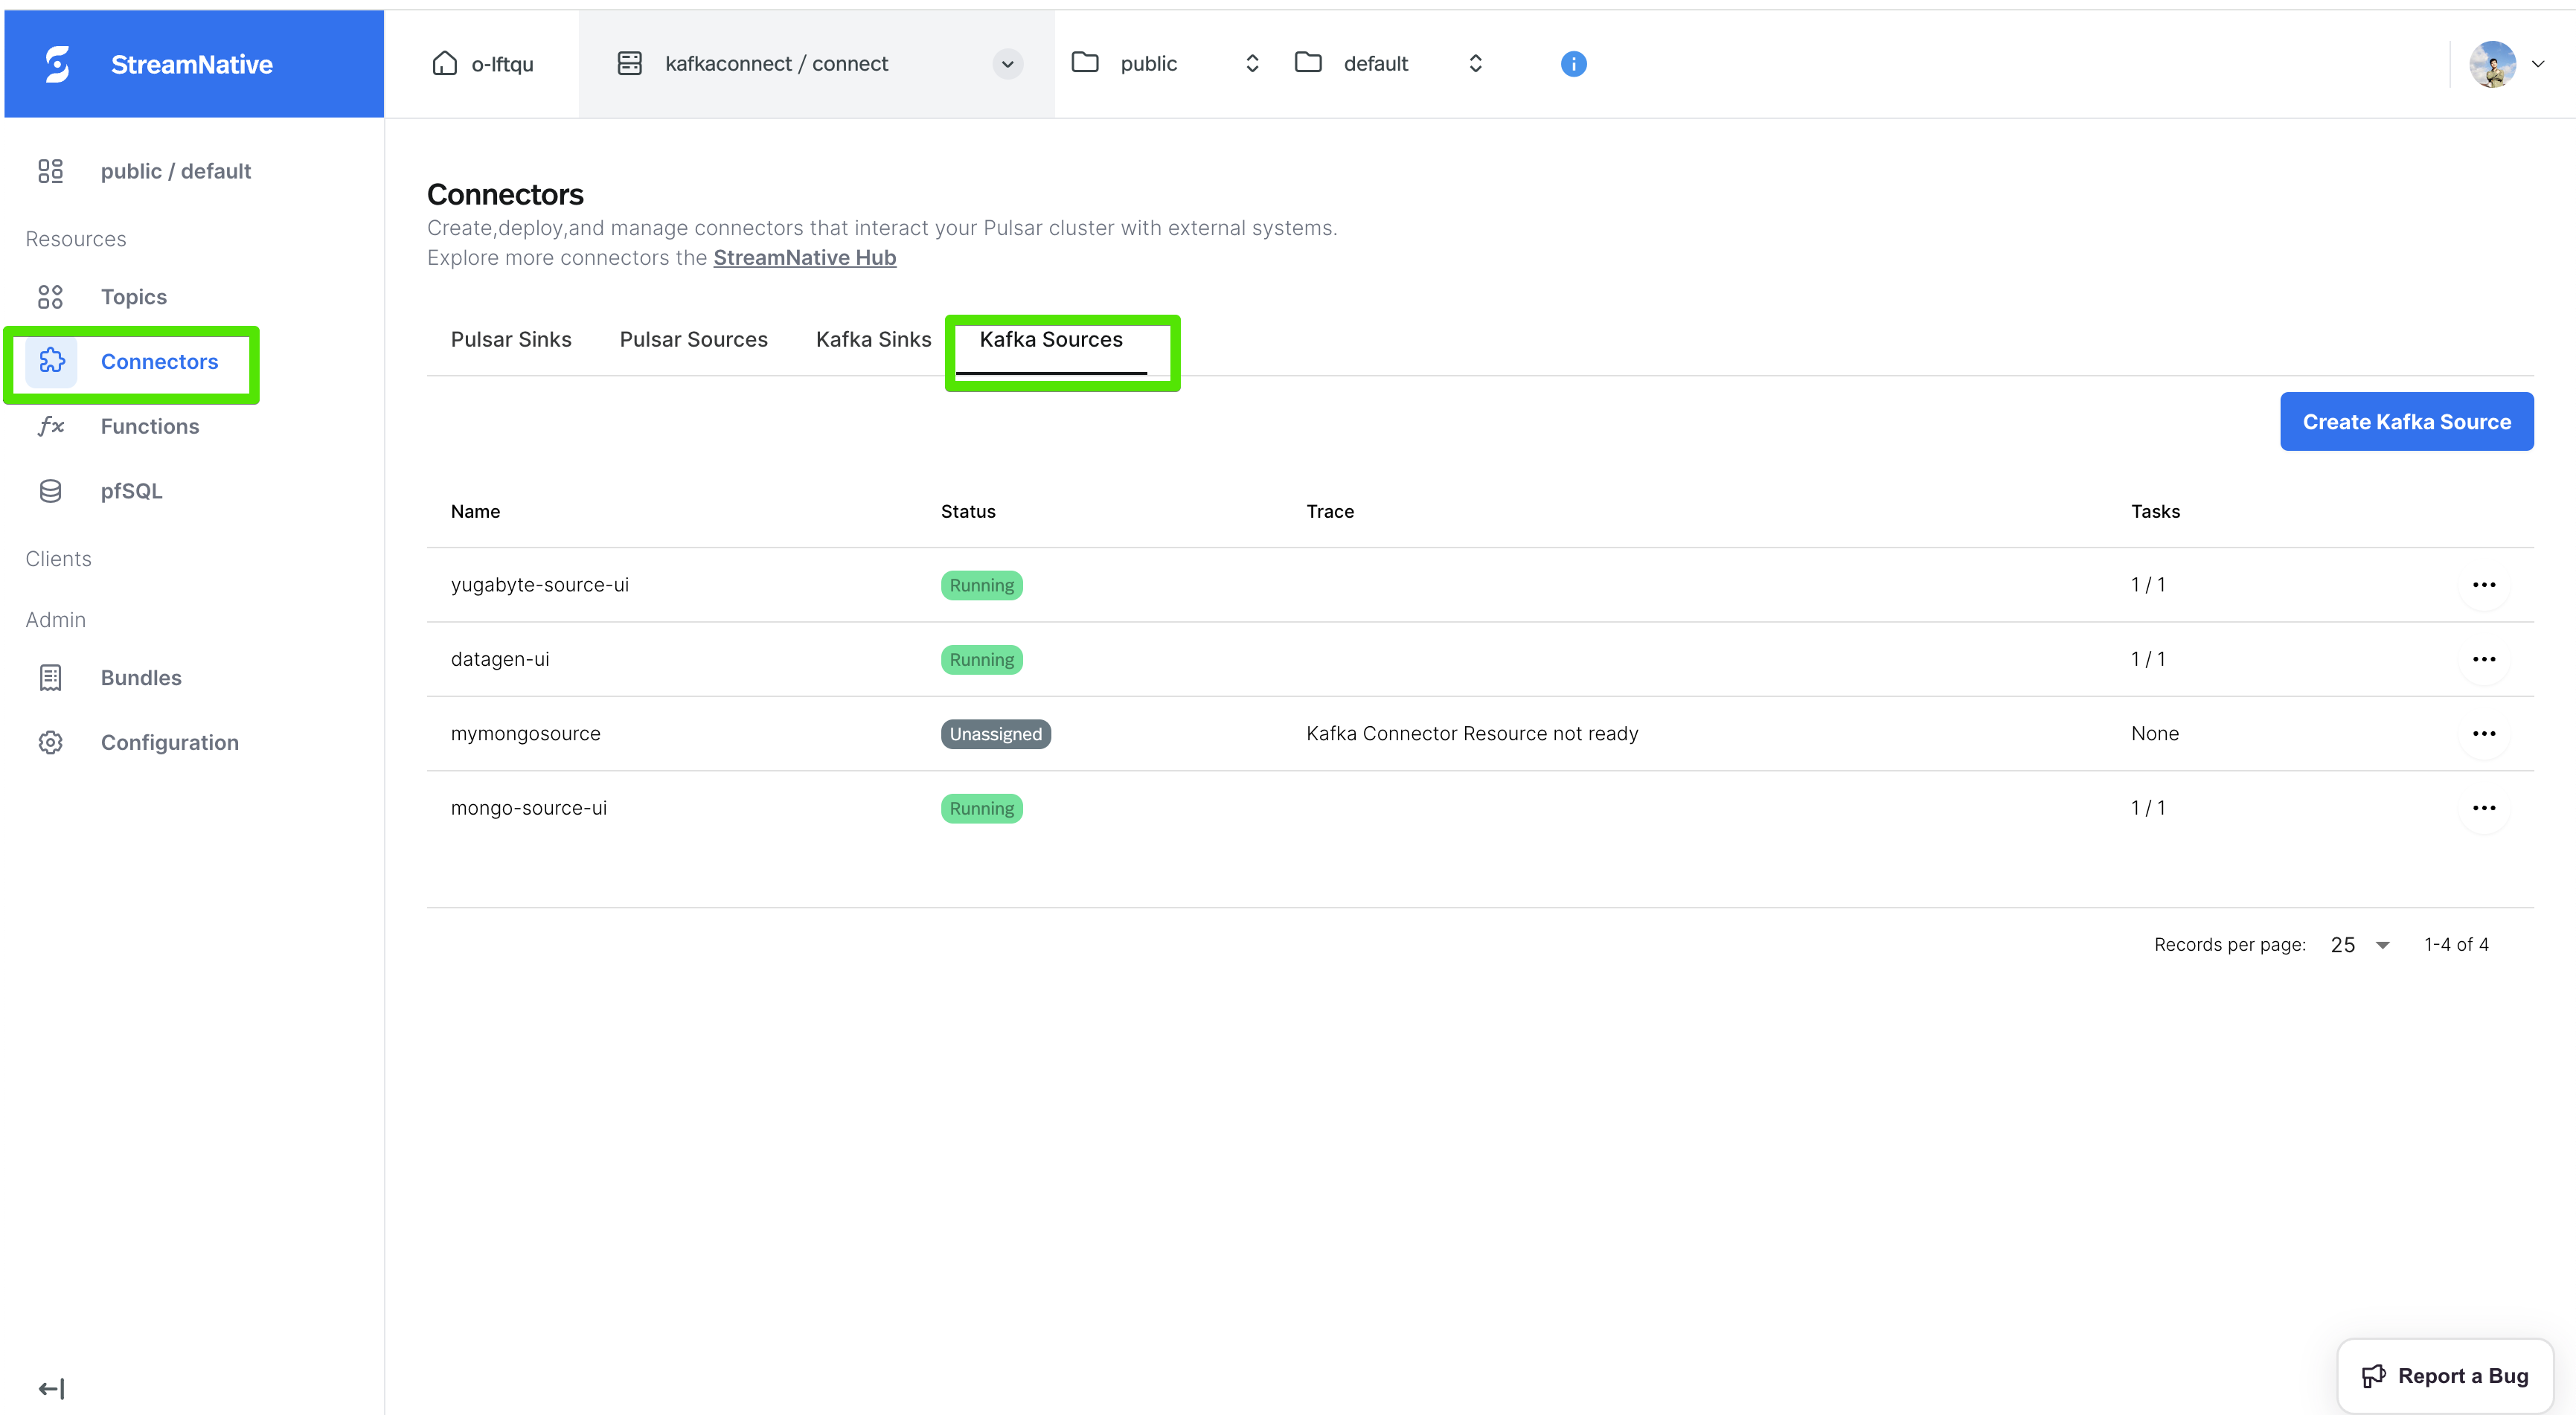
If you want to verify whether the data generator source connect has been created successfully, go back to the **Connectors** page, and you should see the created connector in the **Kafka Sources** tab, like below:
4. Fill in the required fields and optional fields as you wish, and then Click the **Submit** button.
If you want to verify whether the data generator source connect has been created successfully, go back to the **Connectors** page, and you should see the created connector in the **Kafka Sources** tab, like below:
 ## Create kafka connect with SMT
StreamNative Cloud supports Single Message Transformations (SMTs) for Kafka Connect. You can use SMTs to transform messages before they are written to the target system.
The following example shows how to create a Datagen source connector named `test` on StreamNative Cloud using different tools.
Please refer to the [Kafka Connect SMTs](/cloud/connect/kafka-connect/kafka-connect-smt) to check the supported SMTs in StreamNative cloud.
To create a data generator source connect named `test` with SMT, run the following command.
```bash theme={null}
> cat datagen.json
{
"name": "test",
"config": {
"connector.class": "io.confluent.kafka.connect.datagen.DatagenConnector",
"kafka.topic": "testusers",
"quickstart": "users",
"key.converter": "org.apache.kafka.connect.storage.StringConverter",
"value.converter": "org.apache.kafka.connect.json.JsonConverter",
"value.converter.schemas.enable": "false",
"max.interval": 1000,
"iterations": 10000000,
"tasks.max": "1",
"transforms": "InsertSource",
"transforms.InsertSource.type": "org.apache.kafka.connect.transforms.InsertField$Value",
"transforms.InsertSource.static.field": "data_source",
"transforms.InsertSource.static.value": "test-file-source"
}
}
> snctl kafka admin connect apply -f datagen.json --use-service-account
```
You should see the following output:
```bash theme={null}
Created connector test
```
If you want to verify whether the data generator source connect has been created successfully, run the following command:
```bash theme={null}
snctl kafka admin connect get connectors
```
You should see the following output:
```bash theme={null}
NAME TYPE STATE TASKS
test source RUNNING 0: RUNNING
```
To create a data generator source connect named `test` with SMT, run the following command.
```bash theme={null}
> cat datagen.json
{
"name": "test",
"config": {
"connector.class": "io.confluent.kafka.connect.datagen.DatagenConnector",
"kafka.topic": "testusers",
"quickstart": "users",
"key.converter": "org.apache.kafka.connect.storage.StringConverter",
"value.converter": "org.apache.kafka.connect.json.JsonConverter",
"value.converter.schemas.enable": "false",
"max.interval": 1000,
"iterations": 10000000,
"tasks.max": "1",
"transforms": "InsertSource",
"transforms.InsertSource.type": "org.apache.kafka.connect.transforms.InsertField$Value",
"transforms.InsertSource.static.field": "data_source",
"transforms.InsertSource.static.value": "test-file-source"
}
}
> kcctl apply -f datagen.json
```
You should see the following output:
```bash theme={null}
Created connector test
```
If you want to verify whether the data generator source connect has been created successfully, run the following command:
```bash theme={null}
kcctl get connectors
```
You should see the following output:
```bash theme={null}
NAME TYPE STATE TASKS
test source RUNNING 0: RUNNING
```
To create a data generator source connect named `test` with SMT, run the following command.
```bash theme={null}
> cat datagen.json
{
"name": "test",
"config": {
"connector.class": "io.confluent.kafka.connect.datagen.DatagenConnector",
"kafka.topic": "testusers",
"quickstart": "users",
"key.converter": "org.apache.kafka.connect.storage.StringConverter",
"value.converter": "org.apache.kafka.connect.json.JsonConverter",
"value.converter.schemas.enable": "false",
"max.interval": 1000,
"iterations": 10000000,
"tasks.max": "1",
"transforms": "InsertSource",
"transforms.InsertSource.type": "org.apache.kafka.connect.transforms.InsertField$Value",
"transforms.InsertSource.static.field": "data_source",
"transforms.InsertSource.static.value": "test-file-source"
}
}
> curl -X POST --header "Content-Type: application/json" "https://public%2Fdefault:${APIKEY}@${KAFKA-SERVICE-URL}/admin/kafkaconnect/connectors/" --data @datagen.json
{"name":"test","config":{"connector.class":"io.confluent.kafka.connect.datagen.DatagenConnector","kafka.topic":"testusers","quickstart":"users","key.converter":"org.apache.kafka.connect.storage.StringConverter","value.converter":"org.apache.kafka.connect.json.JsonConverter","value.converter.schemas.enable":"false","max.interval":"1000","iterations":"10000000","tasks.max":"1","transforms":"InsertSource","transforms.InsertSource.type":"org.apache.kafka.connect.transforms.InsertField$Value","transforms.InsertSource.static.value":"test-file-source","name":"test"},"tasks":[],"type":"source"}
```
If you want to list the submitted connect for a double check, run the following command:
```bash theme={null}
> curl "https://public%2Fdefault:${APIKEY}@${KAFKA-SERVICE-URL}/admin/kafkaconnect/connectors/"
["test"]
```
To create a data generator source connect named `test` with SMT, follow these steps:
1. Login to the [StreamNative Cloud Console](https://cloud.streamnative.io/).
2. In the left navigation pane, click **Connectors**, then click the **Kafka Sources** tab.
3. Click the **Create Kafka Source** button:
4. Fill in the required fields and optional fields as you wish
5. Click the **Advance Settings** tab, and then fill in the SMT fields:
## Create kafka connect with SMT
StreamNative Cloud supports Single Message Transformations (SMTs) for Kafka Connect. You can use SMTs to transform messages before they are written to the target system.
The following example shows how to create a Datagen source connector named `test` on StreamNative Cloud using different tools.
Please refer to the [Kafka Connect SMTs](/cloud/connect/kafka-connect/kafka-connect-smt) to check the supported SMTs in StreamNative cloud.
To create a data generator source connect named `test` with SMT, run the following command.
```bash theme={null}
> cat datagen.json
{
"name": "test",
"config": {
"connector.class": "io.confluent.kafka.connect.datagen.DatagenConnector",
"kafka.topic": "testusers",
"quickstart": "users",
"key.converter": "org.apache.kafka.connect.storage.StringConverter",
"value.converter": "org.apache.kafka.connect.json.JsonConverter",
"value.converter.schemas.enable": "false",
"max.interval": 1000,
"iterations": 10000000,
"tasks.max": "1",
"transforms": "InsertSource",
"transforms.InsertSource.type": "org.apache.kafka.connect.transforms.InsertField$Value",
"transforms.InsertSource.static.field": "data_source",
"transforms.InsertSource.static.value": "test-file-source"
}
}
> snctl kafka admin connect apply -f datagen.json --use-service-account
```
You should see the following output:
```bash theme={null}
Created connector test
```
If you want to verify whether the data generator source connect has been created successfully, run the following command:
```bash theme={null}
snctl kafka admin connect get connectors
```
You should see the following output:
```bash theme={null}
NAME TYPE STATE TASKS
test source RUNNING 0: RUNNING
```
To create a data generator source connect named `test` with SMT, run the following command.
```bash theme={null}
> cat datagen.json
{
"name": "test",
"config": {
"connector.class": "io.confluent.kafka.connect.datagen.DatagenConnector",
"kafka.topic": "testusers",
"quickstart": "users",
"key.converter": "org.apache.kafka.connect.storage.StringConverter",
"value.converter": "org.apache.kafka.connect.json.JsonConverter",
"value.converter.schemas.enable": "false",
"max.interval": 1000,
"iterations": 10000000,
"tasks.max": "1",
"transforms": "InsertSource",
"transforms.InsertSource.type": "org.apache.kafka.connect.transforms.InsertField$Value",
"transforms.InsertSource.static.field": "data_source",
"transforms.InsertSource.static.value": "test-file-source"
}
}
> kcctl apply -f datagen.json
```
You should see the following output:
```bash theme={null}
Created connector test
```
If you want to verify whether the data generator source connect has been created successfully, run the following command:
```bash theme={null}
kcctl get connectors
```
You should see the following output:
```bash theme={null}
NAME TYPE STATE TASKS
test source RUNNING 0: RUNNING
```
To create a data generator source connect named `test` with SMT, run the following command.
```bash theme={null}
> cat datagen.json
{
"name": "test",
"config": {
"connector.class": "io.confluent.kafka.connect.datagen.DatagenConnector",
"kafka.topic": "testusers",
"quickstart": "users",
"key.converter": "org.apache.kafka.connect.storage.StringConverter",
"value.converter": "org.apache.kafka.connect.json.JsonConverter",
"value.converter.schemas.enable": "false",
"max.interval": 1000,
"iterations": 10000000,
"tasks.max": "1",
"transforms": "InsertSource",
"transforms.InsertSource.type": "org.apache.kafka.connect.transforms.InsertField$Value",
"transforms.InsertSource.static.field": "data_source",
"transforms.InsertSource.static.value": "test-file-source"
}
}
> curl -X POST --header "Content-Type: application/json" "https://public%2Fdefault:${APIKEY}@${KAFKA-SERVICE-URL}/admin/kafkaconnect/connectors/" --data @datagen.json
{"name":"test","config":{"connector.class":"io.confluent.kafka.connect.datagen.DatagenConnector","kafka.topic":"testusers","quickstart":"users","key.converter":"org.apache.kafka.connect.storage.StringConverter","value.converter":"org.apache.kafka.connect.json.JsonConverter","value.converter.schemas.enable":"false","max.interval":"1000","iterations":"10000000","tasks.max":"1","transforms":"InsertSource","transforms.InsertSource.type":"org.apache.kafka.connect.transforms.InsertField$Value","transforms.InsertSource.static.value":"test-file-source","name":"test"},"tasks":[],"type":"source"}
```
If you want to list the submitted connect for a double check, run the following command:
```bash theme={null}
> curl "https://public%2Fdefault:${APIKEY}@${KAFKA-SERVICE-URL}/admin/kafkaconnect/connectors/"
["test"]
```
To create a data generator source connect named `test` with SMT, follow these steps:
1. Login to the [StreamNative Cloud Console](https://cloud.streamnative.io/).
2. In the left navigation pane, click **Connectors**, then click the **Kafka Sources** tab.
3. Click the **Create Kafka Source** button:
4. Fill in the required fields and optional fields as you wish
5. Click the **Advance Settings** tab, and then fill in the SMT fields:
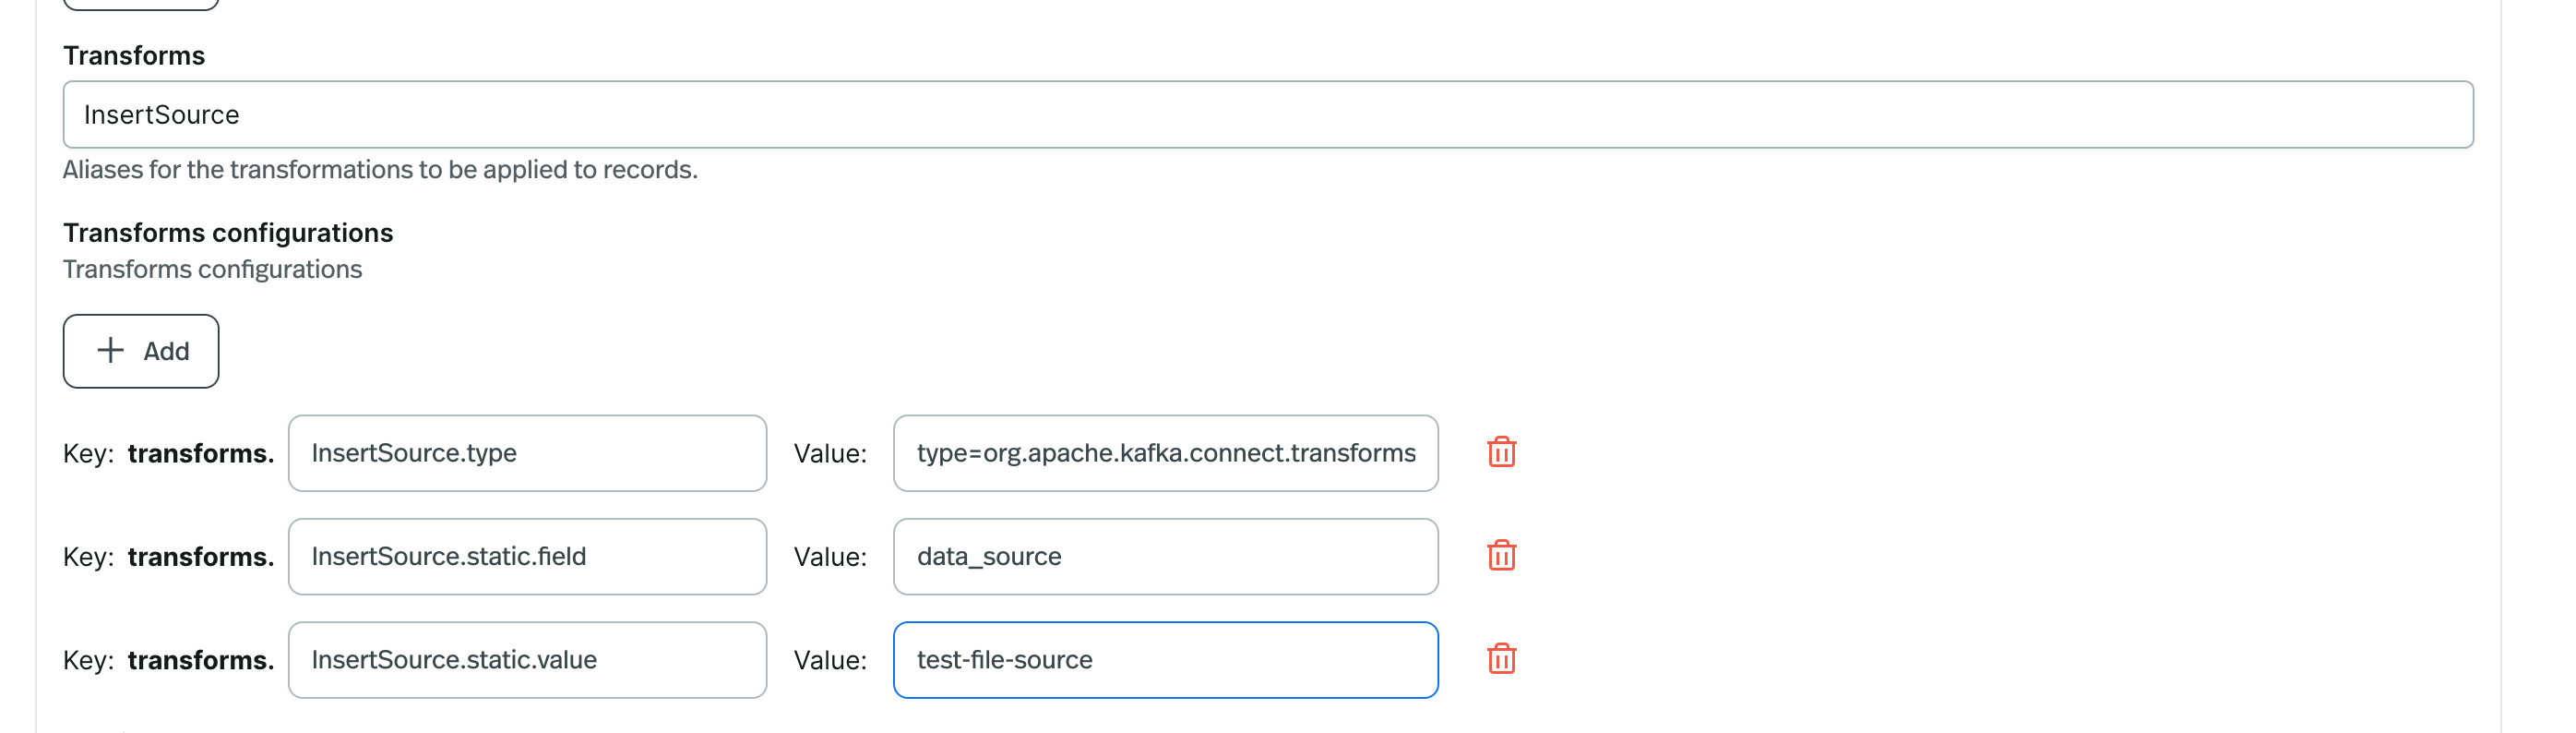 6. Click the **Submit** button.
If you want to verify whether the data generator source connect has been created successfully, go back to the **Connectors** page, and you should see the created connector in the **Kafka Sources** tab, like below:
## Create kafka connect with secret
Some connects require sensitive information, such as passwords, token, to be passed to the connector. And you may not want to expose these sensitive information in the connector configuration.
To solve this problem, you can use the following methods to pass sensitive information to the connector:
* **Create a secret**
For example, the Milvus sink connector requires a token to be passed to the connector.
You can create a secret in the console UI and pass the secret name to the connector configuration.
6. Click the **Submit** button.
If you want to verify whether the data generator source connect has been created successfully, go back to the **Connectors** page, and you should see the created connector in the **Kafka Sources** tab, like below:
## Create kafka connect with secret
Some connects require sensitive information, such as passwords, token, to be passed to the connector. And you may not want to expose these sensitive information in the connector configuration.
To solve this problem, you can use the following methods to pass sensitive information to the connector:
* **Create a secret**
For example, the Milvus sink connector requires a token to be passed to the connector.
You can create a secret in the console UI and pass the secret name to the connector configuration.
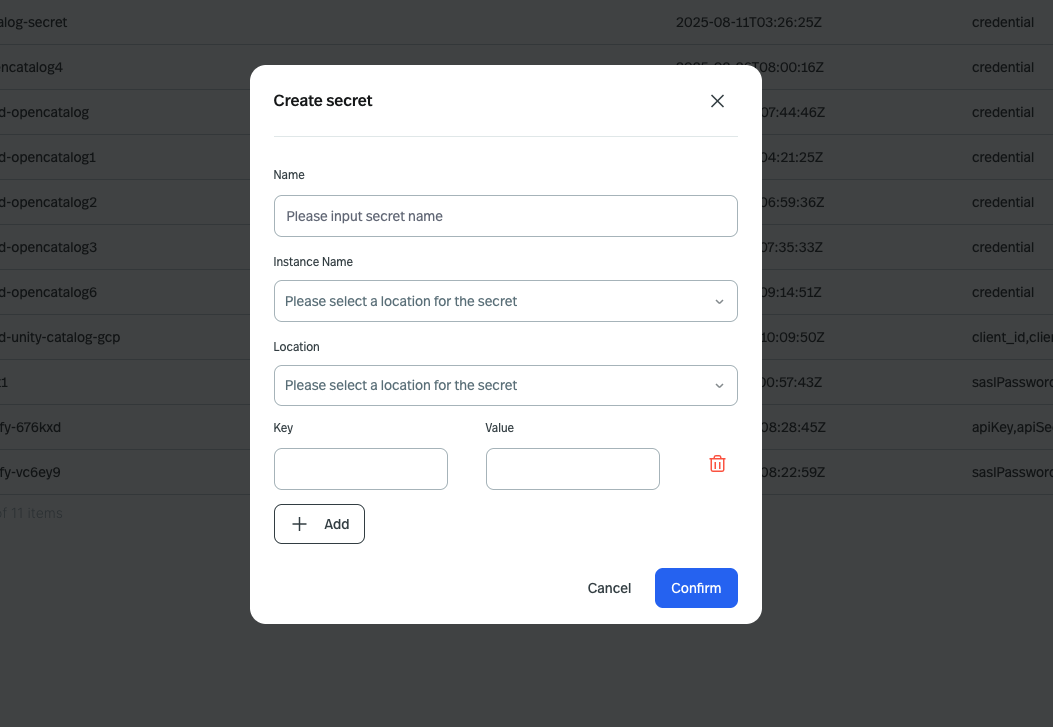 The `location` should be the same as the region of your Pulsar cluster.
The `awsAccessKey` and `awsSecretKey` is the field name, and the `lambda-sink-secret` can be any unique name you want to give to the secret.
For a Milvus sink, we should create a secret with a `token` field.
* **Pass secrets to the connector configuration**
The following example shows how to create a Milvus sink connector named `test` on Streamnative Cloud using different tools.
To create a Milvus sink connector named `test`, run the following command.
```bash theme={null}
> cat milvus.json
{
"name": "test",
"config": {
"connector.class": "com.milvus.io.kafka.MilvusSinkConnector",
"public.endpoint": "http://dockerhost.default.svc.cluster.local:19530",
"collection.name": "demo"
"token": "${snsecret:miluvs-sec:token}",
"topics": "kafka-milvus-input",
"key.converter": "org.apache.kafka.connect.json.JsonConverter",
"key.converter.schemas.enable": "false",
"value.converter": "org.apache.kafka.connect.json.JsonConverter",
"value.converter.schemas.enable": "false",
"tasks.max": "1"
}
}
> snctl kafka admin connect apply -f milvus.json --use-service-account
```
The `miluvs-sec` is the name of the secret you created
You should see the following output:
```bash theme={null}
Created connector test
```
If you want to verify whether the data generator source connect has been created successfully, run the following command:
```bash theme={null}
snctl kafka admin connect get connectors
```
You should see the following output:
```bash theme={null}
NAME TYPE STATE TASKS
test sink RUNNING 0: RUNNING
```
To create a Milvus sink connector named `test`, run the following command.
```bash theme={null}
> cat milvus.json
{
"name": "test",
"config": {
"connector.class": "com.milvus.io.kafka.MilvusSinkConnector",
"public.endpoint": "http://dockerhost.default.svc.cluster.local:19530",
"collection.name": "demo"
"token": "${snsecret:miluvs-sec:token}",
"topics": "kafka-milvus-input",
"key.converter": "org.apache.kafka.connect.json.JsonConverter",
"key.converter.schemas.enable": "false",
"value.converter": "org.apache.kafka.connect.json.JsonConverter",
"value.converter.schemas.enable": "false",
"tasks.max": "1"
}
}
> kcctl apply -f milvus.json
```
The `miluvs-sec` is the name of the secret you created
You should see the following output:
```bash theme={null}
Created connector test
```
If you want to verify whether the data generator source connect has been created successfully, run the following command:
```bash theme={null}
kcctl get connectors
```
You should see the following output:
```bash theme={null}
NAME TYPE STATE TASKS
test sink RUNNING 0: RUNNING
```
To create a Milvus sink connector named `test`, run the following command.
```bash theme={null}
> cat milvus.json
{
"name": "test",
"config": {
"connector.class": "com.milvus.io.kafka.MilvusSinkConnector",
"public.endpoint": "http://dockerhost.default.svc.cluster.local:19530",
"collection.name": "demo"
"token": "${snsecret:miluvs-sec:token}",
"topics": "kafka-milvus-input",
"key.converter": "org.apache.kafka.connect.json.JsonConverter",
"key.converter.schemas.enable": "false",
"value.converter": "org.apache.kafka.connect.json.JsonConverter",
"value.converter.schemas.enable": "false",
"tasks.max": "1"
}
}
> curl -X POST --header "Content-Type: application/json" "https://public%2Fdefault:${APIKEY}@${KAFKA-SERVICE-URL}/admin/kafkaconnect/connectors/" --data @miluvs.json
{"name":"test","config":{"connector.class":"com.milvus.io.kafka.MilvusSinkConnector","topics":"kafka-milvus-input","public.endpoint":"http://dockerhost.default.svc.cluster.local:19530","collection.name":"demo","token":"${snsecret:miluvs-sec:token}","key.converter":"org.apache.kafka.connect.json.JsonConverte","key.converter.schemas.enable":"false","value.converter":"org.apache.kafka.connect.json.JsonConverter","value.converter.schemas.enable":"false","tasks.max":"1","name":"test"},"tasks":[],"type":"sink"}
```
If you want to list the submitted connect for a double check, run the following command:
```bash theme={null}
> curl "https://public%2Fdefault:${APIKEY}@${KAFKA-SERVICE-URL}/admin/kafkaconnect/connectors/"
["test"]
```
To create a Milvus sink connect named `test`, follow these steps:
1. Login to the [StreamNative Cloud Console](https://cloud.streamnative.io/).
2. In the left navigation pane, click **Connectors**, then click the **Kafka Sinks** tab.
3. Click the **Create Kafka Sink** button, and then choose the Milvus connect:
The `location` should be the same as the region of your Pulsar cluster.
The `awsAccessKey` and `awsSecretKey` is the field name, and the `lambda-sink-secret` can be any unique name you want to give to the secret.
For a Milvus sink, we should create a secret with a `token` field.
* **Pass secrets to the connector configuration**
The following example shows how to create a Milvus sink connector named `test` on Streamnative Cloud using different tools.
To create a Milvus sink connector named `test`, run the following command.
```bash theme={null}
> cat milvus.json
{
"name": "test",
"config": {
"connector.class": "com.milvus.io.kafka.MilvusSinkConnector",
"public.endpoint": "http://dockerhost.default.svc.cluster.local:19530",
"collection.name": "demo"
"token": "${snsecret:miluvs-sec:token}",
"topics": "kafka-milvus-input",
"key.converter": "org.apache.kafka.connect.json.JsonConverter",
"key.converter.schemas.enable": "false",
"value.converter": "org.apache.kafka.connect.json.JsonConverter",
"value.converter.schemas.enable": "false",
"tasks.max": "1"
}
}
> snctl kafka admin connect apply -f milvus.json --use-service-account
```
The `miluvs-sec` is the name of the secret you created
You should see the following output:
```bash theme={null}
Created connector test
```
If you want to verify whether the data generator source connect has been created successfully, run the following command:
```bash theme={null}
snctl kafka admin connect get connectors
```
You should see the following output:
```bash theme={null}
NAME TYPE STATE TASKS
test sink RUNNING 0: RUNNING
```
To create a Milvus sink connector named `test`, run the following command.
```bash theme={null}
> cat milvus.json
{
"name": "test",
"config": {
"connector.class": "com.milvus.io.kafka.MilvusSinkConnector",
"public.endpoint": "http://dockerhost.default.svc.cluster.local:19530",
"collection.name": "demo"
"token": "${snsecret:miluvs-sec:token}",
"topics": "kafka-milvus-input",
"key.converter": "org.apache.kafka.connect.json.JsonConverter",
"key.converter.schemas.enable": "false",
"value.converter": "org.apache.kafka.connect.json.JsonConverter",
"value.converter.schemas.enable": "false",
"tasks.max": "1"
}
}
> kcctl apply -f milvus.json
```
The `miluvs-sec` is the name of the secret you created
You should see the following output:
```bash theme={null}
Created connector test
```
If you want to verify whether the data generator source connect has been created successfully, run the following command:
```bash theme={null}
kcctl get connectors
```
You should see the following output:
```bash theme={null}
NAME TYPE STATE TASKS
test sink RUNNING 0: RUNNING
```
To create a Milvus sink connector named `test`, run the following command.
```bash theme={null}
> cat milvus.json
{
"name": "test",
"config": {
"connector.class": "com.milvus.io.kafka.MilvusSinkConnector",
"public.endpoint": "http://dockerhost.default.svc.cluster.local:19530",
"collection.name": "demo"
"token": "${snsecret:miluvs-sec:token}",
"topics": "kafka-milvus-input",
"key.converter": "org.apache.kafka.connect.json.JsonConverter",
"key.converter.schemas.enable": "false",
"value.converter": "org.apache.kafka.connect.json.JsonConverter",
"value.converter.schemas.enable": "false",
"tasks.max": "1"
}
}
> curl -X POST --header "Content-Type: application/json" "https://public%2Fdefault:${APIKEY}@${KAFKA-SERVICE-URL}/admin/kafkaconnect/connectors/" --data @miluvs.json
{"name":"test","config":{"connector.class":"com.milvus.io.kafka.MilvusSinkConnector","topics":"kafka-milvus-input","public.endpoint":"http://dockerhost.default.svc.cluster.local:19530","collection.name":"demo","token":"${snsecret:miluvs-sec:token}","key.converter":"org.apache.kafka.connect.json.JsonConverte","key.converter.schemas.enable":"false","value.converter":"org.apache.kafka.connect.json.JsonConverter","value.converter.schemas.enable":"false","tasks.max":"1","name":"test"},"tasks":[],"type":"sink"}
```
If you want to list the submitted connect for a double check, run the following command:
```bash theme={null}
> curl "https://public%2Fdefault:${APIKEY}@${KAFKA-SERVICE-URL}/admin/kafkaconnect/connectors/"
["test"]
```
To create a Milvus sink connect named `test`, follow these steps:
1. Login to the [StreamNative Cloud Console](https://cloud.streamnative.io/).
2. In the left navigation pane, click **Connectors**, then click the **Kafka Sinks** tab.
3. Click the **Create Kafka Sink** button, and then choose the Milvus connect:
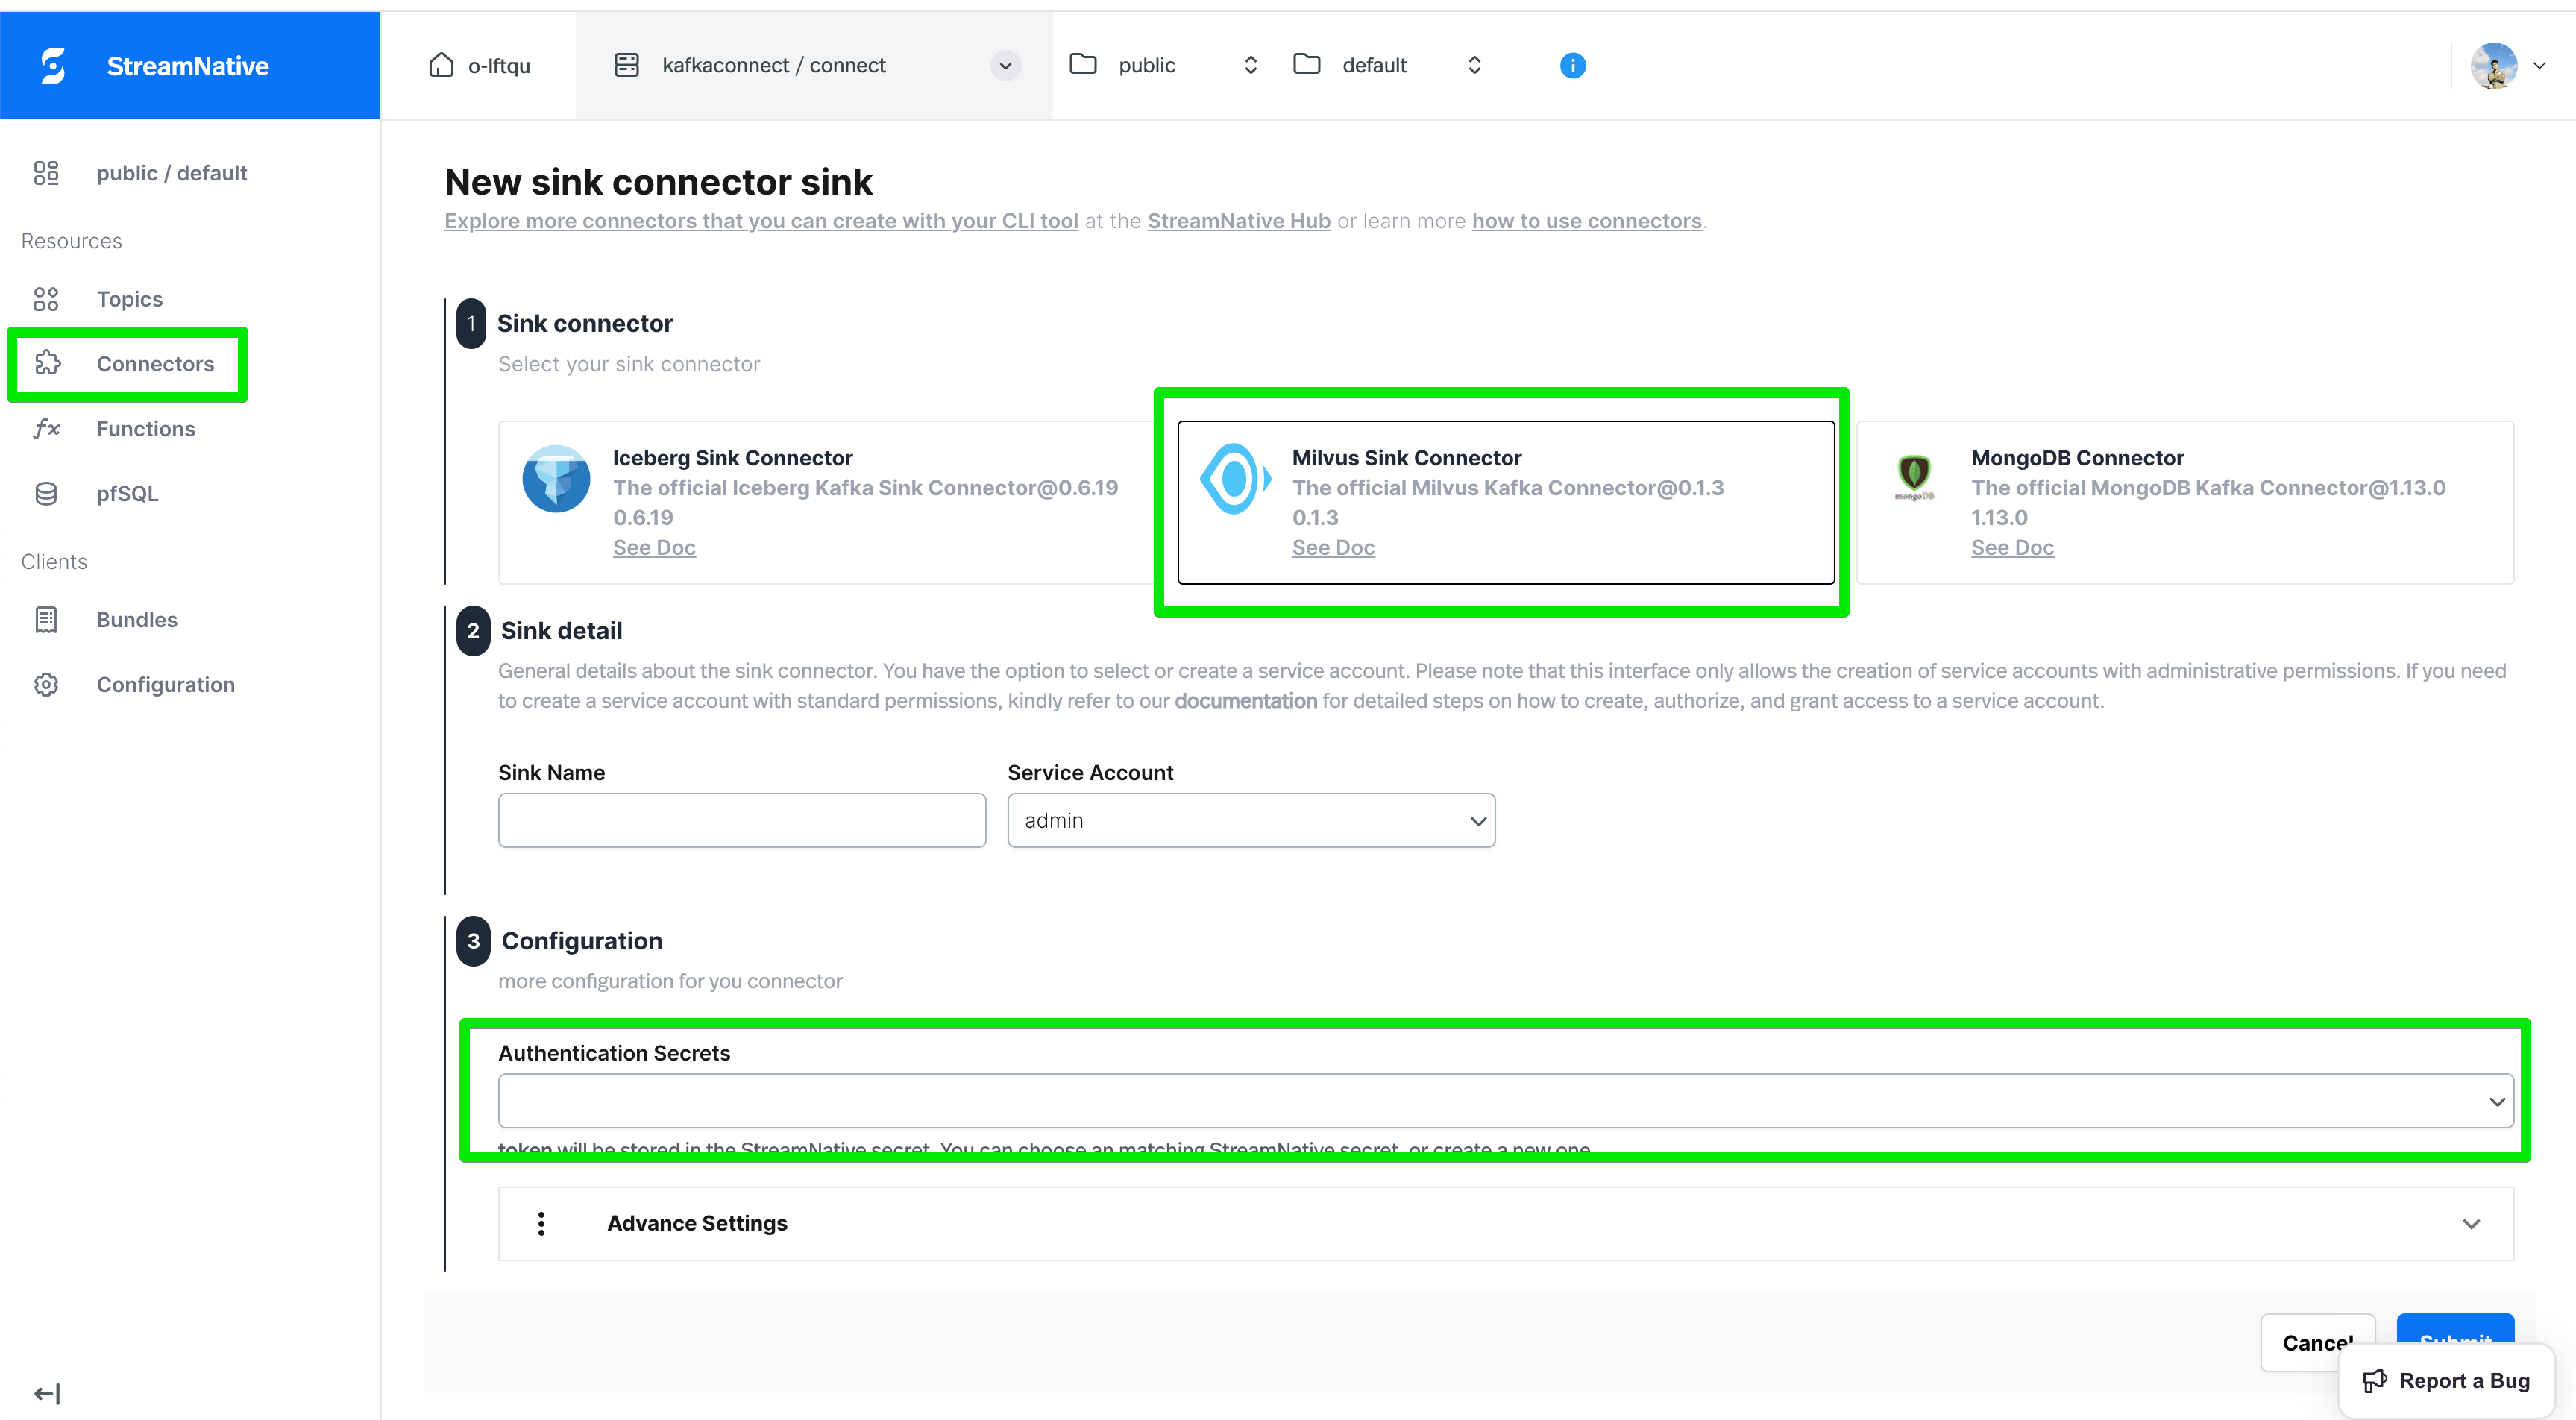 4. In the `Authentication Secrets` selection box, you can choose an existing secret or create a new secret.
5. Fill in the required fields and optional fields as you wish, and then Click the **Submit** button.
If you want to verify whether the data generator source connect has been created successfully, go back to the **Connectors** page, and you should see the created connector in the **Kafka Sources** tab, like below:
## Create a custom kafka connect
Before creating a kafka connect, it’s highly recommended to do the following:
1. [Check kafka connect availability](/cloud/connect/kafka-connect/deploy-kafka-connectors/kafka-connect-check) to ensure the version number of the kafka connect you want to create is supported on StreamNative Cloud.
2. Go to [StreamNative Hub](/connect/overview) and find the connect-specific docs of your version for configuration reference.
To create a custom kafka connect, you need to upload the connector jar/zip file to the StreamNative Cloud Package service first. Below are the steps:
### Upload your connector file to Pulsar
Upload packages
```bash theme={null}
snctl pulsar admin packages upload function://public/default/mongo-connect-zip@v1 \
--path /tmp/mongodb-kafka-connect-mongodb-1.12.0.zip \
--description "mongodb kafka connect in zip format" \
--properties fileName=mongo-kafka-connect.zip \
--properties libDir=mongodb-kafka-connect-mongodb-1.12.0/lib
```
You should see the following output:
```bash theme={null}
The package 'function://public/default/mongo-connect-zip@v1' uploaded from path '/tmp/mongodb-kafka-connect-mongodb-1.12.0.zip' successfully
```
the property `libDir` specifies the directory where the third-party libraries are located in the zip file.
You need to set the context for Pulsarctl first:
```bash theme={null}
# create a context
pulsarctl context set ${context-name} \
--admin-service-url ${admin-service-url} \
--issuer-endpoint ${issuerUrl} \
--audience urn:sn:pulsar:${orgName}:${instanceName} \
--key-file ${privateKey}
# activate oauth2
pulsarctl oauth2 activate
```
Replace the placeholder variables with the actual values that you can get when [setting up client tools](/cloud/process/pulsar-functions/function-setup#set-up-client-tools).
* `context-name`: any name you want
* `admin-service-url`: the HTTP service URL of your Pulsar cluster.
* `privateKey`: the path to the downloaded OAuth2 key file.
* `issuerUrl`: the URL of the OAuth2 issuer.
* `audience`: the [Uniform Resource Name (URN)](/cloud/references/glossary#uniform-resource-name-urn), which is a combination of the `urn:sn:pulsar`, your organization name, and your Pulsar instance name.
* `${orgName}`: the name of your [organization](/cloud/references/glossary#organization).
* `${instanceName}`: the name of your [instance](/cloud/references/glossary#instance).
Upload packages
```bash theme={null}
pulsarctl packages upload function://public/default/mongo-connect-zip@v1 \
--path /tmp/mongodb-kafka-connect-mongodb-1.12.0.zip \
--description "mongodb kafka connect in zip format" \
--properties fileName=mongo-kafka-connect.zip \
--properties libDir=mongodb-kafka-connect-mongodb-1.12.0/lib
```
You should see the following output:
```bash theme={null}
The package 'function://public/default/mongo-connect-zip@v1' uploaded from path '/tmp/mongodb-kafka-connect-mongodb-1.12.0.zip' successfully
```
the property `libDir` specifies the directory where the third-party libraries are located in the zip file.
```bash theme={null}
./bin/pulsar-admin \
--admin-url "${WEB_SERVICE_URL}" \
--auth-plugin org.apache.pulsar.client.impl.auth.oauth2.AuthenticationOAuth2 \
--auth-params '{"privateKey":"file://${privateKey}","issuerUrl":"${issuerUrl}","audience":"urn:sn:pulsar:${orgName}:${instanceName}}' \
packages upload function://public/default/mongo-connect-zip@v1 \
--path /tmp/mongodb-kafka-connect-mongodb-1.12.0.zip \
--description "mongodb kafka connect in zip format" \
--properties fileName=mongo-kafka-connect.zip \
--properties libDir=mongodb-kafka-connect-mongodb-1.12.0/lib
```
Replace the placeholder variables with the actual values that you can get when [setting up client tools](/cloud/process/pulsar-functions/function-setup#set-up-client-tools).
* `admin-url`: the HTTP service URL of your Pulsar cluster.
* `privateKey`: the path to the downloaded OAuth2 key file.
* `issuerUrl`: the URL of the OAuth2 issuer.
* `audience`: the [Uniform Resource Name (URN)](/cloud/references/glossary#uniform-resource-name-urn), which is a combination of the `urn:sn:pulsar`, your organization name, and your Pulsar instance name.
* `${orgName}`: the name of your [organization](/cloud/references/glossary#organization).
* `${instanceName}`: the name of your [instance](/cloud/references/glossary#instance).
You should see the following output:
```bash theme={null}
The package 'function://public/default/mongo-connect-zip@v1' uploaded from path '/tmp/mongodb-kafka-connect-mongodb-1.12.0.zip' successfully
```
the property `libDir` specifies the directory where the third-party libraries are located in the zip file.
The following example shows how to create a custom mongodb source connect named `mongo-source` on Streamnative Cloud using different tools.
To create a custom mongodb source connect named `mongo-source`, run the following command.
```bash theme={null}
> cat mongo.json
{
"name": "mongo-source",
"config": {
"connector.class": "com.mongodb.kafka.connect.MongoSourceConnector",
"connection.uri": "mongodb://mongo.default.svc.cluster.local:27017/?authSource=admin",
"database": "kafka-mongo",
"collection": "source",
"key.converter.schemas.enable": false,
"value.converter.schemas.enable": false,
"sn.pulsar.package.url": "function://public/default/mongo-connect-zip@v1",
"tasks.max": "1"
}
}
> snctl kafka admin connect apply -f mongo.json --use-service-account
```
The `sn.pulsar.package.url` is the package url you uploaded to the StreamNative Cloud Package service.
You should see the following output:
```bash theme={null}
Created connector mongo-source
```
If you want to verify whether the data generator source connect has been created successfully, run the following command:
```bash theme={null}
snctl kafka admin connect get connectors
```
You should see the following output:
```bash theme={null}
NAME TYPE STATE TASKS
mongo-source source RUNNING 0: RUNNING
```
To create a custom mongodb source connect named `mongo-source`, run the following command.
```bash theme={null}
> cat mongo.json
{
"name": "mongo-source",
"config": {
"connector.class": "com.mongodb.kafka.connect.MongoSourceConnector",
"connection.uri": "mongodb://mongo.default.svc.cluster.local:27017/?authSource=admin",
"database": "kafka-mongo",
"collection": "source",
"key.converter.schemas.enable": false,
"value.converter.schemas.enable": false,
"sn.pulsar.package.url": "function://public/default/mongo-connect-zip@v1",
"tasks.max": "1"
}
}
> kcctl apply -f mongo.json
```
The `sn.pulsar.package.url` is the package url you uploaded to the StreamNative Cloud Package service.
You should see the following output:
```bash theme={null}
Created connector mongo-source
```
If you want to verify whether the data generator source connect has been created successfully, run the following command:
```bash theme={null}
kcctl get connectors
```
You should see the following output:
```bash theme={null}
NAME TYPE STATE TASKS
mongo-source source RUNNING 0: RUNNING
```
To create a custom mongodb source connect named `mongo-source`, run the following command.
```bash theme={null}
> cat mongo.json
{
"name": "mongo-source",
"config": {
"connector.class": "com.mongodb.kafka.connect.MongoSourceConnector",
"connection.uri": "mongodb://mongo.default.svc.cluster.local:27017/?authSource=admin",
"database": "kafka-mongo",
"collection": "source",
"key.converter.schemas.enable": false,
"value.converter.schemas.enable": false,
"sn.pulsar.package.url": "function://public/default/mongo-connect-zip@v1",
"tasks.max": "1"
}
}
> curl -X POST --header "Content-Type: application/json" "https://public%2Fdefault:${APIKEY}@${KAFKA-SERVICE-URL}/admin/kafkaconnect/connectors/" --data @mongo.json
{"name":"mongo-source","config":{"connector.class":"com.mongodb.kafka.connect.MongoSourceConnector","connection.uri":"mongodb://mongo.default.svc.cluster.local:27017/?authSource=admin","database":"kafka-mongo","collection":"source","key.converter.schemas.enable":false,"value.converter.schemas.enable":false,"sn.pulsar.package.url":"function://public/default/mongo-connect-zip","tasks.max":"1"}}
```
If you want to list the submitted connect for a double check, run the following command:
```bash theme={null}
> curl "https://public%2Fdefault:${APIKEY}@${KAFKA-SERVICE-URL}/admin/kafkaconnect/connectors/"
["mongo-source"]
```
## Set resources for kafka connect
You can use below two configs to set the resources for the kafka connect to control the CPU and memory usage of the connector:
* `sn.cpu`: The number of CPU cores to allocate to the connector, default to **0.5**.
* `sn.memory`: The bytes of memory to allocate to the connector, default to **2147483648** (2G).
You need to upgrade your Pulsar cluster to `v3.0.8.4+`, `v3.3.3.4+` or `v4.0.1.3+` to use the `sn.cpu` and `sn.memory` configs.
## Tune Kafka Connect clients
You can tune the Kafka client behavior for an individual connector by adding connector-level override settings. These settings are useful when one connector needs different throughput, latency, or retry behavior than the default Kafka Connect worker settings.
Use the following prefixes in the connector configuration:
* `producer.override.*`: Overrides Kafka producer settings. Use this prefix mainly for source connectors that write records to Kafka topics. Common settings include `compression.type`, `batch.size`, `linger.ms`, and `acks`.
* `consumer.override.*`: Overrides Kafka consumer settings. Use this prefix for sink connectors that read records from Kafka topics. Common settings include `max.poll.records`, `fetch.min.bytes`, `fetch.max.wait.ms`, and `auto.offset.reset`.
* `admin.override.*`: Overrides Kafka administrative client settings. Use this prefix when the connector needs different administrative client behavior, such as for topic creation or dead-letter queue operations. Common settings include `request.timeout.ms`, `retry.backoff.ms`, and `default.api.timeout.ms`.
For example, the following sink connector configuration increases the consumer batch size and adjusts admin client timeouts:
```json theme={null}
{
"name": "jdbc-sink",
"config": {
"connector.class": "io.confluent.connect.jdbc.JdbcSinkConnector",
"topics": "orders",
"tasks.max": "1",
"consumer.override.max.poll.records": "1000",
"consumer.override.fetch.min.bytes": "1048576",
"consumer.override.fetch.max.wait.ms": "500",
"admin.override.request.timeout.ms": "30000",
"admin.override.retry.backoff.ms": "500"
}
}
```
The following source connector example tunes the producer used to write records to Kafka:
```json theme={null}
{
"name": "mongo-source",
"config": {
"connector.class": "com.mongodb.kafka.connect.MongoSourceConnector",
"tasks.max": "1",
"producer.override.compression.type": "gzip",
"producer.override.batch.size": "131072",
"producer.override.linger.ms": "20",
"producer.override.acks": "all"
}
}
```
## Schema Registry Support
Kafka Connect supports using schema registry to save Avro/Protobuf/Json schema for the value and key. And StreamNative has an internal schema registry which can be used without complex configurations.
To use it, you just need to set the following configuration in the connector configuration:
* `value.converter.schema.registry.internal: true`: if you want to use the internal schema registry for the value converter.
* `key.converter.schema.registry.internal: true`: if you want to use the internal schema registry for the key converter.
4. In the `Authentication Secrets` selection box, you can choose an existing secret or create a new secret.
5. Fill in the required fields and optional fields as you wish, and then Click the **Submit** button.
If you want to verify whether the data generator source connect has been created successfully, go back to the **Connectors** page, and you should see the created connector in the **Kafka Sources** tab, like below:
## Create a custom kafka connect
Before creating a kafka connect, it’s highly recommended to do the following:
1. [Check kafka connect availability](/cloud/connect/kafka-connect/deploy-kafka-connectors/kafka-connect-check) to ensure the version number of the kafka connect you want to create is supported on StreamNative Cloud.
2. Go to [StreamNative Hub](/connect/overview) and find the connect-specific docs of your version for configuration reference.
To create a custom kafka connect, you need to upload the connector jar/zip file to the StreamNative Cloud Package service first. Below are the steps:
### Upload your connector file to Pulsar
Upload packages
```bash theme={null}
snctl pulsar admin packages upload function://public/default/mongo-connect-zip@v1 \
--path /tmp/mongodb-kafka-connect-mongodb-1.12.0.zip \
--description "mongodb kafka connect in zip format" \
--properties fileName=mongo-kafka-connect.zip \
--properties libDir=mongodb-kafka-connect-mongodb-1.12.0/lib
```
You should see the following output:
```bash theme={null}
The package 'function://public/default/mongo-connect-zip@v1' uploaded from path '/tmp/mongodb-kafka-connect-mongodb-1.12.0.zip' successfully
```
the property `libDir` specifies the directory where the third-party libraries are located in the zip file.
You need to set the context for Pulsarctl first:
```bash theme={null}
# create a context
pulsarctl context set ${context-name} \
--admin-service-url ${admin-service-url} \
--issuer-endpoint ${issuerUrl} \
--audience urn:sn:pulsar:${orgName}:${instanceName} \
--key-file ${privateKey}
# activate oauth2
pulsarctl oauth2 activate
```
Replace the placeholder variables with the actual values that you can get when [setting up client tools](/cloud/process/pulsar-functions/function-setup#set-up-client-tools).
* `context-name`: any name you want
* `admin-service-url`: the HTTP service URL of your Pulsar cluster.
* `privateKey`: the path to the downloaded OAuth2 key file.
* `issuerUrl`: the URL of the OAuth2 issuer.
* `audience`: the [Uniform Resource Name (URN)](/cloud/references/glossary#uniform-resource-name-urn), which is a combination of the `urn:sn:pulsar`, your organization name, and your Pulsar instance name.
* `${orgName}`: the name of your [organization](/cloud/references/glossary#organization).
* `${instanceName}`: the name of your [instance](/cloud/references/glossary#instance).
Upload packages
```bash theme={null}
pulsarctl packages upload function://public/default/mongo-connect-zip@v1 \
--path /tmp/mongodb-kafka-connect-mongodb-1.12.0.zip \
--description "mongodb kafka connect in zip format" \
--properties fileName=mongo-kafka-connect.zip \
--properties libDir=mongodb-kafka-connect-mongodb-1.12.0/lib
```
You should see the following output:
```bash theme={null}
The package 'function://public/default/mongo-connect-zip@v1' uploaded from path '/tmp/mongodb-kafka-connect-mongodb-1.12.0.zip' successfully
```
the property `libDir` specifies the directory where the third-party libraries are located in the zip file.
```bash theme={null}
./bin/pulsar-admin \
--admin-url "${WEB_SERVICE_URL}" \
--auth-plugin org.apache.pulsar.client.impl.auth.oauth2.AuthenticationOAuth2 \
--auth-params '{"privateKey":"file://${privateKey}","issuerUrl":"${issuerUrl}","audience":"urn:sn:pulsar:${orgName}:${instanceName}}' \
packages upload function://public/default/mongo-connect-zip@v1 \
--path /tmp/mongodb-kafka-connect-mongodb-1.12.0.zip \
--description "mongodb kafka connect in zip format" \
--properties fileName=mongo-kafka-connect.zip \
--properties libDir=mongodb-kafka-connect-mongodb-1.12.0/lib
```
Replace the placeholder variables with the actual values that you can get when [setting up client tools](/cloud/process/pulsar-functions/function-setup#set-up-client-tools).
* `admin-url`: the HTTP service URL of your Pulsar cluster.
* `privateKey`: the path to the downloaded OAuth2 key file.
* `issuerUrl`: the URL of the OAuth2 issuer.
* `audience`: the [Uniform Resource Name (URN)](/cloud/references/glossary#uniform-resource-name-urn), which is a combination of the `urn:sn:pulsar`, your organization name, and your Pulsar instance name.
* `${orgName}`: the name of your [organization](/cloud/references/glossary#organization).
* `${instanceName}`: the name of your [instance](/cloud/references/glossary#instance).
You should see the following output:
```bash theme={null}
The package 'function://public/default/mongo-connect-zip@v1' uploaded from path '/tmp/mongodb-kafka-connect-mongodb-1.12.0.zip' successfully
```
the property `libDir` specifies the directory where the third-party libraries are located in the zip file.
The following example shows how to create a custom mongodb source connect named `mongo-source` on Streamnative Cloud using different tools.
To create a custom mongodb source connect named `mongo-source`, run the following command.
```bash theme={null}
> cat mongo.json
{
"name": "mongo-source",
"config": {
"connector.class": "com.mongodb.kafka.connect.MongoSourceConnector",
"connection.uri": "mongodb://mongo.default.svc.cluster.local:27017/?authSource=admin",
"database": "kafka-mongo",
"collection": "source",
"key.converter.schemas.enable": false,
"value.converter.schemas.enable": false,
"sn.pulsar.package.url": "function://public/default/mongo-connect-zip@v1",
"tasks.max": "1"
}
}
> snctl kafka admin connect apply -f mongo.json --use-service-account
```
The `sn.pulsar.package.url` is the package url you uploaded to the StreamNative Cloud Package service.
You should see the following output:
```bash theme={null}
Created connector mongo-source
```
If you want to verify whether the data generator source connect has been created successfully, run the following command:
```bash theme={null}
snctl kafka admin connect get connectors
```
You should see the following output:
```bash theme={null}
NAME TYPE STATE TASKS
mongo-source source RUNNING 0: RUNNING
```
To create a custom mongodb source connect named `mongo-source`, run the following command.
```bash theme={null}
> cat mongo.json
{
"name": "mongo-source",
"config": {
"connector.class": "com.mongodb.kafka.connect.MongoSourceConnector",
"connection.uri": "mongodb://mongo.default.svc.cluster.local:27017/?authSource=admin",
"database": "kafka-mongo",
"collection": "source",
"key.converter.schemas.enable": false,
"value.converter.schemas.enable": false,
"sn.pulsar.package.url": "function://public/default/mongo-connect-zip@v1",
"tasks.max": "1"
}
}
> kcctl apply -f mongo.json
```
The `sn.pulsar.package.url` is the package url you uploaded to the StreamNative Cloud Package service.
You should see the following output:
```bash theme={null}
Created connector mongo-source
```
If you want to verify whether the data generator source connect has been created successfully, run the following command:
```bash theme={null}
kcctl get connectors
```
You should see the following output:
```bash theme={null}
NAME TYPE STATE TASKS
mongo-source source RUNNING 0: RUNNING
```
To create a custom mongodb source connect named `mongo-source`, run the following command.
```bash theme={null}
> cat mongo.json
{
"name": "mongo-source",
"config": {
"connector.class": "com.mongodb.kafka.connect.MongoSourceConnector",
"connection.uri": "mongodb://mongo.default.svc.cluster.local:27017/?authSource=admin",
"database": "kafka-mongo",
"collection": "source",
"key.converter.schemas.enable": false,
"value.converter.schemas.enable": false,
"sn.pulsar.package.url": "function://public/default/mongo-connect-zip@v1",
"tasks.max": "1"
}
}
> curl -X POST --header "Content-Type: application/json" "https://public%2Fdefault:${APIKEY}@${KAFKA-SERVICE-URL}/admin/kafkaconnect/connectors/" --data @mongo.json
{"name":"mongo-source","config":{"connector.class":"com.mongodb.kafka.connect.MongoSourceConnector","connection.uri":"mongodb://mongo.default.svc.cluster.local:27017/?authSource=admin","database":"kafka-mongo","collection":"source","key.converter.schemas.enable":false,"value.converter.schemas.enable":false,"sn.pulsar.package.url":"function://public/default/mongo-connect-zip","tasks.max":"1"}}
```
If you want to list the submitted connect for a double check, run the following command:
```bash theme={null}
> curl "https://public%2Fdefault:${APIKEY}@${KAFKA-SERVICE-URL}/admin/kafkaconnect/connectors/"
["mongo-source"]
```
## Set resources for kafka connect
You can use below two configs to set the resources for the kafka connect to control the CPU and memory usage of the connector:
* `sn.cpu`: The number of CPU cores to allocate to the connector, default to **0.5**.
* `sn.memory`: The bytes of memory to allocate to the connector, default to **2147483648** (2G).
You need to upgrade your Pulsar cluster to `v3.0.8.4+`, `v3.3.3.4+` or `v4.0.1.3+` to use the `sn.cpu` and `sn.memory` configs.
## Tune Kafka Connect clients
You can tune the Kafka client behavior for an individual connector by adding connector-level override settings. These settings are useful when one connector needs different throughput, latency, or retry behavior than the default Kafka Connect worker settings.
Use the following prefixes in the connector configuration:
* `producer.override.*`: Overrides Kafka producer settings. Use this prefix mainly for source connectors that write records to Kafka topics. Common settings include `compression.type`, `batch.size`, `linger.ms`, and `acks`.
* `consumer.override.*`: Overrides Kafka consumer settings. Use this prefix for sink connectors that read records from Kafka topics. Common settings include `max.poll.records`, `fetch.min.bytes`, `fetch.max.wait.ms`, and `auto.offset.reset`.
* `admin.override.*`: Overrides Kafka administrative client settings. Use this prefix when the connector needs different administrative client behavior, such as for topic creation or dead-letter queue operations. Common settings include `request.timeout.ms`, `retry.backoff.ms`, and `default.api.timeout.ms`.
For example, the following sink connector configuration increases the consumer batch size and adjusts admin client timeouts:
```json theme={null}
{
"name": "jdbc-sink",
"config": {
"connector.class": "io.confluent.connect.jdbc.JdbcSinkConnector",
"topics": "orders",
"tasks.max": "1",
"consumer.override.max.poll.records": "1000",
"consumer.override.fetch.min.bytes": "1048576",
"consumer.override.fetch.max.wait.ms": "500",
"admin.override.request.timeout.ms": "30000",
"admin.override.retry.backoff.ms": "500"
}
}
```
The following source connector example tunes the producer used to write records to Kafka:
```json theme={null}
{
"name": "mongo-source",
"config": {
"connector.class": "com.mongodb.kafka.connect.MongoSourceConnector",
"tasks.max": "1",
"producer.override.compression.type": "gzip",
"producer.override.batch.size": "131072",
"producer.override.linger.ms": "20",
"producer.override.acks": "all"
}
}
```
## Schema Registry Support
Kafka Connect supports using schema registry to save Avro/Protobuf/Json schema for the value and key. And StreamNative has an internal schema registry which can be used without complex configurations.
To use it, you just need to set the following configuration in the connector configuration:
* `value.converter.schema.registry.internal: true`: if you want to use the internal schema registry for the value converter.
* `key.converter.schema.registry.internal: true`: if you want to use the internal schema registry for the key converter.