> ## Documentation Index
> Fetch the complete documentation index at: https://docs.streamnative.io/llms.txt
> Use this file to discover all available pages before exploring further.
# Manage Serverless Instances on StreamNative Cloud
## Create an instance
In the UI, you will create a **Serverless** instance and a cluster within the instance.
1. Navigate to the [**Organization Dashboard**](/cloud/get-started/cloud-console#organization-dashboard).
2. Click **Instances** on the left navigation pane to go to the **Instances** page.
3. Click **+ New Instance** button to start the instance creation process.
4. On the **Choose the deployment type for your instance** page, click **Deploy Serverless** to start the instance creation process.
5. On the **Instance Configuration** page, enter the **Instance Name** and select the **Cloud Provider**.
| Item | Description |
| -------------- | ------------------------------------------------------------------------------------------------------------------------------------------------------------------------------------------------- |
| Instance Name | Enter a name for the instance. An instance name starts with a lowercase letter, contains any combination of lowercase letters (a-z), numbers (0-9), and hyphens (-), and must be 4-40 characters. |
| Cloud Provider | Select the cloud provider. Currently, Google Cloud is available. |
6. Click **Cluster Location** to start the cluster creation process.
7. On the **Cluster Name** page, enter the **Cluster Name** and select the **Location** from the dropdown list.
| Item | Description |
| ------------ | ---------------------------------------------------------------------------------------------------------------------------------------------------------------------------------------------- |
| Cluster Name | Enter a name for the cluster. A cluster name starts with a lowercase letter, contains any combination of lowercase letters (a-z), numbers (0-9), and hyphens (-), and must be 4-10 characters. |
| Location | Select the location from the dropdown list. The location represents the available regions in the designated cloud provider. |
8. Click **Finish**.
The cluster page appears, showing the cluster creation process. Depending on the chosen cloud provider and other settings, it might take a few seconds to several minutes to provision the cluster. Once the cluster is ready, the **Cluster Dashboard** page appears.
Edit a file named `instance.yaml` with the following content:
```yaml theme={null}
apiVersion: cloud.streamnative.io/v1alpha1
kind: PulsarInstance
metadata:
name:
namespace:
spec:
availabilityMode: regional
poolRef:
name: shared-gcp
namespace: streamnative
type: serverless
```
* `metadata.name`: The name of the Serverless Instance. Replace `` with the actual name.
* `metadata.namespace`: The organization ID. Replace `` with the actual organization ID.
* `spec.availabilityMode`: The availability mode of the instance. Currently, only `regional` is supported.
* `spec.poolRef`: Refer to the infrastructure pool that runs the **Serverless** instance. Currently it only supports Google Cloud.
* `spec.type`: The type of the instance. For **Serverless** instances, set it to `serverless`.
Run the following command to provision the Serverless Instance:
```bash theme={null}
snctl create -f instance.yaml
```
Once the command is completed, you should be able to see the following message:
```bash theme={null}
pulsarinstance.cloud.streamnative.io/ created
```
Once you have created the instance, you can continue to create a cluster. See [work with clusters](/cloud/clusters/manage-clusters/cluster) for more information.
You can define the Serverless Instance in a Terraform configuration file as below:
```hcl theme={null}
resource "streamnative_pulsar_instance" "test-instance" {
organization = ""
name = ""
availability_mode = "regional"
pool_name = "shared-gcp"
pool_namespace = "streamnative"
type = "serverless"
}
```
* `organization`: The organization ID. Replace `` with the actual organization ID.
* `name`: The name of the Serverless Instance. Replace `` with the actual name.
* `availability_mode`: The availability mode of the instance. Currently, only `regional` is supported.
* `pool_name`: The name of the infrastructure pool that runs the **Serverless** instance. Currently it only supports Google Cloud (`shared-gcp`).
* `pool_namespace`: The namespace of the infrastructure pool (`streamnative`).
* `type`: The type of the instance. For **Serverless** instances, set it to `serverless`.
See [PulsarInstance](https://registry.terraform.io/providers/streamnative/streamnative/latest/docs/resources/pulsar_instance) for more information.
After you defined the instance, you can continue to define the **Cluster** resource. See [work with clusters](/cloud/clusters/manage-clusters/cluster) for more information.
## Manage instances
To view instances created for an organization, follow these steps.
1. In the upper-right corner of the StreamNative Cloud Console, click your Profile and select **Organizations**.
2. Click the name of the organization you want to check.
3. Select **Instances** from the left navigation pane.
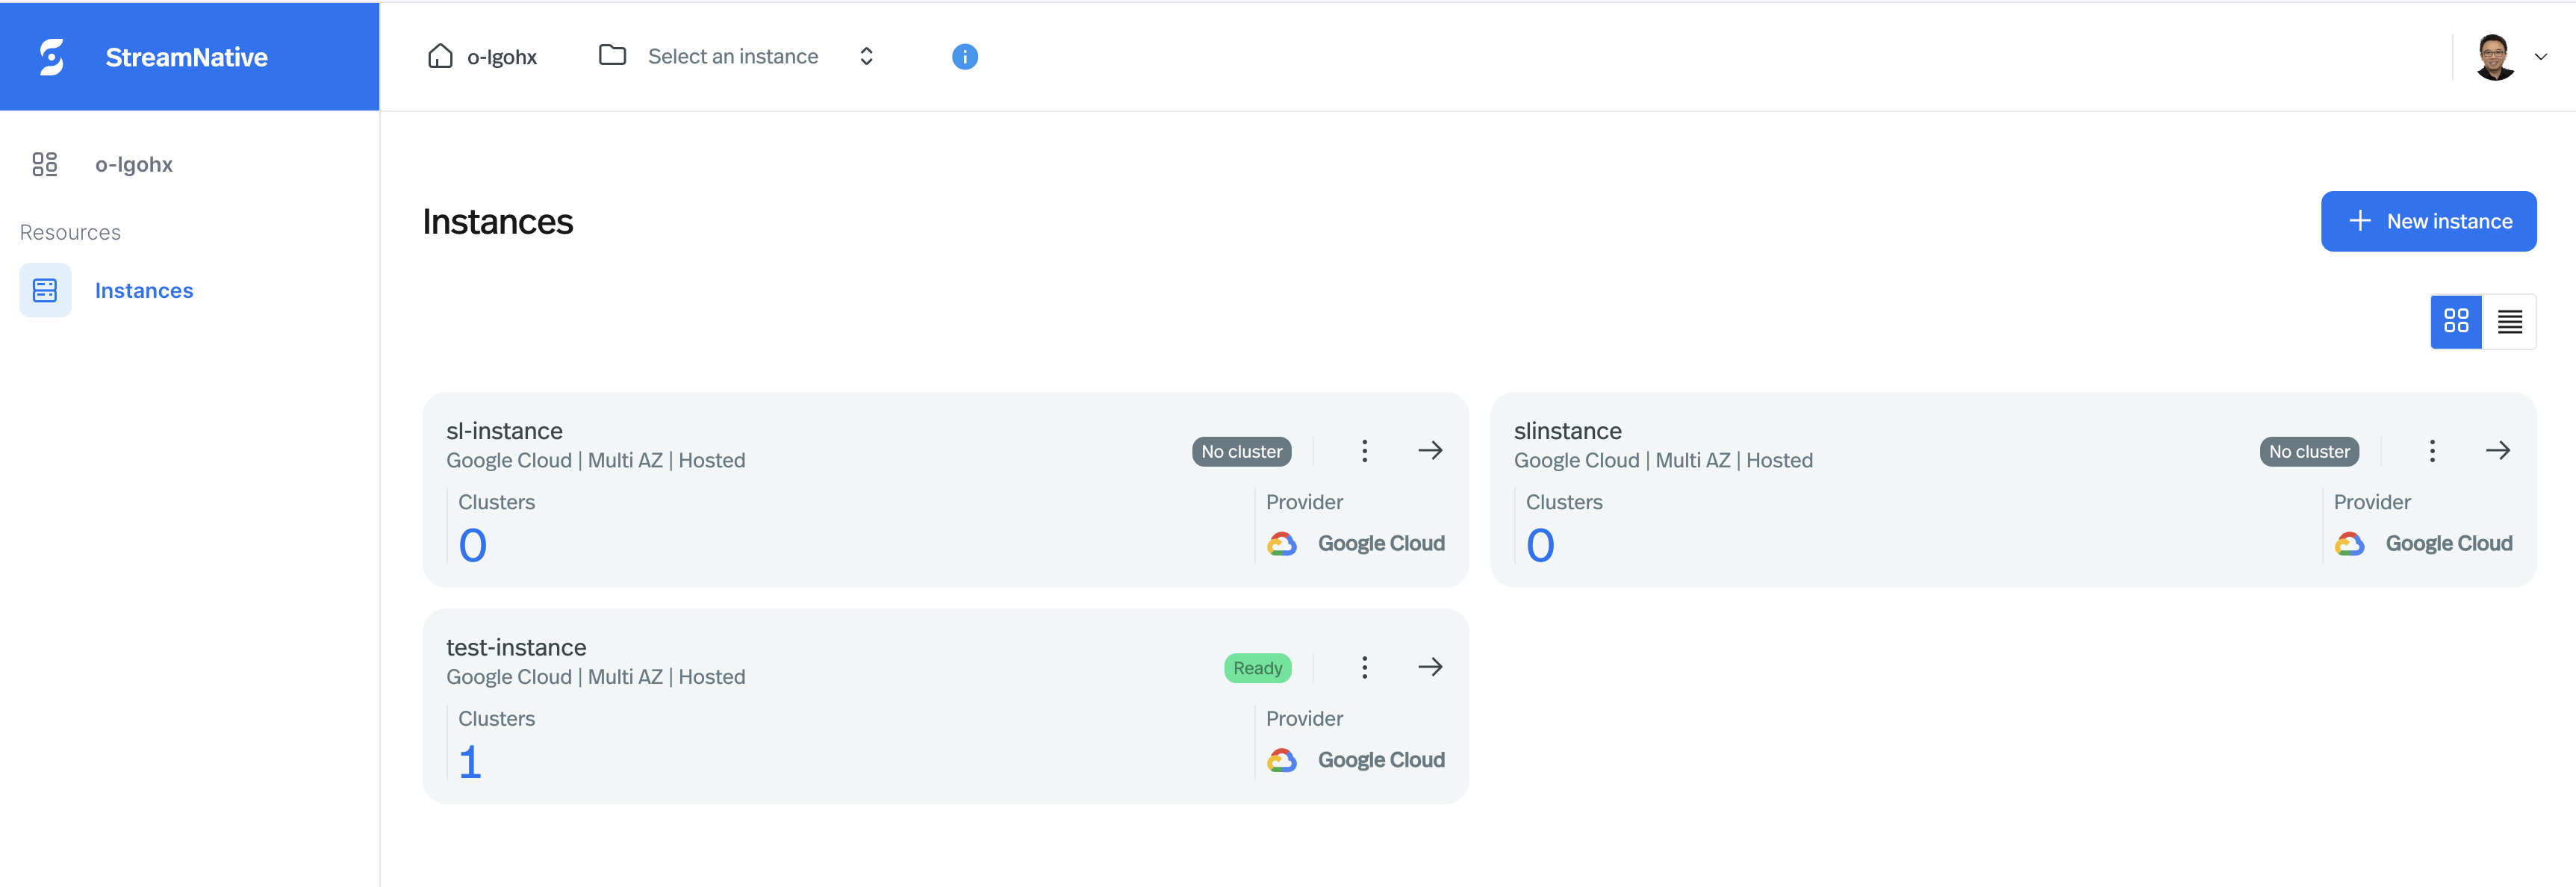
4. On the **Instances** page, you should able to see the list of instances available for the organization. In each **Instance Card**, you are able to see **Instance Name**, **Status**, **Cloud Provider**, **Number of Clusters**, and etc. You can also click the right arrow icon to go the **Instance Dashboard** page.
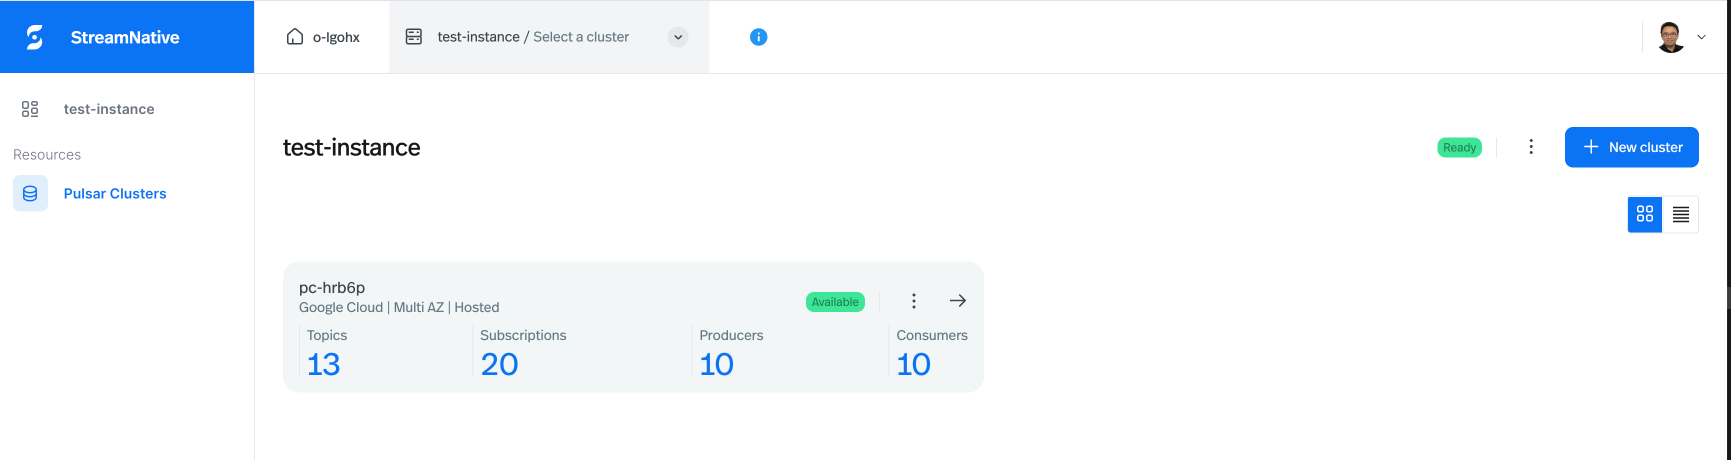
 5. On the **Instance Dashboard** page, you are able to see the list of clusters available for the instance. In each **Cluster Card**, you are able to see **Cluster Name**, **Status**, **Number of Topics**, **Number of Subscriptions**, **Number of Producers**, **Number of Consumers**, and etc. You can also click the right arrow icon to go the **Cluster Dashboard** page.
 To list of the all instances available for an organization, run the following command:
```bash theme={null}
snctl get pulsarinstances -O
```
If you want to get more details about an instance, you can run the following command:
```bash theme={null}
snctl get pulsarinstance -O
```
You should be able to get the details of the instance.
```yaml theme={null}
spec:
auth:
apikey: {}
availabilityMode: regional
poolRef:
name: shared-gcp
namespace: streamnative
type: serverless
status:
auth:
oauth2:
audience: urn:sn:pulsar::
issuerURL: https://auth.streamnative.cloud/
type: oauth2
conditions:
- lastTransitionTime: '2024-11-29T21:34:08Z'
message: a payment method is not required because discount is active
reason: HasActiveDiscount
status: 'True'
type: SubscriptionReady
- lastTransitionTime: '2024-11-29T21:34:08Z'
reason: Created
status: 'True'
type: ResourceServerReady
- lastTransitionTime: '2024-11-29T21:34:09Z'
reason: Created
status: 'True'
type: ServiceAccountReady
- lastTransitionTime: '2024-11-29T21:34:10Z'
reason: AllConditionStatusTrue
status: 'True'
type: Ready
```
* `status.auth.oauth2.audience`: The audience of the Pulsar instance. It will be used for the [Oauth2 authentication](/cloud/security/authentication/service-accounts/use-oauth/oauth-overview).
* `status.auth.oauth2.issuerURL`: The oauth2 issuer URL of the Pulsar instance. It will be used for the [Oauth2 authentication](/cloud/security/authentication/service-accounts/use-oauth/oauth-overview).
* In the `conditions` section, you can see the status of the instance. If all conditions are `True`, the instance is ready.
If you want to get more details about an instance, you can define a data source in the Terraform configuration file.
```hcl theme={null}
data "streamnative_pulsar_instance" "test-instance" {
organization = ""
name = ""
}
```
You should be able to get the details of the instance.
* `id`: The ID of the instance.
* `availability_mode`: The availability mode of the instance. Currently, only `regional` is supported.
* `oauth2_audience`: The audience of the Pulsar instance. It will be used for the [Oauth2 authentication](/cloud/security/authentication/service-accounts/use-oauth/oauth-overview).
* `oauth2_issuer_url`: The oauth2 issuer URL of the Pulsar instance. It will be used for the [Oauth2 authentication](/cloud/security/authentication/service-accounts/use-oauth/oauth-overview).
* `pool_name`: The name of the infrastructure pool that runs the **Serverless** instance. Currently it only supports Google Cloud (`shared-gcp`).
* `pool_namespace`: The namespace of the infrastructure pool (`streamnative`).
* `ready`: The status of the instance. If the Pulsar instance is ready, it is `True`.
You can checkout [PulsarInstance](https://registry.terraform.io/providers/streamnative/streamnative/latest/docs/data-sources/pulsar_instance) for more information.
## Delete an instance
You cannot delete an instance if there are resources associated with the instance.
1. Navigate to the **Instances** page.
2. Click the ellipsis at the top right corner of the instance card that you want to delete, and then click **Delete**.
3. In the **Delete instance** dialog, enter the instance name and then click **Confirm**.
There are two ways to delete an instance.
* Delete the instance by the instance name.
```bash theme={null}
snctl delete pulsarinstance
```
* Delete the instance by the instance manifest file `instance.yaml`.
```bash theme={null}
snctl delete -f instance.yaml
```
Remove the instance resource from the Terraform configuration file and run `terraform apply` to delete the instance.
## Next steps
* [Work with clusters](/cloud/clusters/manage-clusters/cluster)
## Related topics
* Check other types of instances:
* [Dedicated Instances](/cloud/clusters/manage-instances/manage-dedicated-instances)
* [BYOC Instances](/cloud/clusters/manage-instances/manage-byoc-instances)
To list of the all instances available for an organization, run the following command:
```bash theme={null}
snctl get pulsarinstances -O
```
If you want to get more details about an instance, you can run the following command:
```bash theme={null}
snctl get pulsarinstance -O
```
You should be able to get the details of the instance.
```yaml theme={null}
spec:
auth:
apikey: {}
availabilityMode: regional
poolRef:
name: shared-gcp
namespace: streamnative
type: serverless
status:
auth:
oauth2:
audience: urn:sn:pulsar::
issuerURL: https://auth.streamnative.cloud/
type: oauth2
conditions:
- lastTransitionTime: '2024-11-29T21:34:08Z'
message: a payment method is not required because discount is active
reason: HasActiveDiscount
status: 'True'
type: SubscriptionReady
- lastTransitionTime: '2024-11-29T21:34:08Z'
reason: Created
status: 'True'
type: ResourceServerReady
- lastTransitionTime: '2024-11-29T21:34:09Z'
reason: Created
status: 'True'
type: ServiceAccountReady
- lastTransitionTime: '2024-11-29T21:34:10Z'
reason: AllConditionStatusTrue
status: 'True'
type: Ready
```
* `status.auth.oauth2.audience`: The audience of the Pulsar instance. It will be used for the [Oauth2 authentication](/cloud/security/authentication/service-accounts/use-oauth/oauth-overview).
* `status.auth.oauth2.issuerURL`: The oauth2 issuer URL of the Pulsar instance. It will be used for the [Oauth2 authentication](/cloud/security/authentication/service-accounts/use-oauth/oauth-overview).
* In the `conditions` section, you can see the status of the instance. If all conditions are `True`, the instance is ready.
If you want to get more details about an instance, you can define a data source in the Terraform configuration file.
```hcl theme={null}
data "streamnative_pulsar_instance" "test-instance" {
organization = ""
name = ""
}
```
You should be able to get the details of the instance.
* `id`: The ID of the instance.
* `availability_mode`: The availability mode of the instance. Currently, only `regional` is supported.
* `oauth2_audience`: The audience of the Pulsar instance. It will be used for the [Oauth2 authentication](/cloud/security/authentication/service-accounts/use-oauth/oauth-overview).
* `oauth2_issuer_url`: The oauth2 issuer URL of the Pulsar instance. It will be used for the [Oauth2 authentication](/cloud/security/authentication/service-accounts/use-oauth/oauth-overview).
* `pool_name`: The name of the infrastructure pool that runs the **Serverless** instance. Currently it only supports Google Cloud (`shared-gcp`).
* `pool_namespace`: The namespace of the infrastructure pool (`streamnative`).
* `ready`: The status of the instance. If the Pulsar instance is ready, it is `True`.
You can checkout [PulsarInstance](https://registry.terraform.io/providers/streamnative/streamnative/latest/docs/data-sources/pulsar_instance) for more information.
## Delete an instance
You cannot delete an instance if there are resources associated with the instance.
1. Navigate to the **Instances** page.
2. Click the ellipsis at the top right corner of the instance card that you want to delete, and then click **Delete**.
3. In the **Delete instance** dialog, enter the instance name and then click **Confirm**.
There are two ways to delete an instance.
* Delete the instance by the instance name.
```bash theme={null}
snctl delete pulsarinstance
```
* Delete the instance by the instance manifest file `instance.yaml`.
```bash theme={null}
snctl delete -f instance.yaml
```
Remove the instance resource from the Terraform configuration file and run `terraform apply` to delete the instance.
## Next steps
* [Work with clusters](/cloud/clusters/manage-clusters/cluster)
## Related topics
* Check other types of instances:
* [Dedicated Instances](/cloud/clusters/manage-instances/manage-dedicated-instances)
* [BYOC Instances](/cloud/clusters/manage-instances/manage-byoc-instances)